


Introduction

This article serves as a reminder to a web developer to install all the necessary tools to work on a new or reinstalled computer. The installation of the tools that I personally use as well as some of their basic settings are described in detail. Web development covers a large number of different technologies and programming languages, therefore the list of required applications is also large.
WAMP
Before installing WAMP on the Windows platform, it is necessary to install integral development environments for C++ on Windows, i.e. Microsoft Visual C++ Redistributable Packages for Visual Studio (aka MSVC).
In order to know which package should be installed, it is necessary to review the already installed “Microsoft Visual C++ Redistributable Packages” on your computer and then download all the other latest packages, which you can find on the website https://support.microsoft.com. Then we download the latest appropriate version of WAMP from the official site and do the standard installation, next, next, next….
Apache password
After installing WAMP, the default user is root while a password is not required, but if you want to create a new user and password, we need to configure it in two places:
- MySql
In CMD, set the path where Wamp is installed and inside it the folder containing mysqladmin, in my case the path is: C:wampbinmysqlmysql5.6.17bin and issue the command:
C:wampbinmysqlmysql5.6.17bin> mysqladmin -u root password
In case of password change, the command is:
C:wampbinmysqlmysql5.6.17bin> mysqladmin -u root -p password
Since we have set passwords for the root user, we can now start the mysql console (via the wamp icon in the system tray) and insert a new password.
- PhpMyAdmin
Let’s look for the folder where Wamp is installed and inside it the file config.inc.php, in my case the path is: C:wampappsphpmyadmin4.1.14config.inc.php and open the file using a text editor and then look for a line with this content:
$cfg[‘Servers’][$i][‘password’] = ”;
and insert the password inside the empty quotation marks. The given password is associated with the change password option in the PhpAdmin window when clicking on the “users” tab and selecting “Edit Privileges” on the root user
Linux terminal in Windows
The Linux terminal in windows can be installed through “Git Bash”, but also through a specialized application called “cmder”.
Cmder
You can find this application at cmder.net, where you will also find a link to download the application. Since this application does not install, it needs to be unpackeddownloaded folder and place it in the root “C:” (I think placing it in Program Files causes problems). Simply create a shortcut to the .exe file and start the application. Note to SublimeText users that this terminal can be integrated into Sublime as the default terminal.
CMD to Linux bash
There is also an option to activate the “Windows Bash Shell” within windows which allows you to switch CMD to Linux bash. The steps required to activate this option are as follows:
- Activating the “Windows Subsystem for Linux” option can be done in two ways:
- command in CMD (as administrator):
Enable-WindowsOptionalFeature -Online -FeatureName Microsoft-Windows-Subsystem-Linux - In the Windows menu called “Turn Windows feature on off” we find and check the option “Windows Subsystem for Linux”.
Depending on the way we activate “Windows Subsystem for Linux” it is necessary to restart the system afterwards!
- command in CMD (as administrator):
- Installing a Linux distribution
In the Microsoft Store, select the desired distribution (eg Ubuntu) and download it. After that we choose the “Lunch” option to install. During installation, you will be asked to create a user and assign a password. When the installation is finished, we need to update the distribution with the command:
apt-get update - Turning on “Developer mode” on Windows is done by selecting the “For developers” tab in the Settings menu, where we check the Developers mode option.
After this procedure, we can call the command bash within the “ordinary” CMD, which will turn CMD into Linux bash. The exit from this mode is with the command exit.
Node.js

Before installing node.js it is necessary to install Python 2.7.
Python 2.7 installation
Python version 2.7 is downloaded from the official site as an MSI package. The installation is simple and automatic. next, next, next…
Node.js & npm
Installing node & npm

Download Node.js from the official page where we select the appropriate version of Windows Installer (.msi), and then do the standard installation. Upon completion of the installation, the following items are obtained:
- node.js installation
- node.js documentation
- node.js command prompt
- npm package manager
Checking the installed versions of node.js and its package manager npm can be done in the command prompt with the commands:
node -v
npm -v
Update node.js
Updating node, or choosing a specific node.js version is easiest done using the tool
nvm install latest
After updating, we can list all installed versions with the command:
nvm list
And then we choose which specific version we want to use:
nvm use 6.7.0
Updating npm
If you need to install a newer version (often with node.js the latest version of npm does not come!) you need to open the node.js command prompt and issue a command in it:
|
1 |
npm i -g npm |
Yarn
Installation
Yarn installation is based on downloading the .msi file from the official site in the install section, followed by the standard installation with next…next…next
Yarn update
Yarn is updated with the command:
|
1 |
npm upgrade --global yarn |
Sass

Before installing sass it is necessary to have Ruby
installed
Ruby installation
Ruby installer is downloaded from http://rubyinstaller.org/.
During the installation, check the part where it is mentioned “add Ruby executables to your path” and then call “command prompt” i.e. cmd and check if everything is OK with the ruby installation with the command:
ruby -v
Sass installation

Sass is a CSS preprocessor. Sass fills the gaps in CSS as a language with its capabilities. Sass is installed as a Ruby library and is run with the following command in CMD:
game install sass
If everything went OK, check the installed version of Sass with the command:
sass -v
But if it reports an error during installation, the best advice is to uninstall the current version of Ruby and install a more stable version (read older!).
Typescript
Typescript is a high-level JavaScript compiler, whose strength lies in the development tools built for it. Before installing Typescript, it must be checked whether node.js and its package manager npm are installed, because Typescript is installed through it. Installation of Typescript is done via the command line using the command:
npm install -g typescript
Controlling the installed version with the command:
tsc -v
Composer
On the official page getcomposer.org select Getting Started, find the section related to installing composer using installer. We download the Composer-Setup.exe file, after which the standard installation begins next, next, next. Pay attention that the installer finds the path to the corresponding php.exe file.
Controlling the installation with a command in the command line:
composer -v
PHP Storm
Installing PHPStorm is standard without any problems, so called. next, next, next…
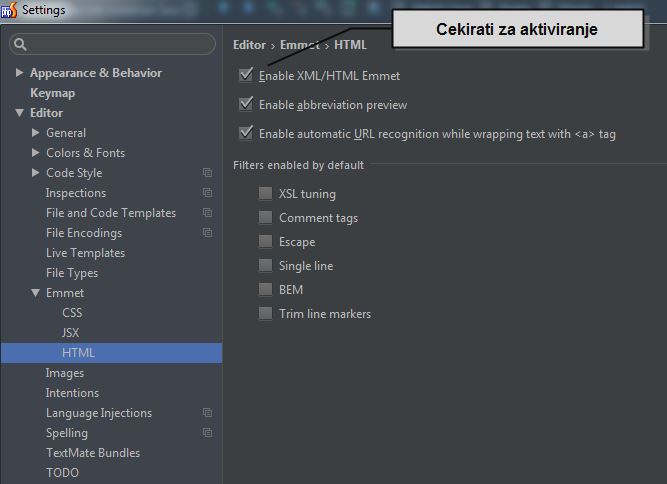
Activating the Emmet plugin
In order to activate emmet” you need:
- in CSS, check the box “Enable CSS Emmet”, as well as the option “Auto insert CSS vendor prefixes”
- in JavaScript, check Enable JSX Emmet
- in HTML check “Enable XML Emmet”, as well as the option “Enable automatic URL recognition while wrapping text with <a> tag “
Read more about additional PHPStorm settings in the PhpStorm article.
Git
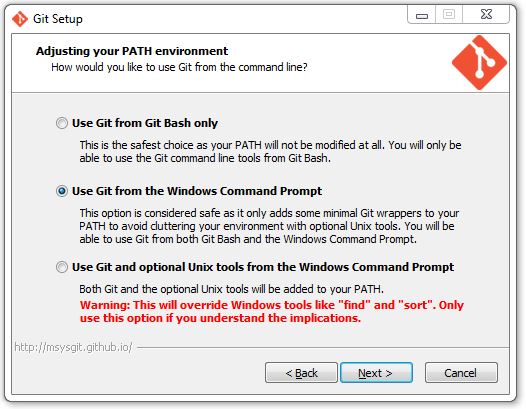
- From the official site download the windows version. The installation is standard with next, next, next except for the part shown in the picture where the option should be checked:
Use Git from the Windows Command Prompt
- Installation control;
git -v
- Configure name:
git config – -global user.name SOME NAME
- Configuring Email address:
git config – -global user.email YOUR@ADDRESS
For easy management in windows it is good to use “HUB” i.e. GitHub
- Create a GitHub site account
- Install helper applications for working with Git (Git Gui, Git Bash) with the application “Git for windows”. Download from official page.
- Download GitHub for Windows from the official site and install it. The login form opens immediately and you log in there with your username from GitHub.
Grunt

Before installing Grunt it is necessary to have:
- Node.js is installed, and if it is already installed, you should check the version and update npm.
- so that Grunt can compile .scss files into .css it is necessary to install Sass
If we have done all the preliminary work, a global installation of Grunt is done with the command:
npm update -g grunt
This is followed by a global installation of the command line interface grunt-CLI with the command:
npm install -g grunt-cli
The job of the pre-installed gruntCLi is to load a local installation of the Grunt library and apply the configuration from the local Gruntfile to perform the tasks asked of it.
FileZilla

FileZilla is an FTP client that supports FTP, FTP over SSL/TLS (FTPS) and SSH File Transfer Protocol (SFTP). It is necessary for the transport of data on the network. Download from official site and standard installation
Keyboard with Serbian letters
Installing the software from vesic.org allows using the English keyboard, which along with the right Alt gives our letters. These are the combinations:
- AltGr + [ -> Ш
- AltGr + ] -> Đ
- AltGr + -> F
- AltGr + ; -> C
- AltGr + ‘ -> Ć
Installation procedure
After downloading the appropriate version, install the keyboard and then open Control Panel / Regional and Language Options and select the US keyboard, click Add, add the newly installed keyboard. Set it as the default, and remove the US driver – you won’t need it anymore.
Dev Environment
Virtual Box & extension
We download
“Virtual box platform packages” from the official page virtualbox.org. The installation of the Virtual box itself is standard, and default values are used during installation, i.e. next, next, next…
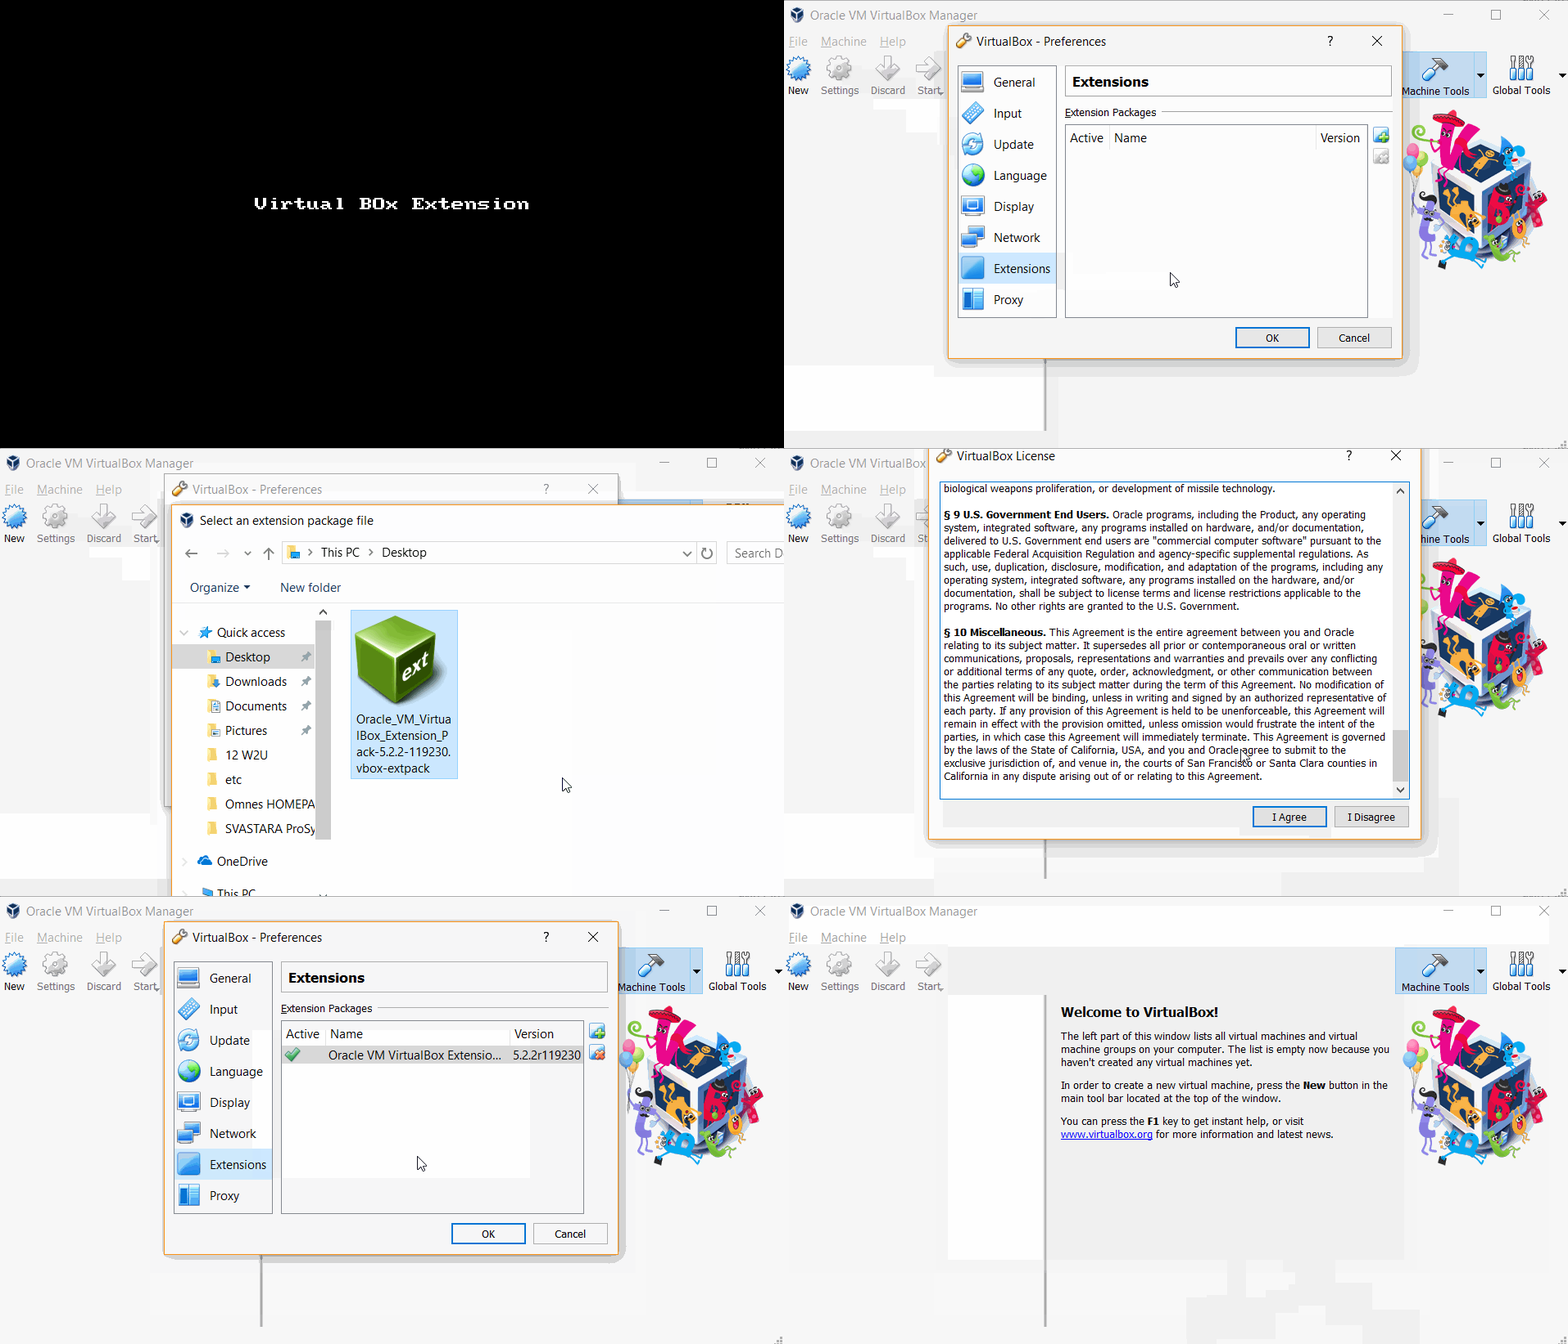
In addition to the virtual box itself, we need to download the VirtualBox Extension Pack which is on the same page by selecting “All supported platforms “. This “extension pack” is integrated only after the installation of the Virtual box itself. After starting Virtual Box, in the File menu, select Preferences, then under the Extensions tab, click on the plus sign and add the previously downloaded extension.
Vagrant
Download the appropriate version from the official site vagrantup.com/. The installation is standard, during which you have to accept all the default values offered and install the softwarewith next, nex, next… After restarting the computer, we control the installation from the terminal with:
|
1 |
vagrant --version |
Docker
If you have Windows 10 Professional or Enterprise 64-bit versions, then the .exe file is downloaded from the official page www.docker.com/docker-windows. The installation is simple and it is enough to use the default values. In case you do not have one of the mentioned required versions of Windows, you need to install Docker Toolbox which you will also find on the official page.
Poedit
PoEdit is a program for editing and creating .po and .mo files necessary for site localization. It can be downloaded from the home page poedit.net/. Installation is standard with next, next…