Introduction
Events are phenomena, which are most often the result of something the user does (mouse click, keyboard click, drag and drop…), although they can also be caused by the system, browser… Registering an event on an HTML element implies binding an event listener (eng. event listener) to the HTML element and defining the consequence of that event. The Event listener, after the event has been executed, calls the event handler (eng. event handler) to action. Event handler is a callback function that is activated as a result of some event.
Event registration
There are several different methods for registering events in JavaScript.
Inline event handler (via HTML attributes)
Inline event handlers register the event through the HTML attribute and belong to the deprecated way of event registration. The HTML attribute is obtained by adding the prefix “on” to the name of the event, i.e. on{eventtype}.
Example No. 1
|
1 |
<button id="testing" onclick="alert('do something after click');">Klikni</button> |
Example No. 2
|
1 2 3 4 5 6 |
<button id="demo" onclick="letCallbackFunction()">Klini me</button> <script> function nekaCallbackFunkcija() { // Do something after the click } </script> |
This procedure can still “get the job done” although it is not the best practice as it has several drawbacks:
- Does not separate JS from HTML
- Prevents adding multiple “event handlers” (functions that are executed after JS events) for the same event
- It is not practical if you need to apply a certain event to several of the same type of HTML tags, because you need to write the code in each tag.
- When using the inline event handler the keyword THIS points to a global object i.e. widnow object (because the HTML attribute is not the owner of the function, but only of the function call).
- In the case that the inline event handler is embedded in the <a href=””></a> tag, there are problems with the sequence of events because the href attribute is also triggered, which will open another page.
Traditional event registration model
|
1 2 |
var element = document.getElementById('foo'); element.onclick = function () { /* Do something after the click*/ }; |
This model is better than the inline event handler because it separates the JS from the HTML code and the THIS keyword points to the targeted element but still cannot add more than one function to the same event.
The only way to have more than one event handler on the same event is shown in the following example:
|
1 2 3 4 5 |
var element = document.getElementById('foo'); element.onclick = function () {prvaFunkcija(); drugaFunkcija()} prvaFunkcija() { // Do something after click } drugaFunkcija() { // Do something after click } |
“addEventListener” (W3C Model)
This model is the most accepted way of registering events and allows registering multiple events on one element. The method addEventListener supports both bubbling and capturing the sequence of event execution and defines this through the third optional parameter. This parameter is a boolean value that defines whether the execution order is capture or not. Therefore, if this parameter is false, it means that it is not capturing but bubbling, while the value of the parameter true clearly defines capturing. The default value is false, so if this third optional parameter is not used it is considered to be bubblingorder.
Example No. 1
|
1 2 3 4 |
var element = document.getElementById('foo'); element.addEventListener("click", function(event) { /* Do something after the click*/ }); |
Example No. 2
In order to avoid code repetition, it is recommended to use a named instead of an anonymous function:
|
1 2 3 4 5 6 7 8 9 |
var element1 = document.getElementById('foo'); var element2 = document.getElementById('bar'); element1.addEventListener('click',uradiNesto,false); element2.addEventListener('click',uradiNesto,false); function uradiNesto() { this.style.backgroundColor = '#cc0000'; } |
Event object
Whenever an event occurs (eng. event), javascript places all relevant data related to the event in the event object (eg where the mouse pointer was, which button was clicked, which element was clicked…). This event object is always passed to the callback function, and the data stored in it can be accessed via the event object property. You can view a list of all event object properties here.
Example
|
1 2 3 4 |
function nekaCallbackFunkcija (e) { console.log(e.target); // Returns: The HTML element that initiated the event e.target.style.visibility = 'hidden'; // Sakriva HTML elemenat } |
Example
See the Pen Example of using event object by Web programming (@chos) on CodePen.
Order of execution during propagation
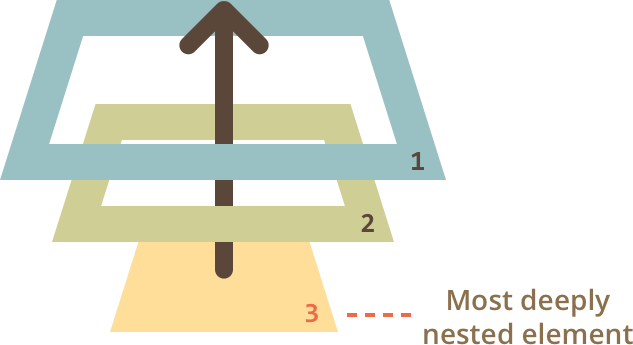
If we have HTML elements that are “nested” inside each other and all of them have an event listener attached, the events are not executed at once, but according to a certain order. The sequence of event execution can be:
a) Bubbling
This sequence implies the activation of events from the inner element to the outer one (from the child to the parent, see the picture). Almost all events are bubbling except for a few exceptions such as focus event where the default order is capturing.
b) Capturing
This sequence implies the activation of events from external to internal (from parent to child)
Difference between THIS and event.target
It should be emphasized that in the case of the existence of several HTML elements with registered events, and they are nested among themselves, the value of event.target does not always indicate the same as the keyword “this”!
The objects property “event.target” points to the element that initiated the event while “this” points to the element on which the event handler is currently executing (event.currentTarget).
See the Pen Difference between THIS and event.target by Web programming (@chos) on CodePen.
Stopping Propagation
If for some reason there is a need to prevent “stop propagation” from the targeted element along the DOM, the event.stopPropagation() method is used. But if we want to include the targeted element in the ban (that is, to prevent it from reacting to the event), then we use the method event.stopImmediatePropagation()
Example
|
1 2 3 4 |
$( "p" ).click(function( event ) { event.stopPropagation(); // Do something }); |
Default behavior prevention
When programming, there are requests to prevent the default behavior of DOM elements after some event. Most often, it is related to preventing the link tag from opening the page or submitting the form after clicking the submit button. Most often, the problem is solved with the following syntax:
|
1 |
event.preventDefault(); |
Example
This example shows how to prevent the default behavior of the link tag:
|
1 2 3 4 |
var eLink = document.getElementsByTagName("a")[0]; eLink.addEventListener("click", function (event) { event.preventDefault(); }); |
However, in the case that the DOM element whose default behavior we want to change is nested, and its parent element also has an “eventListener” “hooked”, with the previous method we will not prevent the “ocine” event on the parent element. Therefore, we need to prevent propagation with event.stopPropagation(); and add another line to the previous example:
|
1 2 3 4 5 |
var eLink = document.getElementsByTagName("a")[0]; eLink.addEventListener("click", function (event) { event.preventDefault(); event.stopPropagation(); }); |
The previous example can be done in a different way by adding return false inside the function (it tells the function that the execution should be stopped, and therefore the event will not be reacted to). This line of code changes both lines of code from the previous example.
|
1 2 3 4 5 |
var eLink = document.getElementsByTagName("a")[0]; eLink.addEventListener("click", function (event) { // some additional code return false; }); |
Dynamic event listener registration
When new HTML elements are dynamically built using JavaScript, they are not “born” with event listeners attached, so it is necessary to dynamically add its own event listener to each new element.
Example
See the Pen Adding dynamic event handler by Web programming (@chos) on CodePen.
Another legitimate solution for adding event listeners to dynamically added elements is by using event delegation which is explained below.
Event delegation
In case there are a lot of HTML elements to which “event listener” should be added, such as in the case of a list with many members, there may be unnecessary consumption of resources. Therefore, it is useful to apply the “event delegation” technique, which is based on defining only one “event listener” on the parent element. The principle on which this technique works is based on the feature that if we activate an event on an element, due to the bubbling event activation schedule, after some time that event will be “triggered” on the parent element as well. And to determine which element was the trigger of the event, this technique uses the “event.target” property. In addition to the simplicity of this technique and changing resource consumption, the advantage is that future dynamically created elements are included in this way.
Example
Procedureit starts with binding an “event listener” to the parent element, after which the activated event is searched to see if the trigger was our type of element.
|
1 2 3 4 5 6 7 |
// Binding the event listener to the parent element document.getElementById("parent").addEventListener("click", function(e) { // The question mark is the event trigger (e.target), an element of the required type if(e.target && e.target.nodeName == "LI") { console.log("li elemenat je kliknut"); } }); |
The simplest implementation of event delegation is using the on() jQuery method. This method accepts as an optional argument a selector that defines the “child” elements on which we expect events to be triggered.
|
1 2 3 |
$('#container').on('click', 'li', function(event) { console.log('li elemenat je kliknut'); }); |
NOTE:
Please note that this technique relies on the bubbling sequence of event execution, but some events do not have such a schedule (blur, focus, load, unload…), so it cannot be applied to them. You should also avoid the “mousemove” event because it would trigger too many events and consume resources.
Problem with stacking event listeners
When working with events, there may be an “inadvertent” accumulation of the “event listener”. This problem can be best explained through the following example:
See the Pen Event problem by Web programming (@chos) on CodePen.
When the button is clicked in the previous example after checking the checkbox multiple times, alert windows appear one after the other (the same number of times as the checkbox was checked). The problem occurs because a new event listener is added to the button element at each check.
This problem can be solved in a number of ways, but the following example shows a quick “hack”:
See the Pen Event problem solved by Web programming (@chos) on CodePen.
A quick solution to this problem with which we prevent the accumulation of “event listeners” is to add the off() method. With the off() method we cancel all click listeners, and then with the on() method we add a new event listener.
Debugging
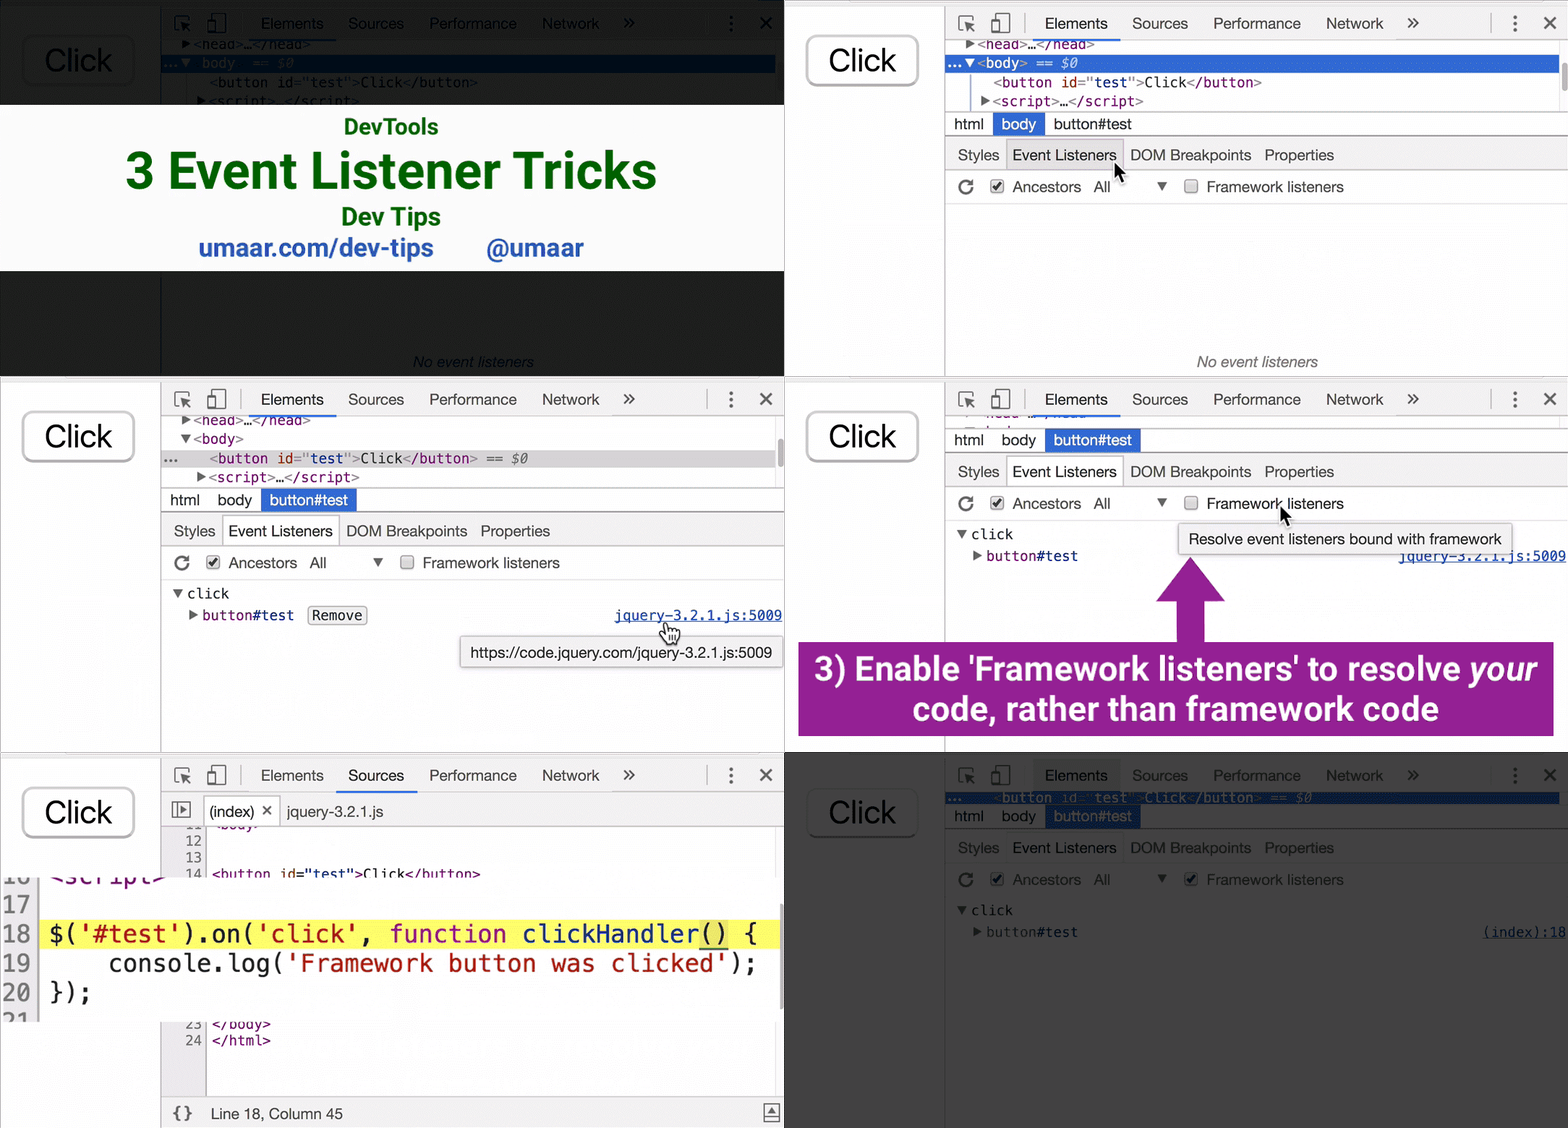
You can view the events in the Elements Panel, where you can see all the registered events. If you click on “remove”, you can remove the registered event handler. This is useful for quickly checking if an event handler is causing an unexpected error. And by clicking on the link you can see the handler function itself.
If your code also uses a library like jQuery, DevTools can hide the library’s event handlers and show only ours (this is not always feasible). This is achieved by selecting the “Framework listeners” checkbox.