


Introduction

Every web developer at some point finds himself in the position of hosting his application on a VPS that is based on the Linux operating system and needs basic knowledge of Linux server administration.
To facilitate the administration of linux servers, specialized applications such as “Control panel”, “Plesk” are often used… However, these applications are not free, what’s more, they often cost almost the same as renting the VPS itself. Even if a server administration license is leased, it is considered desirable (necessary) for a web developer to have basic knowledge of working with the Linux operating system. I have tried in this article to record data related to the linux operating system and its basic use through the bash shell (terminal).
Bash shell
For work with the Linux operating system, Bash Shell (terminal) is provided, which allows the user to:
- executing commands from the command line
- history of previously executed commands
- job control (job control)
- use of shell functions and aliases
- arithmetic operations
NOTE: On windows 10 there is a possibility to activate the Linux subsystem with all linux options, with which we simply switch windows CMD to “bash”. You will see more about this in the article “Installation tools for web development”.
Bash script
A file that contains a series of sequentially listed commands that are executed in the order in which they are listed is called a bash script and has the extension .sh.
It should be noted that the Unix system represents everything within the operating system as sequences of bytes without a structure, this includes files as well as devices connected to a computer with a Linux operating system. Therefore, all hardware (network cards, hard drives, partitions, keyboard, printer) is treated as a file-like object. Each hardware component is represented by a special file that has an appropriate name and place in the file system (eg system memory is defined as a file with the location /dev/mem, and the terminal (keyboard and screen) is defined in the file /dev/tty1).
“In Linux everything is a file”
Access to server using SSH protocol
What is the SSH protocol?
The SSH protocol is most often used for connection and communication with a remote Linux system. Secure Shell (SSH) is a cryptographic network protocol for the secure operation of network services over an unsecured network. SSH commands are encrypted and secure because both ends of the connection, both client and server, are authenticated using a digital certificate, and passwords are encrypted.
The protocol works according to the client-server model, which means that the connection is initiated by the SSH client connecting to the SSH server. The SSH client handles the connection establishment process and uses public key cryptography to verify the identity of the SSH server. After the setup phase, the SSH protocol uses strong symmetric encryption algorithms to ensure the privacy and integrity of the data exchanged between the client and the server.
Connection to the system with SSH protocol
Forconnection to the remote server is required:
- hostname IP
- username of the host
- password for the user
The remote server is accessed using the appropriate commands, depending on whether your user is the same as on the server or we don’t have two different commands. If your user is the same as on the server we can use:
ssh ip-adresa-udaljenog-serveraBut if it is not the same user then we use:
ssh naziv-usera-udaljenog-servera@ip-adresa-udaljenog-serveraAfter this, the system requires the appropriate code to be entered, finally the command is used to terminate the session:
exit
Applications that support the SSH protocol
To access the remote server, we need bash (terminal), there is the already mentioned option to switch Windows’ CMD to bash, but this only applies to WIN 10, for users of older Windows editions, the solution is one of the third-party applications that emulate linux bash:
Copying and synchronizing files with Rsync
Rsync is a fast and highly customizable file copying tool. It can copy files locally as well as from another host. It offers a large number of options and allows flexible specification of the selection of files to be copied. It is known for its “delta” transfer algorithm, which reduces the amount of data sent over the network by sending only the differences between the source files and existing files in the destination.
There are two different ways for Rsync to contact a remote system: using SSH or directly contacting dynamic Rsync over TCP.
rsync options source destinationNOTE:
Using the SSH protocol, data is transferred over a secure connection with encryption. To use the SSH protocol, you must specify the root password to connect, and using the SSH option will encrypt the encrypted mode so that your password will be secure.
Additional options are:
- -v => the verbose option simply produces screen output that provides comments on the work as it occurs, so you’ll be displaying the real-time status of the user program or the task launcher or the commands you’ve submitted.
- -r => copies data recursively (copying a directory and all its files and subdirectories and all their files, deeper and deeper to the bottom of the directory tree).
- -a => archive mode enables recursive copying of files while preserving symbolic links, file permissions, ownership and timestamps.
- -z => compress files
- -h => human-readable format
- -d => directory transfer without recursion
- -e => specify the ssh as remote shell
a) Work with local files
rsync -zvh test.txt /home/test1/rsync -t *.c foo:src/rsync -avz foo:src/bar /data/tmprsync -avz foo:src/bar/ /data/tmpb) Synchronization from local to remote server
General appearance of the command:
rsync options izvorni_fajl naziv_usera@ip_adresa_udaljenog_servera:destinacijaExample
rsync -avzh public_html/test.txt root@22.22.22.22:/home/rsync -avzhe ssh public_html/test.txt root@22.22.22.22:/home/c) Synchronization from remote server to local
Generalcommand layout:
rsync options naziv_usera@ip_adresa_udaljenog_servera:izvorni_fajl destionacijaExample
rsync -avzh root@22.22.22.22:/home/test.txt /home/test/rsync -avzhe root@22.22.22.22:/home/test.txt /home/test/sync -avze ssh --exclude '*txt' rroot@22.22.22.22:/home/test.txt home/test/Linux file system structure
The picture shows the most common file system structure of the Linux operating system. The most important directory is Root and it is the only one without a parent directory. It is marked with a slash “/” and only the “root” user has access to this directory. If the path that defines the location of a file or directory begins with a slash “/”, we know that it is an absolute path. Relative path is defined relative to the current position and starts with “./”, as this is how the current directory is marked.
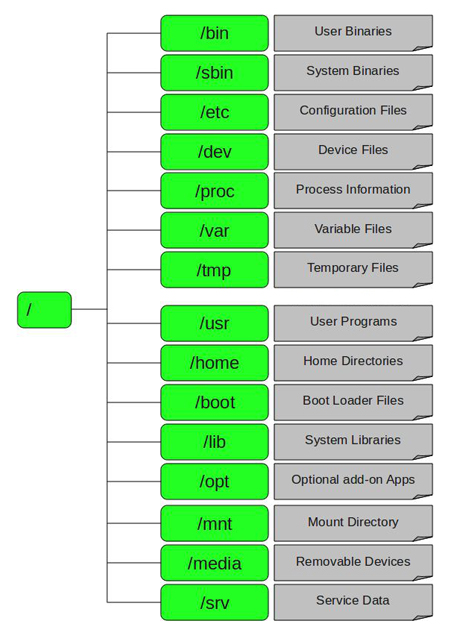
/bin
This directory stores binary executable commands, such as: ps, ls, ping, grep, cp…
/etc
Contains configuration files for all programs, as well as shell scripts for starting and shutting down applications.
/dev
Linux represents devices as files, so this directory contains several special files that represent devices. For example “/dev/sda” represents the first SATA drive in the system.
/home
This folder stores private and configuration files for each user. Each user has only “write” access in his directory, to write in other directories he needs to be the root user.
/media
This directory contains subdirectories that display removable media inserted into the computer.
/root
This directory is the directory of the root user. Instead of being at “/home/root”,with other users he is here.
/srv
This directory contains data for services provided by the system. For example if you use Apache HTTP Server to serve web pages, you will probably store your website files in a directory inside the /srv directory.
/tmp
Applications store temporary files in this directory. The files in this directory are generally deleted whenever your system reboots and can be deleted at any time by utilities such as “tmpvatch”.
/usr
This directory contains applications and files used by users, as opposed to applications and files used by the system. For example non-essential applications are located inside the “/usr/bin” directory instead of the /bin directory, and the local “/usr/local” directory is used as a place to install local applications, preventing them from unnecessarily “polluting” the rest of the system.
/var
Changeable (variable) files are recorded in this directory. Files whose contents are expected to grow can be found under this directory. This usually includes: system log files (/var/log), packages and database files (/var/lib), or emails (/var/mail)…
Basic linux commands
Help writing commands
When working with the Bash shell, we use:
- Tab on the keyboard is a huge help when typing Linux commands, as it will automatically fill in file and directory names.
- The symbols “?” and “*” are wildcard in Linux. The question mark “?” will replace a single character, while “*” will replace the entire string.
- Text is copied in the terminal with the
Ctrl+Shift+Ccommand, while it is pasted with theCtrl+Shift+Vcommand (if the command does not work, try right-clicking or the command from the context menu).
Command syntax
All commands in Linux can be represented with the following pattern:
[sudo] command [optional switch] [file or directory path][command] --helpman [command]sudo [command]Bash Shortcuts
CTRL + c
CTRL + z
CTRL + a
CTRL + e
CTRL + u
CTRL + k
CTRL + r
!!
!abc
!abc:p
!*
Monitoring and information
psps -efps -ef | grep nazivprocesakill processIDkillall processNamedu -sh naziv_foldera/*vmstatcat /proc/meminfocat /proc/cpuinfofree -hidlastifconfig -aping webprogramiranje.orgdig webprogramiranje.orgnetstat -nutlpbadblocks -s /dev/sdaWorking with the file system
pwd
mkdir test-direktorijum
cd test-direktorijum
cd ..
ls
ls -a
ls -R
ls -t
ls -S
ls -l
ls -1
ls -m
touch novi_fajl.txt
less neki_fajl
cat neki_file1 neki_file2
file file1
in the terminal
cp pic.jpg pic2.jpg
cp /home/pic.jpg /home/backup/pic.jpg
cp -R /home/slike /home/backup
cp *.jpg /home
mv /home/file1 /home/file2
mv /home/file1 /tmp/file2
rm file1
head file1
to the terminal
tail file1
tail -3 file1
Search
grep "neki tekst" /home/logovi.txt
grep -r "neki tekst" /home/
grep -i "neki tekst" /home/
find /home/ -name "test*"
find /home/ -user "pera"
find /home/ -mmin 60
find /home/ -amin 60find /home/ -size 60M
find /home/ -size +50M -size -100M
find /home -type f -empty
find /home -type d "test"
find /home -type d -empty
File permissions
chmod 644 file.html
chmod u=rw example.jpg
chmod -R 755 nekifolder
chmod 775 file
chmod -R 600 nekifolder
chown user:group nekifile
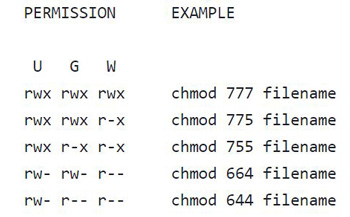
User: Read, Write, and eXecute => u=rwx
Group: Read and eXecute => g=rx
Others: Read => o=r
- “row” = 4
- “write” = 2
- “execute” = 1
- “no permission = 0
- 5 is a combination of permissions 4+0+1 (read, no write, and execute)
- 6 is a combination of permissions 4+2+0 (read, write, and no execute)
- 7 is a combination of permissions 4+2+1 (read, write, and execute)
chmod u=rwx,g=rx,o=r nazivfajla is equivalent to chmod 754 nazivfajlaArchiving
The command “tar” merges several files into one, i.e. creates an archive, such an archive can be compressed with the “gzip” algorithm.
tar -cf archive.tar file1 file2tar -cf archive.tar mydir/tar -czvf naziv_arhive.tar.gz /home/testtar -czvf naziv_arhive.tar.gz testtar -xf archive.tartar -xzvf archive.tar.gztar -xvf archive.tar documents/work/budget.doctar -xvf archive.tar documents/work/tar -czf DogPhotos.tar.gz --exclude='kitty.jpg' MyPetPhotosEXPLANATION:
–create or (-c) => creates a new .tar archive
–verbose or (-v) – the verbose option displays the status of the user program
–file or (-f) => indicates that the next argument in the command will be the name of the archive file
–gzip or (-z) => compress archive with gzip algorithm
–extract or (x) – extracts archive
–ignore-case => ignore case when searching against the given pattern
–overwrite => deletes the initial uncompressed file and replaces it with a compressed
–recursion => recursion is the default
setting
–no-recursion => no recursion
–exclude=PATTERN => excludes the defined pattern from the selection
Pipe
Pipe is a form of redirection used in Linux and other Unix-like operating systems to send the output of one program to another program for further processing. It is marked with a vertical line | between two commands.
komanda_1 | komanda_2 | komanda_3
In the previous example, command_1 will be executed first, after which command_2 will take its output as input parameters and process them, and finally command_3 will take the processed data and also process them.
Example
ls -al | grep '^d'
This command combination lists only the subdirectories of the current working directory.
Example
$ls -l | grep -i "neki_naziv"
This combination of commands lists the contents of the current working directory, and then filters by the desired name (case-insensitive -i = insenitive).
Example
ls -la | sort -nk5
This combination of commands lists the contents of the current working directory, and sorts it according to the numerical values in the 5th column.
Cron job
Cron is the name of a program that allows unix users to execute commands or scripts (groups of commands) automatically at a specific time/date. Cron is a daemon, which means it only needs to be started once, after which it will wait for a command. The Cron daemon uses cron tables to define which tasks it should run and when. Each line of the cron table represents one job to be executed in a defined time period.
Cron syntax
The format of one line of the cron table looks like this:
(Minute 0-59) (Hour 0-23) (Day of Month 1-31) (Month 1-12) (Day of week 0-7) (Command) @reboot ~/backup-home.sh @yearly ~/backup-home.sh @monthly ~/backup-home.sh @weekly ~/backup-home.sh @daily ~/backup-home.sh @hourly ~/backup-home.sh*/2 * * * * ~/backup-home.sh* 17-20 * * * ~/backup-home.s0 5 1,15 * * ~/backup-home.sh0 5 1 * * ~/backup-home.shCrontab
Crontab is a command used to list the tables used by the cron daemon.
crontab -a naziv_cron_fajlacrontab -lcrontab -ecrontab -r