


Introduction
Advantages and disadvantages of modular programming

Organizing the code in only one file makes programming very complicated. For this reason, in JavaScript, as in many other programming languages, the program code is divided into smaller units, the so-called. modules. The division is made according to a certain scheme, which enables good organization and facilitates visual and structural clarity.
When dividing into smaller parts (modules), it happens that one module depends on the code contained in another module. This is overcome by “importing” code from one module to another. Until the appearance of the ES2015 standard, there was no syntax for modules, so the external CommonJS or AMD syntax was used. By default, Webpack uses “CommonJS” syntax, so the require() and module.export keywords can be found within the webpack.config.js file. However, if “Babel” is implemented in the project, it is recommended to use the JavaScript syntax built into the language itself according to the ES2015 standard.
EXPLANATION:
External syntaxes are not JavaScript libraries, but rather appropriate specifications and conventions for defining modules. The external syntax can only be used with the help of a module loader or bundler that “breathes life into it”. When a loader/bundler module supports a syntax, it means that it knows how to implement built-in methods that are previously intended to be used through a certain syntax. See more on this in the article Modular Programming – External Syntax (AMD & CommonJS)
A JavaScript module on which the work of another module depends is called “dependency”. Dividing the code into several smaller modules has its advantages, however, the following problems arise that need to be overcome:
- increased number of requests for uploading those files to the server.
- organizing the loading order of modules, and all their dependencies (eng. dependencies)
Purpose of bundler
“Module bundler” solves problems caused by code fragmentation, by compiling all modules into one file, taking care that modules that are dependencies of other modules are loaded before modules that need them.
The most famous module bundlers are:
-
Browserify – implements CommonJS syntax in the browser environment. It can be upgraded with various plugins. With the help of a task runner (Gulp or Grunt) it can complete various tasks related to the processing of program code.
-
Webpack – load modules in any popular format (CommonJS, UMD, AMD, ES6). It comes as a single package and does not require any additional plugins. The official site for webpack is https://webpack.github.io/, while the documentation for webpack 2 is at https://webpack.js.org/
EXPLANATION:
The main purpose of “webpack” is to combine all modules into one or more larger files, while webpack gets additional functionalities through “webpack loaders” or “webpack plugins”.
Since the installation is done via the package manager, it is necessary to have node.js and the corresponding package manager installed. After that, using “package manager”, we install webpack itself:
|
1 |
npm install --save-dev webpack |
|
1 |
yarn add --dev webpack |
NOTE:
All examples from the article are combined into one project. The final version of the project is published on GitHub
https://github.com/choslee/webprogramiranje-webpackOsnove.
Basic webpack configuration
The webpack configuration is defined in the webpack.congfig.js file. It uses the common.js syntax, so the keywords require() and module.exports = {…} are noted. You can read more about common.js in the article Modular programming with external syntax
NOTE:
Whenever webpack.config.js changes, the files need to be regenerated (“build”). If the “webpack –watch” option is used, then it is necessary to terminate the process with CTRL + C and turn on gs again.
Defining the input and generating the output file
Since we already defined what the entry point is when generating the package.json file (eg “index.js”), now we can use that fact to define the entry point for webpack as well. We define the initial and output file for webpack in webpack.config.js:
|
1 2 3 4 5 6 |
module.exports = { entry: "./index.js", // Ulazni .js file output: { filename: "bundle.js", // The name of the file to be generated } } |
The previous configuration implies that the file bundle.js will be generated in the root of the project, however, if we want bundle.js to be generated elsewhere, it is necessary to add a new path property to the output property. The value of the path property is the absolute path, so we use the node.js variable __dirname which represents the absolute path of the folder where the module is located.
|
1 2 3 4 5 6 7 |
module.exports = { entry: "./src/index.js", // The path to the main initial JavaScript file. output: { filename: "bundle.js", // The name of the file to be generated path: __dirname + "/dist" // The path of the file to be generated } } |
Instead of path: __dirname + "/dist" we can use the node.js method path.resolve([...paths]) with exactly the same result. In order to use the path.resolve() method within the webpack.config.js file we need to import the require ('path') module at the top of the file.
|
1 2 3 4 5 6 7 8 9 |
const path = require ('path'); module.exports = { entry: "./src/index.js", // The path to the main initial JavaScript file. output: { filename: "bundle.js", // The name of the file to be generated path: path.resolve(__dirname, "dist") // The path of the file to be generated } } |
Defining multiple input and generating multiple output files
In the previous part, only one input and one final javascript file was defined through “entry” and “output” properties, which is the most common configuration for “Single Page Application” (so-called SPA). However, if your application has multiple pages, there is a good chance that there will be requests on each one that loads a different oneJavaScript bundle file. WebPack also provides this functionality, it is only necessary to define several entry (entry) files in the configuration file and to write code that dynamically generates several final (“output”) JavaScript files:
|
1 2 3 4 5 6 7 8 |
entry: { indexJS : "./src/js/index.js", drugaJS : "./src/js/druga.js" }, output: { filename: "[name].bundle.js", path: __dirname + "/dist" } |
The input and output files defined like this will generate two new JavaScript bundle files: “index.bundle.js” and “druga.bundle.js”. The entry property names indexJS and otherJS are “chunks” names, which are used later by the HtmlWebpackPlugin plugin. In this way, we have made it possible for two different scripts to be embedded on two different pages.
In addition to the previously described definition of multiple inputs and outputs, there is often a need to separate the javascript code into our code and the so-called “third party dependencies”. This procedure is slightly different from the one described and requires the use of a plugin that prevents code duplication. You can read about this in the “CommonsChunkPlugin” section.
Starting webpack
Standard startup
Running weback is the same as running any other npm package.
|
1 |
npm run webpack |
|
1 |
yarn run webpack |
Webpack watch
In order to avoid constantly calling the command npm run webpack which builds new changes, there is a possibility to write a script within the package.json file which with the flag --watch enables building after saving the changes within the project.
|
1 2 3 |
"scripts": { "watch": "webpack --watch" } |
After defining the script in package.json, we can run a command in the terminal that will monitor the changes:
|
1 |
npm run watch |
|
1 |
yarn watch |
To stop tracking changes in the terminal, use the shortcut:
|
1 |
Ctrl + c |
After which we are asked to confirm the termination and enter Y.
Webpack dev server
Webpack also provides a simple web server that gives us the ability to automatically load code changes in the browser, the so-called “live reloading“, after saving the changes in the editor.
Web server installation
|
1 |
npm install --save-dev webpack-dev-server |
|
1 |
yarn add --dev webpack-dev-server |
Configuration of webpack for dev server
The basic configuration is reduced to defining the folder that should be displayed, therefore it is necessary to add a part inside the “webpack.config.js” file under the section where “devtool” is configured:
|
1 2 3 |
devServer: { contentBase: './dist' } |
Starting the dev server
To simply start the server, it is necessary to define a script within the “package.json” file
|
1 |
"dev": "webpack-dev-server --open" |
This allows us to bring up the server from the terminal with a simple command and display everything from the “dist” folder. Flag --open allows us to display this in a new tab within the browser.
|
1 |
npm run dev |
|
1 |
yarn dev |
The Webpack dev server will automatically reload the changes in the browser after each JS or CSS file change. To stop the server in the terminal, we use the shortcut:
|
1 |
CTRL + C |
After which we are asked to confirm the termination and enter Y.
You can see more about the webpack dev server on the WebPack official page in the section “Using webpack dev server”
BrowserSync & Webpack dev server
BrowserSync is also a web server and, just like the WebPack dev server, it can independently automatically load changes into the so-called browser. “Live reloading”. In addition to this possibility, BrowserSync enables simultaneous synchronized testing on several different devices (mobile phones, tablets…) while they are on the local server, provided they are on the same network. This implies that the same action (eg clicking a button, scrolling pages…) is performed simultaneously on all active devices.
When BrowserSync is installed next to Webpack dev server, then we have two active servers, but in this case BrowserSync acts as a mediator (proxy server). This way we are able to use the best features of the two.
Installing Browsersync
Browsersync app installs itself (see official site browsersync.io/)
|
1 |
npm install browser-sync --save-dev |
|
1 |
yarn add browser-sync --dev |
When used with webpack it is installed as a plugin.
|
1 |
npm install --save-dev browser-sync-webpack-plugin |
|
1 |
yarn add --dev browser-sync-webpack-plugin |
BrowserSync plugin configuration
It is necessary to import the plugin at the top of the webpack.config.js file:
|
1 |
var BrowserSyncPlugin = require('browser-sync-webpack-plugin'); |
And in the section responsible for plugins, add:
|
1 2 3 4 5 6 7 8 |
new BrowserSyncPlugin({ host: 'localhost', port: 3000, // url adresa za vreme developmenta http://localhost:3000/ proxy: 'http://localhost:8080/' // proxy endpoint WebpackDev Servera na http://localhost:8080 }, { reload: false // It prevents BrowserSync from reloading the page, so that the WebpackDev Server will do it }) |
In addition to this, it is necessary to turn off the option for webpack dev server to open a new tab, because it is also opened via BrowserSync, so duplication would occur. Therefore, it is necessary to delete --open in the place where we previously defined the script within the package.json file.
Starting BrowserSync
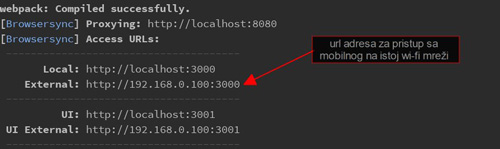
BrowserSync starts itself when Webpack is in “watch” mode! After starting, BrowserSync will deliver URL addresses for synchronized access to the project with two or more devices at the end of the output in the terminal. It is enough to enter the marked address in your mobile and the devices will be connected to your project. Everything that is done on one device is executed in parallel on the other. You can read more about this on the official site “BrowserSync for webpack”.
Webpack loaders
Purpose
The main purpose of Webpack is to be a bundler ie. to gather all the JavaScript files into one big file according to the proper order that respects their dependencies. However, before the mentioned actions, certain “preliminaries” can be performed on those files, and webpack loaders are responsible for that. Loaders preprocess files before webpack itself processes them. Loader can:
- to integrate CSS files into JavaScript
- to transform files from another language into JavaScript (transpiler), e.g. Typescript to JavaScript or ES6+ to JavaScript.
- to minify files (CSS/JavaScript) to JavaScript
- to transform inline images into a base64-encoded URL string that can thus be made available to JavaScript, after which itcan insert them to the side.
- to load and compile entire frameworks (e.g. Vue.js, Angular.js…)
- to test the code (eg Mocha…)
- to lint the code (eg ESlint…)
- to load and compile the templating system into HTML (eg Handlebar…)
Loaders can be connected in series (chain together). You can view the list of existing loaders on the official website webpack.js.org/loaders/
CSS loader
Installing the CSS package
If javascript does CSS processing (minification, transpiling…) it is necessary to import that CSS file into the javascript module using the syntax
import '../css/main.css'. In order for javascript to recognize this syntax, you need to use “css-loader”. The CSS loader “handles” importing CSS code by generating it as a string.
If we also want to embed CSS in the Javascript module itself, then we use “style-loader”. The style-loader integrates the CSS string into the <style> tag that is then incorporated into the “head” of the HTML page. Installation of these packages is done with the command:
|
1 |
npm install --save-dev style-loader css-loader |
|
1 |
yarn add --dev style-loader css-loader |
Wabpack configuration for CSS loaders
Inside the “webpack.congfig.js” file, the following code should be added to the existing configuration:
|
1 2 3 4 5 6 7 8 9 10 11 |
module: { rules: [ { test: /.css$/, use: [ {loader :'style-loader'}, // Inserts styles in the form of the <style> tag in the <head> tag, using the JS module {loader :'css-loader'} // Knows how to handle imports if the import keyword is used and cast CSS to a plain string for JavaScript to manipulate ] } ] } |
NOTE:
Please note that in this sequence the loaders are applied in order from last to first, therefore “style-loader”, should be before “css-loader”.
Webpack uses a regular expression defined under the “test” property with which it finds all CSS files, while the “use” property defines which loaders to use and in which order. See more about this on the official asset management/css loaders page. If we still don’t want to embed the processed CSS in the JavaScript module, we can achieve this via the webpack plugin called ExtractTextWebpackPlugin
SASS loader
Installing packages for SASS
If we use SASS inside a JavaScript module (eg import './scss/main.scss';), then it is necessary to install in addition to the necessary packages related to CSS: “style-loader” and “css-loader” and the package “sass-loader” which transpiles SASS into CSS. In addition, it is necessary to install the library (eng. library) for node.js related to SASS node-sass:
|
1 |
npm install style-loader css-loader sass-loader node-sass --save-dev |
|
1 |
yarn add sass-loader node-sass --dev |
Webpack configuration for SASS loader
The SASS configuration code still uses the css-loader to parse the resulting css after transpiling SASS as well as the style-loader which inserts such css into the style tag. Also used sass-loader for transpiling:
|
1 2 3 4 5 6 7 8 9 10 11 12 |
module: { rules: [ { test: /.scss$/, use: [ {loader : 'style-loader'}, // Inserts styles in the form of the <style> tag in the <head> tag, using the JS module {loader : 'css-loader'}, // Knows how to handle imports if the import keyword is used and cast CSS to a plain string for JavaScript to manipulate {loader : 'sass-loader'} // Transpilira Sass u CSS ] } ] } |
You can see more about this on the official page of sass-loader
PostCSS
PostCSS is a tool that can further process and transform CSS or SASS files.
Installing PostCSS
|
1 |
npm install--save-dev postcss-loader |
|
1 |
yarn add --dev postcss-loader |
Webpack configuration for postCSS
After installation, it is necessary to add 'postcss-loader' to the wepack.config.js file, as in the following example:
|
1 2 3 4 5 6 7 8 9 10 11 |
rules: [ { test: /.scss$/, use: [ {loader : 'style-loader'}, // Inserts styles in the form of the <style> tag in the <head> tag, using the JS module {loader : 'css-loader'}, // Knows how to handle imports if the import keyword is used and cast CSS to a plain string for JavaScript to manipulate {loader : 'postcss-loader'}, // It implements all the functionality that comes with the PostCSS loader {loader : 'sass-loader'} // Transpilira Sass u CSS ] } ] |
NOTE:
Since the “use” loaders are applied in order from last to first, it is necessary to put postcss-loader after sass-loader.
PostCSS plugins
Adding functionality to the postCSS loader is enabled through the installation of so-called plugins. plugin. There are more than 200 regular plugins that can do different tasks, some of the frequently used plugins are:
- autoprefixer – adds binding prefixes for the appropriate browsers using the site database Can I Use.
1npm install --save-dev autoprefixer
1yarn add --dev autoprefixer
- cssnext – allows us to use the latest CSS syntax, by transforming the new CSS syntax into an old one that is compatible with older browsers. So there is no need to wait for browser support. It is possible to install the package “cssnext”, however according to the official documentation with “postcss” it is recommended to install it like this:
1npm install postcss postcss-import postcss-url postcss-cssnext postcss-browser-reporter postcss-reporter --save-dev
1yarn add postcss postcss-import postcss-url postcss-cssnext postcss-browser-reporter postcss-reporter --dev
- cssnano – minifies and formats CSS through multiple optimizations to get the smallest possible file size for production.
1npm install cssnano --save-dev
1yarn add --dev cssnano
- rucksack – adds new features for working with CSS, such as responsive typography (font-size: responsive;), shorthand positioning syntax (position: absolute 0 20px;), native clearfix (clear: fix;), automatic font src generation (font-path: ‘/path/to/font/file’;), quantity pseudo-selectors (li:between(4,6))…
1npm install rucksack-css --save-dev
1yarn add --dev rucksack-css
The list of offered plugins can be viewed on the official website as https://github.com/postcss or on postcss.parts catalog.h
“postcss.config.js”
The installed plugins are loaded and configured in a separate file postcss.config.js:
|
1 2 3 4 5 6 7 8 |
plugins: [ require('autoprefixer'), require('cssnano')({ preset: 'default', }), require('rucksack-css'), require('postcss-cssnext') ] |
Babel
Babel is a JavaScript transpiler, which “creates” code according to the ES5 standard from new versions of JavaScript. It consists of:
- babel-core is babel’s main npm package
- babel-loader is a module that connects “Babel” and Webpack
Installing packages for Babel
Webpack installation is done with the following commands:
|
1 |
npm install --save-dev babel-loader babel-core |
|
1 |
yarn add --dev babel-loader babel-core |
You can see more about the installation of Babel on the official page babeljs.io
Webpack configuration for babel
|
1 2 3 4 5 6 7 8 9 |
module: { rules: [ { test: /.js$/, exclude: /node_modules/, loader: "babel-loader" } ] } |
Babel preset
In order to be able to use the presets, we need to install them.
In this example, we will use the “env” preset package that is installed with
babel-preset-env, and is used to transpile javascript code written according to the version that is current in the current year (ES2017). We can also choose another preset for a standard defined in another year (eg ES2016), but we need to use the appropriate package to install
babel-preset-es2016. You can see more about these packages in the documentation on the official website babeljs.io/docs/plugins/#presets-official-presets
|
1 |
npm install babel-preset-env --save-dev |
|
1 |
yarn add babel-preset-env --dev |
In addition to the installation, it is necessary to create a file named .babelrc, which is placed in the root of the project. This file is in charge of saving Babel’s settings, therefore it is necessary to insert the following configuration JSON inside that file:
|
1 2 3 |
{ "presets": ["env"] } |
Browser list
In addition to this simple babel preset configuration, it is recommended to use the “intelligent” way of transpiling, which takes into account that newer browsers support new ES standards. This intelligent way of selection allows not to transpile to ES5 if it is not necessary, because it increases the size of the code. Therefore, it is recommended to conditionally transpile JavaScript depending on the browser on which JavaScript is compiled. It would be ideal if you would target exactly those browsers supported by our code. It is enough to programmatically select browsers:
|
1 2 3 |
"targets": { "browsers": ["last 2 versions", "safari >= 7"] } |
Browser List is a Babel library that allows us to select a browser using some conditions (eg "last 2 versions"). See more about the Browserlist library on the official “BrowserList” pages. For a good selection of terms, use the following online page “browserl.ist”.
Example: Philip Walton
|
1 2 3 4 5 6 7 8 9 10 11 12 13 14 15 16 17 |
{ presets: [ ['env', { modules: false, useBuiltIns: true, targets: { browsers: [ 'Chrome >= 60', 'Safari >= 10.1', 'iOS >= 10.3', 'Firefox >= 54', 'Edge >= 15', ], }, }], ] } |
When babel is started, this configuration will output two production-ready javascript files:
- main.js (the syntax will be ES2015+)
- main-legacy.js (the syntax will be ES5)
Therefore, after this it is necessary to insert this script into the desired HTML file:
|
1 2 3 4 5 6 |
<!-- Browsers with ES module support load this file. --> <script type="module" src="main.js"></script> <!-- Older browsers load this file (and module-supporting --> <!-- browsers know *not* to load this file). --> <script nomodule src="main-legacy.js"></script> |
See more about this in Philip Walton’s article Deploying ES2015+ Code in Production Today and deploying this on his GitHub account “Webpack ESNext Boilerplate”
Image loader
In an HTML document, the browser pulls images from the server only when it “runs into” the <img> tag (or not the element that has the “background-image” property). Using webpack we can optimize images and even save them as binary data inside JavaScript. Images inserted in javascript can be preloaded, so the browser will not have to download them with an additional request.
Installing the img loader package
|
1 |
npm install file-loader image-webpack-loader url-loader --save-dev |
|
1 |
yarn add file-loader image-webpack-loader url-loader --dev |
Webpack configuration for image loader
“image-webpack-loader” compresses the image, after which “url-loader” checks the size of such compressed image. If the image is smaller than the desired size (the size is defined through options), the “url-loader” transfers it with “Base64 encoding”s into an encrypted binary file that is inserted directly into the JavaScript module. If the compressed image is still larger than the defined one, then webpack inserts it into the dist folder as a separate file.
|
1 2 3 4 5 6 7 8 9 10 11 12 |
rules: [ { test: /.(png|jpe?g|gif|svg)$/, use: [ { loader: 'url-loader', options: { limit: 10000 } // Converts the image to binary data if it satisfies the condition < 10k (as base64 strings) }, { loader: 'image-webpac-loader',} ] } ] |
Usage
To use images in the JavaScript module, we need to import them:
|
1 2 |
import malaSlika from "../../assets/mala-slika.jpg"; import velikaSlika from "../../assets/velika-slika.jpg"; |
As you can see, the images are located in the assets folder, which is located in the root of the project. After import, we can do whatever we need with the images, e.g. simple rendering:
|
1 2 3 4 5 6 7 |
const mala = document.createElement('img'); mala.src = malaSlika; document.body.appendChild(mala); const velika = document.createElement('img'); velika.src = velikaSlika; document.body.appendChild(velika); |
After building the project with webpack, only the big image appears in the dist folder for production (because it did not pass the test limit of 10000), while the small image is embedded as a binary string in the JavaScript module.
eslint-loader
ESlinter is one of the most popular code linters, it standardizes the appearance of JavaScript code and finds errors immediately at compile time.
Installation
Need to install “eslint core”:
first
|
1 |
npm install eslint --save-dev |
|
1 |
yarn add eslint --dev |
After which we can also install “eslint-loader”:
|
1 |
npm install eslint-loader --save-dev |
|
1 |
yarn add eslint-loader --dev |
You can read more about eslint-loader on the official plugin page github.com/MoOx/eslint-loader
Configuration in webpack.config.a
|
1 2 3 4 5 6 7 8 9 10 |
rules: [ { test: /.js$/, exclude: /node_modules/, use: [ "babel-loader", "eslint-loader", ], }, ], |
NOTE:
Pay attention to the loader loading order, this loader needs to be before (read: “below”) the babel-loader otherwise the linting will be over the transpiled code. There is an option to add properties
enforce: "pre" which allows it to load this loader first regardless of the place in the code.
Configuration .eslintrc.json
It is necessary to configure the eslint core itself. The configuration is stored in the .eslintrc.json file.
Example configuration
|
1 2 3 4 5 6 7 8 9 10 11 12 |
{ "env": { "browser": true, "commonjs": true, "es6": true, "node": true }, "extends": "eslint:recommended", "rules": { // goes here verify some rules } } |
The “extends” section defines which set of rules we want to apply. We can use the recommended set from eslint “eslint:recommended” or install some other e.g. “airbnb”
In the “rules” section, one of the rules can be changed individually. You can find a list of all the rules on the official website in the “rules” section. It is enough to choose a rule and change its configuration.
Example – deactivating rules
If we do not want any rule to be applied, it is enough to insert the code "nazivPravila": 0 in the “rules” section, so if we do not want to activate the “no-console” rule check:
|
1 2 3 |
"rules": { "no-console":0 }, |
Enabling sourcemap
SourceMap is a file inside which is mapped the connection between the code in the final file displayed in the browser and the original non-bundled files (which have not yet been transpiled, minified, compressed,…). Sourcemap allows the browser to reconstruct the initial source and display the reconstructed original code in the debugger, even though it actually resides within the final minified and bundled file.
JavaScript sourcemap
To activate this functionality, it is not necessary to install any package, it is enough to define certain parameters in the webpack.config.js file:
|
1 |
devtool: 'inline-source-map', |
After this, in the web browser inspector, each code will be linked to its initial (original) file before bundling, not to bundle.js. You can read more about this on the official site under the section using source maps.
CSS & SCSS sourcemap
The most common organization when working with SASS is to import all files into one To activate this option for CSS or SCSS files, it is necessary to add the SCSS/CSS loader code options:{sourceMap: true} to each loader:
|
1 2 3 4 5 |
use: [ {loader : 'css-loader', options : {sourceMap: true}}, {loader : 'postcss-loader', options : {sourceMap: true}}, {loader : 'sass-loader', options : {sourceMap: true}} ] |
After this, in the web browser inspector, each element will be linked to its initial (original) SCSS file before bundling, and not to main.css.
Webpack plugins
Webpack has its own plugins through which it can extend its functionality. You can view the list of available plugins for webpack 2 on the official page https://webpack.js.org/plugins/.
ExtractTextWebpackPlugin
We have already seen in the previous part how the CSS file is easily integrated into JavaScript, and this technique is excellent when we want to create “reusable” components that would be incorporated repeatedly into different parts of the program. However, it is not good to applyembedding styles in javascript for all styles of the application, because the styles would be loaded when the javascript and that is usually only after loading the DOM. This is unacceptable from the point of view of “user experience”, because at one point the user would be shown unstylized content.
ExtractTextWebpackPlugin is a webpack plugin that allows the processed CSS (transpiled, minified…) to be extracted into a separate file. The CSS file thus separated can be simply embedded in the top of the HTML through the link tag, which will ensure that the styles are loaded before the DOM. This technique allows us to the user immediately after loading
DOM sees styled content.
Installing ExtractTextWebpackPlugin
|
1 |
npm install --save-dev extract-text-webpack-plugin |
|
1 |
yarn add --dev extract-text-webpack-plugin |
Webpack configuration for ExtractTextWebpackPlugin
After installation, it is necessary to update the configuration file webpack.config.js. First, it is necessary to import the plugin module at the top of the file:
|
1 |
const ExtractTextPlugin = require("extract-text-webpack-plugin"); |
After that, you need to edit the part related to CSS and replace “style-loader” with the plugin:
|
1 2 3 4 5 6 7 |
use: ExtractTextPlugin.extract({ fallback: "style-loader", use: [ {loader :'css-loader'}, // Knows how to handle imports if the import keyword is used and cast CSS to a plain string for JavaScript to manipulate {loader :'postcss-loader'} // It implements all the functionality that comes with the PostCSS loader ] }) |
It is also necessary to do the same for the SCSS part:
|
1 2 3 4 5 6 7 8 9 |
test: /.scss$/, use: ExtractTextPlugin.extract({ fallback: "style-loader", use: [ {loader : 'css-loader'}, // Knows how to handle imports if the import keyword is used and cast CSS to a plain string for JavaScript to manipulate {loader : 'postcss-loader'}, // It implements all the functionality that comes with the PostCSS loader {loader : 'sass-loader'} // Transpilira Sass u CSS ] })} |
In addition to the above changes, it is necessary to add a new section in webpack.config.js related to the plugin, which “informs” webpack which plugin we use and in which file we want to extract the CSS from the JavaScript file bundle.js.
|
1 2 3 |
plugins: [ new ExtractTextPlugin("styles.css"), ] |
After starting webpack, a new file “style.css” will appear, which needs to be inserted into our HTML page:
|
1 |
<link rel="stylesheet" href="styles.css"> |
HtmlWebpackPlugin
The purpose of this plugin is to generate a new HTML file based on a template, which is dynamically linked to the generated “bundle.js” file.
Installing HtmlWebpackPlugin
|
1 |
npm install html-webpack-plugin --save-dev |
|
1 |
yarn add html-webpack-plugin --dev |
Webpack configuration for HtmlWebpackPlugin
It is necessary to import the required plugin at the top of the file:
|
1 |
const HtmlWebpackPlugin = require('html-webpack-plugin'); |
And then in the section related to plugins, in addition to the previously inserted ExtractTextPlugin, add this one:
|
1 2 3 |
plugins: [ new HtmlWebpackPlugin() ] |
After starting webpack, it will generate a new HTML file index.html, which already contains links to two also generated javascript files:
|
1 2 3 4 5 6 7 8 9 10 11 |
<!DOCTYPE html> <html> <head> <meta charset="UTF-8"> <link href="styles.css" rel="stylesheet"></head> <body> <script type="text/javascript" src="index.bundle.js"></script> <script type="text/javascript" src="druga.bundle.js"></script> </body> </html> |
Generating HTML based on a template
The pre-generated HTML file except for the included scripts is not particularly interesting. Therefore, it is necessary to create an HTML template with appropriate content, which we will use to generate new HTML. Connecting the template and the corresponding JavaScript file is done by defining an object that is passed as a parameter to the HtmlWebpackPlugin plugin. This object defines the name and path of the HTML template used, as well as the name of the corresponding bundled JavaScript part.
|
1 2 3 4 5 |
new HtmlWebpackPlugin({ filename: 'index.html', // The name of the HTML template template: 'src/index.html', // The path to the template chunks: ['indexJS'] // The name of one of the two JavaScripts defined in the "entry" section }) |
However, it is most likely that the application does not consist of only one HTML file, ie. pages, rather than from several of them, therefore we need to organize the project differently and change the configuration of the plugin.
We will create a new folder within the src folder, which we will call “views”, and which is responsible for storing the template HTML pages. Inside it we can create two HTML pages that we will call “index.html” and “druga.html”. After this we need to change the current configuration for HtmlWebpackPlugin in the webpack.config.js file:
|
1 2 3 4 5 6 7 8 9 10 |
new HtmlWebpackPlugin({ filename: 'index.html', template: 'src/views/index.html', chunks: ['indexJS'] }), new HtmlWebpackPlugin({ filename: 'druga.html', template: 'src/views/druga.html', chunks: ['drugaJS'] }) |
See more about this plugin on the webpack website under the section “Setting up htmlwebpackplugin”, or on the plugin page itself “Html webpack plugin”, while ready-made templates you can read it at https://github.com/jaketrent/html-webpack-template.
CleanWebpackPlugin (cleaning /dist folder)
Every time you change the name of the files to be generated, new renamed files will be generated in the production folder. However, the file with the old name will not disappear, even though it is unnecessary, so it creates a bunch of unnecessary files in the production folder. For this reason, we need to delete old files before generating new ones, so we will use a plugin called “clean-webpack-plugin”. This plugin, every time webpack is stratified, first deletes the contents of the entire production folder “dist”, and then generates new files in it.
CleanWebpackPlugin installation
|
1 |
npm install clean-webpack-plugin --save-dev |
|
1 |
yarn add clean-webpack-plugin --dev |
Configuration of CleanWebpackPlugin
First, it is necessary to import the installed plugin at the top of the page
|
1 |
const CleanWebpackPlugin = require('clean-webpack-plugin'); |
And then in the plugin-related section, add this:
|
1 2 3 |
plugins: [ new CleanWebpackPlugin(['dist']) // The folder to be deleted is defined ] |
See more about this plugin on the official page under the section Cleaning up the dist folder.
CommonsChunkPlugin
If the application has a lot of “third party dependencies”, the recommendation related to the optimization of the application is to separate the “third party dependencies” into the so-called “Vendor Chunk”. This is done because we want to enable the browser to cache this data because unlike our code, it is rarely updated. We have already covered this procedure in the section “Defining multiple input and generating multiple output files”, so now we will call it “vendor” in the second bundle file, and in it we will put all the “third party dependencies” that are in the package.json file under “dependencies”. Read more about this on the official site in the section “explicit-vendor-chunk”.
Example
In this example, a simple Vue.js project webpack-simple was generated, which includes “vue” as third party dependencies.
|
1 2 3 4 5 6 7 8 |
entry: { app: './src/main.js', vendor: ["vue"] }, output: { path: path.resolve(__dirname, './dist'), filename: "[name].bundle.js", }, |
The preceding code will generate two files: app.bundle.js and vendor.bundle.js, so the browser will be able to cache vendor.bundle.js. However, during this procedure, a problem appeared that now those two files are larger in total than the initial bundle.js file before splitting. This happens because in the input file index.js some of the “third party dependencies” were “manually” imported at the top of the file, so duplication occurred.
The solution to the duplication problem is a plugin called “CommonsChunkPlugin”.
CommonsChunkPlugin configuration
This plugin is already built into webpack itself, so you don’t need to install it, you just need to configure it.
|
1 2 3 |
new webpack.optimize.CommonsChunkPlugin({ names: ["vendor"] }) |
This configuration tells webpack to check if inside the “entry” files (in this case “app” and “vendor”) there is a package that is in both files, and if there is to put it only in the one named “vendor”.
UPDATE:
Webpack 4 deprecated “CommonsChunkPlugin” and instead uses two other options “optimization.splitChunks” and “optimization.runtimeChunk”, see more about this in the article “RIP CommonsChunkPlugin”.
UglifyjsWebpackPlugin
The main purpose of this plugin is JavaScript minification.
Installation
|
1 |
npm install --save-dev uglifyjs-webpack-plugin |
|
1 |
yarn add --dev uglifyjs-webpack-plugin |
Configuration
To be able to configure, we first need to import the plugin at the top of the webpack.config.js file.
|
1 |
const UglifyJsPlugin = require('uglifyjs-webpack-plugin') |
After which we can add this plugin in the section responsible for plugins:
|
1 2 3 4 5 6 7 8 9 10 11 12 13 14 |
new UglifyJsPlugin({ test: /.js($|?)/i, uglifyOptions: { debug: true, minimize: true, sourceMap: false, output: { comments: false }, compress: { warnings: false } } }) |
The previous configuration will be active all the time, but what if we want it to be minified only when building for production – then use the condition:
|
1 2 3 4 5 6 7 8 9 10 11 12 13 14 15 16 17 18 |
if (process.env.NODE_ENV.trim() === 'production') { module.exports.plugins = (module.exports.plugins || []).concat([ new UglifyJsPlugin({ test: /.js($|?)/i, uglifyOptions: { debug: true, minimize: true, sourceMap: false, output: { comments: false }, compress: { warnings: false } } }) ]) } |
Read more about this plugin on the official website in the section UglifyjsWebpackPlugin, and see the setting of process.env.NODE_ENV variables in the section of the same name “process.env.NODE_ENV”
Dynamic loading of JavaScript modules
Dynamic module loading implies that within one JavaScript file, the execution of another JavaScript file is called dynamically (after the user’s action). The entire system is based on a specific piece of code that resides within the home page from which a new module is requested to be loaded, and deals with dynamic module loading:
|
1 |
System.import("relativnaPutanja_do_modulaKojiSeUcitava"); |
After executing this part of the code the added JavaScript module is loaded into the page.
Syntax “System.import()” allows us to dynamically and conditionally load one module. It is written according to the ES2015 standard and is based on Promises therefore it returns Promises.
|
1 2 3 4 5 |
System.import("./dinamickiModul") .then(module => console.log(module)) .catch(error => { console.log("We are having problems loading the passed module through Promise"); }); |
You can read more about this in the specification of the ES2015 standard.
process.env.NODE_ENV
When you use one of the frameworks during application development, the framework is constantly vigilant and performs frequent checks to provide you with the necessary warnings to help you with common errors and pitfalls. However, this becomes useless in final production and increases the size of the application on load and only burdens the application. The production mode in the framework is defined through the variable “process.env.NODE_ENV”, therefore it is important to define this variable in wepack when we want to send the application to production. For this purpose, webpack’s DefinePlugin is used, because it allows to set operating system variables. In order to be able to use this webpack plugin within the “webpack.config.js” file, it is necessary to first import it into the file:
|
1 |
const path = require ('path'); |
Then through this plugin we define the variable ‘process.env.NODE_ENV’:
|
1 2 3 4 5 |
new webpack.DefinePlugin({ 'process.env': { NODE_ENV: '"production"' } }) |
However, it is unnecessary for the “process.env.NODE_ENV” variable to be set to “production” when working locally with a dev server, therefore it is necessary to define the variable programmatically. This is achieved by configuring DefinePlugin:
differently
|
1 2 3 |
new webpack.DefinePlugin({ 'process.env.NODE_ENV': JSON.stringify(process.env.NODE_ENV) }) |
With the previous code, we told webpack that the system variable “process.env.NODE_ENV” would be the same as the variable on our local system. And the definition of that variable in the local system is doneconfiguration through the “scripts” property in the “package.json” file:
|
1 2 3 4 |
"scripts": { "dev" : "SET NODE_ENV=development & webpack-dev-server", "build" : "SET NODE_ENV=production & webpack" }, |
If we don’t use “UglifyjsWebpackPlugin” we can monetize the production code by adding the flag -p:
|
1 2 3 4 |
"scripts": { "dev" : "SET NODE_ENV=development & webpack-dev-server", "build" : "SET NODE_ENV=production & webpack -p" } |
Final version of the project with the article
All examples from the article are combined into one project. The final version of the project is published on GitHub
https://github.com/choslee/webprogramiranje-webpackOsnove.
webpack.config.js
|
1 2 3 4 5 6 7 8 9 10 11 12 13 14 15 16 17 18 19 20 21 22 23 24 25 26 27 28 29 30 31 32 33 34 35 36 37 38 39 40 41 42 43 44 45 46 47 48 49 50 51 52 53 54 55 56 57 58 59 60 61 62 63 64 65 66 67 68 69 70 71 72 73 74 75 76 77 78 79 80 81 82 83 84 85 86 87 88 89 90 91 92 93 94 95 96 97 98 99 100 101 102 103 104 105 106 107 108 109 110 111 112 |
const path = require ('path'); const ExtractTextPlugin = require("extract-text-webpack-plugin"); const HtmlWebpackPlugin = require('html-webpack-plugin'); const CleanWebpackPlugin = require('clean-webpack-plugin'); const BrowserSyncPlugin = require('browser-sync-webpack-plugin'); const UglifyJsPlugin = require('uglifyjs-webpack-plugin'); const webpack = require('webpack'); module.exports = { entry: { indexJS: "./src/js/index.js", drugaJS: "./src/js/druga.js", vendor: ["jquery"] }, output: { path: path.resolve(__dirname, "dist"), // The path of the file to be generated filename: "[name].bundle.js" }, devtool: 'inline-source-map', devServer: { contentBase: './dist' }, module: { rules: [ { test: /.scss$/, use: ExtractTextPlugin.extract({ fallback: "style-loader", use: [ {loader: 'css-loader', options: {sourceMap: true}}, // translates CSS into CommonJS {loader: 'postcss-loader', options: {sourceMap: true}}, // postcss plugin loader {loader: 'sass-loader', options: {sourceMap: true}} // compiles Sass to CSS ] }) }, { test: /.js$/, exclude: /node_modules/, loader: "babel-loader" }, { test: /.(png|jpe?g|gif|svg)$/, use: [ { loader: 'url-loader', options: { limit: 40000 } // Convert images < 40k to base64 strings }, { loader: 'image-webpack-loader',} ] }, { test: /.js$/, exclude: /node_modules/, loader: "eslint-loader", options: { // eslint options (if necessary) } } ] }, plugins: [ new ExtractTextPlugin("styles.css"), new HtmlWebpackPlugin({ filename: 'index.html', template: 'src/views/index.html', chunks: ['indexJS', "vendor"] }), new HtmlWebpackPlugin({ filename: 'druga.html', template: 'src/views/druga.html', chunks: ['drugaJS', "vendor"] }), new CleanWebpackPlugin(['dist']), new BrowserSyncPlugin({ host: 'localhost', port: 3000, // url adresa za vreme developmenta http://localhost:3000/ proxy: 'http://localhost:8080/' // proxy endpoint WebpackDev Servera na http://localhost:8080 }, { reload: false // It prevents BrowserSync from reloading the page, so that the WebpackDev Server will do it } ), new webpack.DefinePlugin({ 'process.env.NODE_ENV': JSON.stringify("process.env.NODE_ENV") }), new webpack.optimize.CommonsChunkPlugin({ names: ["vendor"], minChunks: Infinity }), ] }; if (process.env.NODE_ENV.trim() === 'production') { module.exports.plugins = (module.exports.plugins || []).concat([ new UglifyJsPlugin({ test: /.js($|?)/i, uglifyOptions: { debug: true, minimize: true, sourceMap: false, output: { comments: false }, compress: { warnings: false } } }) ]) } |
package.json
|
1 2 3 4 5 6 7 8 9 10 11 12 13 14 15 16 17 18 19 20 21 22 23 24 25 26 27 28 29 30 31 32 33 34 35 36 37 38 39 40 41 42 43 |
{ "name": "js-proba-webpack", "version": "1.0.0", "description": "Proba instaliranja webpacka", "main": "index.js", "scripts": { "dev": "SET NODE_ENV=development & webpack-dev-server", "build": "SET NODE_ENV=production & webpack" }, "author": "Dragoljub Zivanovic", "license": "ISC", "devDependencies": { "autoprefixer": "^7.1.6", "babel-core": "^6.26.0", "babel-loader": "^7.1.2", "babel-preset-env": "^1.6.1", "browser-sync": "^2.18.13", "browser-sync-webpack-plugin": "^1.2.0", "clean-webpack-plugin": "^0.1.17", "css-loader": "^0.28.7", "eslint": "^4.12.0", "eslint-loader": "^1.9.0", "extract-text-webpack-plugin": "^3.0.2", "file-loader": "^1.1.5", "html-webpack-plugin": "^2.30.1", "image-webpack-loader": "^3.4.2", "node-sass": "^4.5.3", "postcss-cssnext": "^3.0.2", "postcss-loader": "^2.0.8", "rucksack-css": "^1.0.2", "sass-loader": "^6.0.6", "style-loader": "^0.19.0", "stylelint": "^8.2.0", "stylelint-webpack-plugin": "^0.9.0", "uglifyjs-webpack-plugin": "^1.1.1", "url-loader": "^0.6.2", "webpack": "^3.8.1", "webpack-dev-server": "^2.9.4" }, "dependencies": { "jquery": "^3.2.1" } } |