


This specific menu is displayed in an assembly
For each menu, it is necessary to define the items that are in it. It is defined in XML format in a file located in a specific folder named “menu” (located in the “res” folder). We generate this file by right-clicking on the “menu” folder in the project section and selecting the New / “Menu resource file” option.
|
1 2 3 4 |
<?xml version="1.0" encoding="utf-8"?> <menu xmlns:android="http://schemas.android.com/apk/res/android"> // goes here menu content </menu> |
Menu items are defined through the element <item/> which can have many attributes defined, the most commonly used attributes are the following:
- id (android:id=”@+id/delete”)
- title (android:title=”@string/delete”)
- icon (android:icon=”@drawable/ic_delete”)
- enabled (android:enabled=”false”)
- checkable (android:checkable=”true”)
- showAsAction (These attributes are related to the display of “menu options” elements within the action bar )
- ifRoom (app:showAsAction=”ifRoom”)
- withText (app:showAsAction=”withText”)
- never (app:showAsAction=”never”)
- always (app:showAsAction=”always”)
Example
|
1 2 3 4 5 6 7 8 9 10 11 12 13 14 15 16 17 18 |
<?xml version="1.0" encoding="utf-8"?> <menu xmlns:android="http://schemas.android.com/apk/res/android"> <item android:id="@+id/edit_menu_item" android:title="@string/edit" android:checkable="true" android:checked="true" android:icon="@drawable/ic_mode_edit" /> <item android:id="@+id/make_default" android:title="@string/make_default" android:checkable="true" android:checked="true"/> <item android:id="@+id/delete_menu_item" android:title="@string/delete" android:icon="@drawable/ic_delete" /> </menu> |
Groups
It is possible to gather similar menu items into groups:
|
1 2 3 4 5 6 |
<group android:id="@+id/group_delete"> <item android:id="@+id/menu_archive" android:title="@string/menu_archive" /> <item android:id="@+id/menu_delete" android:title="@string/menu_delete" /> </group> |
Creating a submenu is simple, a new “menu” element should be embedded within the “item” element:
|
1 2 3 4 5 6 7 8 9 10 11 12 13 14 15 16 17 18 19 20 21 |
<menu xmlns:app="http://schemas.android.com/apk/res-auto" xmlns:android="http://schemas.android.com/apk/res/android"> <item android:id="@+id/edit_menu_item2" android:icon="@drawable/ic_mode_edit" android:title="@string/edit" app:showAsAction="ifRoom" /> <item android:id="@+id/options_menu" android:icon="@drawable/ic_device_hub_black" android:title="Options"> <menu> <item android:id="@+id/subMenu1" android:title="Submenu1"/> <item android:id="@+id/subMenu2" android:title="Submenu2"/> </menu> </item> </menu> |
NOTE:
With elements where the attribute android:checkable=”true” is used, after clicking on such a menu member, you need to set the state of the check box, because the checkBox (or radio button) does not automatically change its state. After the click, we need to ask what the state of the item was before this click (whether it was checked) using isChecked().
If it was previously checked, now after the click it is no longer and we have to set the state setChecked(false) and vice versa if it was not checked
item.isChecked()=false now after the click it is and we have to set
item.setChecked(true);
|
1 2 3 4 5 6 7 8 9 10 11 |
switch (item.getItemId()) { case R.id.make_default: if (item.isChecked()){ item.setChecked(false); Toast.makeText(this, "It is now unchecked", Toast.LENGTH_SHORT).show(); }else { item.setChecked(true); Toast.makeText(this, "It is now checked", Toast.LENGTH_SHORT).show(); } return true; } |
First it is necessary to define the content of the menu in XML format.
Example (neki_menu.xml)
|
1 2 3 4 5 6 7 8 9 10 11 12 13 14 15 |
<?xml version="1.0" encoding="utf-8"?> <menu xmlns:android="http://schemas.android.com/apk/res/android" android:layout_width="wrap_content" android:layout_height="wrap_content"> <item android:checkable="true" android:id="@+id/make_default" android:title="@string/make_default" /> <item android:id="@+id/save" android:title="@string/save" /> <item android:id="@+id/remove" android:title="@string/remove" /> </menu> |
In this example, the first element of the menu is the so-called checkbox.
After defining the content, it is necessary to enable that menu to be available in the activity.
Example
|
1 2 3 4 5 6 |
@Override public void onCreateContextMenu(ContextMenu menu, View v, ContextMenu.ContextMenuInfo menuInfo) { super.onCreateContextMenu(menu, v, menuInfo); MenuInflater inflater = getMenuInflater(); inflater.inflate(R.menu.neki_menu, menu); } |
As part of the activity, it is necessary to register a button (in the onCreate() method) that will be connected to that menu:
|
1 2 3 4 |
ImageView ivOptionsMenuBtn; ivOptionsMenuBtn = findViewById(R.id.ivOptionsDots); registerForContextMenu(ivOptionsMenuBtn); |
And then attach a clickListener to it that willon click to call the openContextMenu(view):
method
|
1 2 3 4 5 6 |
ivOptionsMenuBtn.setOnClickListener(new View.OnClickListener() { @Override public void onClick(View v) { openContextMenu(v); } }); |
In the onContextItemSelected() method, we define what will happen when one of the menu members is clicked. To select a menu member, the “id” item defined in XML (neki_menu.xml) is used:
|
1 2 3 4 5 6 7 8 9 10 11 12 13 14 15 16 |
@Override public boolean onContextItemSelected(MenuItem item) { switch (item.getItemId()) { case R.id.make_default: Toast.makeText(this, "Make default", Toast.LENGTH_SHORT).show(); return true; case R.id.save: Toast.makeText(this, "Save", Toast.LENGTH_SHORT).show(); return true; case R.id.remove: Toast.makeText(this, "Remove", Toast.LENGTH_SHORT).show(); return true; default: return super.onContextItemSelected(item); } } |
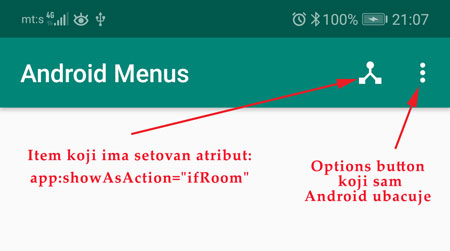
For the options menu, it is not necessary to define a button that will respond to a click and open this menu, because android itself inserts this button into the action bar and assigns it an icon with three vertical dots.
It should be emphasized that here we have the opportunity to define which menu item will be immediately displayed in the actionBar next to the options icon (three vertical dots). This is provided with the app:showAsAction="ifRoom" attribute. The options menu is displayed exactly where the button is clicked. If a member is displayed immediately in the action bar, then it is not in the menu itself.
In addition to these specifics, as with all other menus, it is necessary to define the content of the menu in XML format.
|
1 2 3 4 5 6 7 8 9 10 11 12 13 14 15 16 17 18 19 20 21 22 23 24 |
<?xml version="1.0" encoding="utf-8"?> <menu xmlns:android="http://schemas.android.com/apk/res/android" xmlns:app="http://schemas.android.com/apk/res-auto"> <item android:id="@+id/share" android:icon="@drawable/ic_device_hub_black" android:title="device" app:showAsAction="ifRoom" /> <item android:id="@+id/edit_menu_item" android:icon="@drawable/ic_mode_edit" android:title="@string/edit" /> <item android:id="@+id/make_default" android:checkable="true" android:title="Make default" /> <item android:id="@+id/delete_menu_item" android:title="@string/delete" android:icon="@drawable/ic_delete" /> <item android:id="@+id/exit" android:title="Exit" /> </menu> |
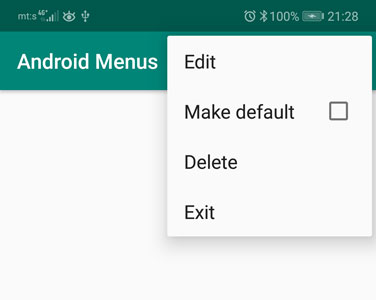
In a similar way to the Context Float menu, the menu is integrated here:
|
1 2 3 4 5 6 |
@Override public boolean onCreateOptionsMenu(Menu menu) { MenuInflater inflater =getMenuInflater(); inflater.inflate(R.menu.options_menu, menu); return true; } |
In the onOptionsItemSelected method, we define what will happen after clicking on one of the menu members:
|
1 2 3 4 5 6 7 8 9 10 11 12 13 14 15 16 17 18 19 20 21 22 23 24 25 26 27 28 |
@Override public boolean onOptionsItemSelected(MenuItem item) { switch (item.getItemId()) { case R.id.share: Toast.makeText(this, "Share", Toast.LENGTH_SHORT).show(); return true; case R.id.edit_menu_item: Toast.makeText(this, "Edit", Toast.LENGTH_SHORT).show(); return true; case R.id.make_default: if (item.isChecked()){ item.setChecked(false); Toast.makeText(this, "Is not default", Toast.LENGTH_SHORT).show(); }else { item.setChecked(true); Toast.makeText(this, "Is default", Toast.LENGTH_SHORT).show(); } return true; case R.id.delete_menu_item: Toast.makeText(this, "Delete", Toast.LENGTH_SHORT).show(); return true; case R.id.exit: Toast.makeText(this, "Exit", Toast.LENGTH_SHORT).show(); return true; default: return super.onOptionsItemSelected(item); } } |
This menu is specific because it is linked to the place where it was clicked. The menu is displayed where there is space either below the clicked place, or above the clicked place. The PopUp menu is hidden from the screen when the user clicks on a menu item or somewhere outside the menu.
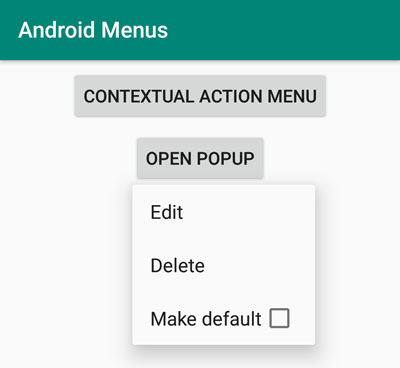
In order for a class (eg an activity) to be able to perform actions after a click, it is necessary for the class to implement the PopupMenu.OnMenuItemClickListener interface.
After implementing the interface, it is necessary to implement (Override) and its abstract method onMenuItemClick(), through which we are enabled to define for each member of the menu which action will be taken after clicking on the member.
|
1 2 3 4 5 6 7 8 9 10 11 12 13 14 15 16 |
@Override public boolean onMenuItemClick(MenuItem menuItem) { switch (menuItem.getItemId()) { case R.id.edit_menu_item: Toast.makeText(this, "Edit", Toast.LENGTH_SHORT).show(); return true; case R.id.delete_menu_item: Toast.makeText(this, "Delete", Toast.LENGTH_SHORT).show(); return true; case R.id.make_default: Toast.makeText(this, "MakeDefault", Toast.LENGTH_SHORT).show(); return true; default: return false; } } |
In order to display the PopUp menu, we need to define the onClick method (eg shoPopup()) on the trigger (eg some button) which looks like this:
|
1 2 3 4 5 6 7 8 9 10 |
public void showPopup (View v){ PopupMenu popup = new PopupMenu(this, v); // Adding a listener to each menu member popup.setOnMenuItemClickListener(this); // Link to menu content MenuInflater inflater = popup.getMenuInflater(); inflater.inflate(R.menu.popup_menu, popup.getMenu()); // Displaying the menu popup.show(); } |
This specific menu is displayed as part of the actionBar, more precisely through the actionBar. In addition to the menu items shown with icons at the right end, there is also a menu title in the middle, and an arrow to close the menu on the left.
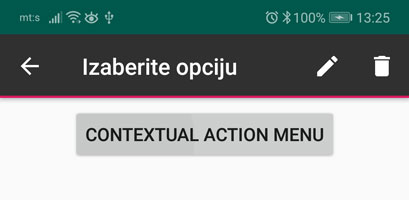
As with any menu, you first need to create the menu content in xml format (New “Menu resource file”) in the “menu” folder
Example (context_action_menu.xml)
|
1 2 3 4 5 6 7 8 9 10 11 |
<?xml version="1.0" encoding="utf-8"?> <menu xmlns:android="http://schemas.android.com/apk/res/android"> <item android:id="@+id/edit_menu_item" android:title="@string/edit" android:icon="@drawable/ic_mode_edit" /> <item android:id="@+id/delete_menu_item" android:title="@string/delete" android:icon="@drawable/ic_delete" /> </menu> |
Defining the ActionModeCallback method
First of all, within the activity, it is necessary to define a variable of type ActionMode (note, choose version v.7), because it is used within the callback method:
|
1 |
private ActionMode mActionMode; |
And then the ActionModeCallback instance where all the work related to the Contextual Action Mode menu is done. It has 4 methods, in the first onCreateActionMode() the previously defined menu content is connected to the Action Mode menu. In the onActionItemClicked() method, actions are defined after clicking on one of the members. And what happens when the menu is closed is defined in the onDestroyActionMode() method.
|
1 2 3 4 5 6 7 8 9 10 11 12 13 14 15 16 17 18 19 20 21 22 23 24 25 26 27 28 29 30 31 32 33 34 35 36 37 38 |
private ActionMode.Callback mActionModeCallback = new ActionMode.Callback() { @Override public boolean onCreateActionMode(ActionMode actionMode, Menu menu) { // Associating previously defined content with this type of menu actionMode.getMenuInflater().inflate(R.menu.context_action_menu, menu); // Defining the Title menu actionMode.setTitle("Izaberite opciju"); return true; } @Override public boolean onPrepareActionMode(ActionMode actionMode, Menu menu) { return false; } @Override public boolean onActionItemClicked(ActionMode actionMode, MenuItem menuItem) { // Defining the click action of each menu item switch (menuItem.getItemId()) { case R.id.edit_menu_item: // The action that takes place after clicking on a menu item: Toast.makeText(MainActivity.this, "We're editing something", Toast.LENGTH_SHORT).show(); // We can close the menu after clicking on the selection actionMode.finish(); return true; case R.id.delete_menu_item: Toast.makeText(MainActivity.this, "We're deleting something", Toast.LENGTH_SHORT).show(); // We can close the menu after clicking on the selection actionMode.finish(); return true; default: return false; } } @Override public void onDestroyActionMode(ActionMode actionMode) { // We define the ActionMode value after closing the menu mActionMode = null; } }; |
As part of the activity, it is necessary to define a clickListener on a certain button (in the onCreate() method) with which we will enable the previously defined mActionModeCallback() callback method to be called on a click:
|
1 |
mActionMode = startSupportActionMode(mActionModeCallback); |
So the whole listener code would look like this:
|
1 2 3 4 5 6 7 8 9 10 11 12 13 |
Button btnContextActionMenu = findViewById(R.id.btnContextActionMenu); btnContextActionMenu.setOnLongClickListener(new View.OnLongClickListener() { @Override public boolean onLongClick(View view) { // Ako je aktivan menu vratiti false if(mActionMode != null){ return false; } // If it is inactive, then we activate it mActionMode = startSupportActionMode(mActionModeCallback); return true; } }); |