


Creating a server without a library

To create a server, you need the http/https object, which is built into the core of node.js, and we can import it as a module. There are two module options:
- http – Http is one of the built-in modules that comes with Node.js and allows creating a server to accept client requests and return responses
- https – The Https module includes all the basic features of http, but with additional options to handle the necessary security differences like certificates.
When we import one of these two modules, it will return an “http/https” object, as in the following example:
|
1 |
const http = require('http'); |
Now that we have the http object we will use it to create a server using the method createServer():
|
1 |
const server = http.createServer() |
In order for the server to start “listening” for requests, we must start it, this is done by calling the listen() method:
|
1 |
listen(port, hostname, backlog, callback) |
The listen() method accepts four optional parameters, and we will only use the first parameter which defines the port:
|
1 2 3 |
const http = require('http'); const server = http.createServer() server.listen(3000); |
The request to the server is sent from this address "http://localhost:3000". To stop the server, we can use its close() method.
Callback for responding to the request of the so-called requestListener()
In the previous example, a server was created, but it does not have any functionality, in order for this server to respond to a request, it is necessary to create an event listener that will listen to requests to the server. We can do that on the standard so-called event-based way with the on():
method
|
1 2 3 4 5 6 |
const http = require('http'); const server = http.createServer() server.on("request", (request, response) => { // handle requests }) server.listen(3000); |
However, this approach is not used most often (although it is completely valid), but a function (so-called requestListener()) is passed as a parameter to the createServer() method, which responds to the request and automatically adds a “request” event.
|
1 2 3 4 5 6 |
const http = require('http'); const requestListener = function(request, response) { // handle requests } const server = http.createServer(requestListener); server.listen(3000); |
for simplicity it is best to use the anonymous function:
|
1 2 3 4 5 |
const http = require('http'); const server = http.createServer(function(request, response) { // handle requests }); server.listen(3000); |
Accepting GET request and response
Request acceptance
A request object is sent to the server with the request and we can access it through the “request” parameter. It is quite a “big” object that carries a lot of information in its properties and methods, so we can use it for the content of the response body (eg method, url, headers properties):
|
1 2 3 4 5 6 7 8 9 10 11 12 13 14 15 16 |
const http = require('http'); const server = http.createServer((request, response) => { let headers = request.headers; let method = request.method; let url = request.url; if (method === "GET" && url === "/") { console.log(request.url + "n"); console.log(request.headers + "n"); console.log(request); //hendle some response } } ) server.listen(3000); |
Parsing the query from the url address
If the sender’s request is specific, he will forward it through the url (eg http://host:8000/?name=Pera), and therefore it is necessary to parse the url and extract data from it. For parsing we will use node.js module “url”.
|
1 2 3 4 5 6 7 8 9 10 |
var http = require('http'); var url = require('url'); var server = http.createServer((request, response) => { var queryData = url.parse(request.url, true).query; // if there is a variable "name" in the url (eg http://host:8000/?name=Pera) // we can extract it from the url and use it later in the server response: var imeIzZahteva = queryData.name; }); server.listen(3000); |
Server response
a) API based response
To create a basic response (response), we will use the properties of response objects: statusCode and its methods:setHeader(), write() and end():
|
1 2 3 4 |
response.statusCode = 200 response.setHeader("Content-Type", "application/json") response.write("some body content") response.end() |
For the server’s response, we can use some of the data we get from the request object:
|
1 2 3 4 5 6 7 8 9 10 11 12 13 14 15 16 17 18 19 20 21 22 23 |
// Url zahteva = http://localhost:3000/" const http = require('http'); const server = http.createServer((request, response) => { let headers = request.headers; let method = request.method; let url = request.url; const responseBody = { headers, method, url, body: ["item1", "item2", "item3"] } if (method === "GET" && url === "/") { response.statusCode = 200 response.setHeader("Content-Type", "application/json") response.write(JSON.stringify(responseBody)) response.end() } } ) server.listen(3000); |
The simplest response header is defined in the previous example, here you can see how a standard header can look like.
NOTE:
In the previous example, we can take advantage of the destructuring of the object so that we very simply create variable headers, method and url. See here how the previous example would look when using object destructuring, see more about object destructuring in the article “Destructuring in JavaScript”
b) HTML response
In the previous examples, the responses were the so-called “API based”, but if we want to return html then we will do it similar to the following example:
|
1 2 3 4 5 6 7 8 9 10 11 12 13 14 15 16 17 18 19 20 21 22 |
// Url zahteva = http://localhost:3000/" const http = require('http'); const server = http.createServer((request, response) => { const { method, url } = request if (method === "GET" && url === "/") { response.setHeader("Content-Type", "text/html") response.statusCode = 200 response.end( `<!doctype html> <html> <body> <h2>This is the title</h2> <p>This is some text</p> </body> </html>` ) } } ) server.listen(3000); |
If in the previous example the url with which the sender sends the request is http://localhost:3000/?name=Pera, then the sender will receive the response “Hello Pera” otherwise it will receive the response “Hello World”.
Receiving data sent with the POST/PUT method
In addition to the get method that visibly sends data within the url, we can “invisibly” send data to the server if we use the POST method. Usually this method is used when we send collected data from a form. In this example, we will generate the form on the server when the client sends a request for a page with the url: http://localhost:3000:
|
1 2 3 4 5 6 7 8 9 10 11 12 13 14 15 16 17 18 19 20 21 22 23 |
const http = require('http'); const server = http.createServer((request, response) => { const { method, url } = request if (method === "GET" && url==="/") { response.setHeader("Content-Type", "text/html") response.statusCode = 200 response.end(`<!doctype html> <html> <body> <form action="/message" method="post"> <input type="text" name="fname" /><br /> <input type="number" name="age" /><br /> <input type="file" name="photo" /><br /> <button>Save</button> </form> </body> </html> `) } } ) server.listen(3000); |
The result of this request on the client looks like this:
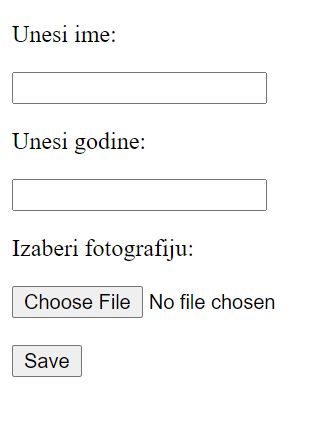
When the user enters the data in the form and clicks the “Save” button, due to the defined HTML attribute “action”, the data from the form will be sent to the page with the url /message, and a new request will be created with it that will forward the data. Collected form data is sent as “readable streams” and may look like this:
|
1 |
localefname=NekoIme&age=15&photo=naziv_izabrane_slike.png |
What are STREAMS?
Streams are a way to efficiently handle any kind of information exchange (also used for reading/writing files, network communication…). Streams are not a concept unique to Node.js, but have existed within the Unix operating system for decades. Unlike the traditional method where the entire file is loaded into memory and only then processed, here when using streams the program reads part by part of data and processes it simultaneously, thus not burdening the memory at all. In addition to the mentioned advantage where memory is used efficiently because you don’t need to load large amounts of data into memory to be able to process them, there is another advantage called “time efficiency” which reduces the time needed to start processing data, because you can start processing as soon as you get a part of the data, instead of waiting for all the data to be available. Read more about streams in the article Node.js Streams
In order to know at what moment the data is sent and whenthe data transfer is completed, there are registered events for that. “Readable streams” have the following event types registered:
- data (this event is emitted whenever the stream passes a piece of data called “chunk”)
- end (this event is emitted whenever the stream has no more data to forward)
- error
- close
- readable
In the following example, we will log on to the “data” event to be notified when the data is being sent, and in order to know when the message ends, we must also log on to the “end” event:
|
1 2 3 4 5 6 7 8 9 10 11 |
if (req.method === 'POST' && url==="/message") { let body = ''; req.on('data', chunk => { // convert Buffer chunk to string body += chunk.toString(); }); req.on('end', () => { console.log(body); res.end('We have downloaded your submitted information'); }); } |
The body variable could look like this after receiving the data:
|
1 |
fname=NekoIme&age=15&photo=naziv_izabrane_slike.png |
When we have data in this form, we need to parse it, and for that we will use the node.js module “querystring” and its method parse() transfer data in this form to a collection of “key/value” pairs:
|
1 2 3 4 5 6 7 8 9 10 11 12 13 |
const { parse } = require('querystring'); if (req.method === 'POST') { let body = ''; req.on('data', chunk => { body += chunk.toString(); }); req.on('end', () => { console.log( parse(body) ); res.end('We have downloaded your submitted information'); }); } |
A now readable code will be printed in the console:
|
1 2 3 4 5 |
{ fname: 'NekoIme', age: '15', photo: 'selected_image_name.png' } |
Here you can see the entire previous example combined as well as an example in which a buffer (chunk) is concated into a string.
Creating a server with the Express library
Express is a minimalist framework for Node.js that simplifies the process of creating servers and handling HTTP requests. To get started, we first need to install Express using npm:
|
1 |
npm install express |
Once Express is installed, we can import it and use it to create a server. In the following example, we will create a simple server that will respond to a GET request:
|
1 2 3 4 5 6 7 8 9 10 11 |
const express = require('express'); const app = express(); const port = 3000; app.get('/', (req, res) => { res.send('Hello World!'); }); app.listen(port, () => { console.log(Server is listening at http://localhost:${port}); }); |
In this example, the Express application (app) uses the app.get() method to handle GET requests on the base URL (“/”). The res.send() method sends the response to the client. The server is started using the app.listen() method, which listens for requests on the defined port (in this case, 3000).
Accepting POST requests and sending responses
In addition to GET requests, we can use Express to handle POST requests. In the following example, we will create a route that accepts a POST request and sends a response:
|
1 2 3 4 5 6 7 8 9 10 11 12 13 14 |
const express = require('express'); const app = express(); const port = 3000; app.use(express.json()); // Middleware za parsiranje JSON podataka app.post('/data', (req, res) => { const data = req.body; res.json({ message: 'Data received', data }); }); app.listen(port, () => { console.log(Server is listening at http://localhost:${port}); }); |
Here we use app.use(express.json()) middleware to parse JSON data from the request body. When the client sends a POST request to the “/data” route, the server will accept the data and send a JSON response back to the client.
Adding routes and error handling
Express makes it easy to add different routes and handle errors. For example, we can add a route for “/about” and create middleware to handle 404 errors:
|
1 2 3 4 5 6 7 8 9 10 11 12 13 14 15 16 17 18 19 20 |
const express = require('express'); const app = express(); const port = 3000; app.get('/', (req, res) => { res.send('Hello World!'); }); app.get('/about', (req, res) => { res.send('About page'); }); // Middleware for handling 404 errors app.use((req, res) => { res.status(404).send('Page not found'); }); app.listen(port, () => { console.log(Server is listening at http://localhost:${port}); }); |
With this approach, our server can handle different routes and return appropriate responses. Middleware for 404 errors is used to catch all non-existent routes and send the appropriate message to the client.
Express framework offers much more features and flexibility, but these are the basic steps to create a simple server. More information can be found in the official documentation.
|
1 2 3 4 5 6 7 8 9 10 11 12 13 14 15 16 17 18 19 20 21 22 23 24 25 26 27 28 29 30 31 32 33 34 35 36 37 38 39 40 41 42 43 44 45 46 47 48 49 50 51 52 53 54 55 56 57 58 59 60 61 62 63 64 65 66 67 68 69 70 71 72 73 74 75 76 77 78 79 80 81 82 83 84 85 86 87 88 89 90 91 92 93 94 95 96 97 98 99 100 101 102 103 104 105 106 107 108 109 110 111 112 113 114 115 116 117 118 119 120 121 122 123 124 125 126 127 128 129 130 131 132 133 134 135 136 137 138 139 140 141 142 143 144 145 146 147 148 149 150 151 152 153 154 155 156 157 158 159 160 161 162 163 164 165 166 167 168 169 170 171 172 173 174 175 176 177 178 179 180 181 182 183 184 185 186 187 188 189 190 191 192 193 194 195 196 197 198 199 200 201 202 203 204 205 206 207 208 209 210 211 212 213 214 215 216 217 218 219 220 221 222 223 224 225 226 227 228 229 230 231 232 233 234 235 236 237 238 239 240 241 242 243 244 245 246 247 248 249 250 251 252 253 254 255 256 257 258 259 260 261 262 263 264 265 266 267 268 269 270 271 272 273 274 275 276 277 278 279 280 281 282 283 284 285 286 287 288 289 290 291 292 293 294 295 296 297 298 299 300 301 302 303 304 305 306 307 308 309 310 311 312 313 314 315 316 317 318 319 320 321 322 323 324 325 326 327 328 329 330 331 332 333 334 335 336 337 338 339 340 341 342 343 344 345 346 347 348 349 350 351 352 353 354 355 356 357 358 359 360 361 362 363 364 365 366 367 368 369 370 371 372 373 374 375 376 377 378 379 380 381 382 383 384 385 386 387 388 389 390 391 392 393 394 395 396 397 398 399 400 401 402 403 404 405 406 407 408 409 410 411 412 413 414 415 416 417 418 419 420 421 422 423 424 425 426 427 428 429 430 431 432 433 434 435 436 437 438 439 440 441 442 443 444 445 446 447 448 449 450 451 452 453 454 455 456 457 458 459 460 461 462 463 464 465 466 467 468 469 470 471 472 473 474 475 476 477 478 479 480 481 482 483 484 485 486 487 488 489 490 491 492 493 494 495 496 497 498 499 500 501 502 503 504 505 506 507 508 509 510 511 |
IncomingMessage { _readableState: ReadableState { objectMode: false, highWaterMark: 16384, buffer: BufferList { head: null, tail: null, length: 0 }, length: 0, pipes: [], flowing: null, ended: false, endEmitted: false, reading: false, sync: true, needReadable: false, emittedReadable: false, readableListening: false, resumeScheduled: false, errorEmitted: false, emitClose: true, autoDestroy: false, destroyed: false, errored: null, closed: false, closeEmitted: false, defaultEncoding: 'utf8', awaitDrainWriters: null, multiAwaitDrain: false, readingMore: true, decoder: null, encoding: null, [Symbol(kPaused)]: null }, _events: [Object: null prototype] { end: [Function: clearRequestTimeout] }, _eventsCount: 1, _maxListeners: undefined, socket: <ref *1> Socket { connecting: false, _hadError: false, _parent: null, _host: null, _readableState: ReadableState { objectMode: false, highWaterMark: 16384, buffer: BufferList { head: null, tail: null, length: 0 }, length: 0, pipes: [], flowing: true, ended: false, endEmitted: false, reading: true, sync: false, needReadable: true, emittedReadable: false, readableListening: false, resumeScheduled: false, errorEmitted: false, emitClose: false, autoDestroy: false, destroyed: false, errored: null, closed: false, closeEmitted: false, defaultEncoding: 'utf8', awaitDrainWriters: null, multiAwaitDrain: false, readingMore: false, decoder: null, encoding: null, [Symbol(kPaused)]: false }, _events: [Object: null prototype] { end: [Array], timeout: [Function: socketOnTimeout], data: [Function: bound socketOnData], error: [Function: socketOnError], close: [Array], drain: [Function: bound socketOnDrain], resume: [Function: onSocketResume], pause: [Function: onSocketPause] }, _eventsCount: 8, _maxListeners: undefined, _writableState: WritableState { objectMode: false, highWaterMark: 16384, finalCalled: false, needDrain: false, ending: false, ended: false, finished: false, destroyed: false, decodeStrings: false, defaultEncoding: 'utf8', length: 0, writing: false, corked: 0, sync: true, bufferProcessing: false, onwrite: [Function: bound onwrite], writecb: null, writelen: 0, afterWriteTickInfo: null, buffered: [], bufferedIndex: 0, allBuffers: true, allNoop: true, pendingcb: 0, prefinished: false, errorEmitted: false, emitClose: false, autoDestroy: false, errored: null, closed: false, closeEmitted: false }, allowHalfOpen: true, _sockname: null, _pendingData: null, _pendingEncoding: '', server: Server { maxHeaderSize: undefined, insecureHTTPParser: undefined, _events: [Object: null prototype], _eventsCount: 2, _maxListeners: undefined, _connections: 2, _handle: [TCP], _usingWorkers: false, _workers: [], _unref: false, allowHalfOpen: true, pauseOnConnect: false, httpAllowHalfOpen: false, timeout: 0, keepAliveTimeout: 5000, maxHeadersCount: null, headersTimeout: 60000, requestTimeout: 0, _connectionKey: '6::::3000', [Symbol(IncomingMessage)]: [Function: IncomingMessage], [Symbol(ServerResponse)]: [Function: ServerResponse], [Symbol(kCapture)]: false, [Symbol(async_id_symbol)]: 2 }, _server: Server { maxHeaderSize: undefined, insecureHTTPParser: undefined, _events: [Object: null prototype], _eventsCount: 2, _maxListeners: undefined, _connections: 2, _handle: [TCP], _usingWorkers: false, _workers: [], _unref: false, allowHalfOpen: true, pauseOnConnect: false, httpAllowHalfOpen: false, timeout: 0, keepAliveTimeout: 5000, maxHeadersCount: null, headersTimeout: 60000, requestTimeout: 0, _connectionKey: '6::::3000', [Symbol(IncomingMessage)]: [Function: IncomingMessage], [Symbol(ServerResponse)]: [Function: ServerResponse], [Symbol(kCapture)]: false, [Symbol(async_id_symbol)]: 2 }, parser: HTTPParser { '0': [Function: bound setRequestTimeout], '1': [Function: parserOnHeaders], '2': [Function: parserOnHeadersComplete], '3': [Function: parserOnBody], '4': [Function: parserOnMessageComplete], '5': [Function: bound onParserExecute], '6': [Function: bound onParserTimeout], _headers: [], _url: '', socket: [Circular *1], incoming: [Circular *2], outgoing: null, maxHeaderPairs: 2000, _consumed: true, onIncoming: [Function: bound parserOnIncoming], [Symbol(resource_symbol)]: [HTTPServerAsyncResource] }, on: [Function: socketListenerWrap], addListener: [Function: socketListenerWrap], prependListener: [Function: socketListenerWrap], _paused: false, _httpMessage: ServerResponse { _events: [Object: null prototype], _eventsCount: 1, _maxListeners: undefined, outputData: [], outputSize: 0, writable: true, destroyed: false, _last: false, chunkedEncoding: false, shouldKeepAlive: true, _defaultKeepAlive: true, useChunkedEncodingByDefault: true, sendDate: true, _removedConnection: false, _removedContLen: false, _removedTE: false, _contentLength: null, _hasBody: true, _trailer: '', finished: false, _headerSent: false, socket: [Circular *1], _header: null, _keepAliveTimeout: 5000, _onPendingData: [Function: bound updateOutgoingData], _sent100: false, _expect_continue: false, [Symbol(kCapture)]: false, [Symbol(kNeedDrain)]: false, [Symbol(corked)]: 0, [Symbol(kOutHeaders)]: null }, [Symbol(async_id_symbol)]: 4, [Symbol(kHandle)]: TCP { reading: true, onconnection: null, _consumed: true, [Symbol(owner_symbol)]: [Circular *1] }, [Symbol(kSetNoDelay)]: false, [Symbol(lastWriteQueueSize)]: 0, [Symbol(timeout)]: null, [Symbol(kBuffer)]: null, [Symbol(kBufferCb)]: null, [Symbol(kBufferGen)]: null, [Symbol(kCapture)]: false, [Symbol(kBytesRead)]: 0, [Symbol(kBytesWritten)]: 0, [Symbol(RequestTimeout)]: undefined }, httpVersionMajor: 1, httpVersionMinor: 1, httpVersion: '1.1', complete: false, headers: { host: 'localhost:3000', connection: 'keep-alive', 'cache-control': 'max-age=0', 'sec-ch-ua': '"Google Chrome";v="89", "Chromium";v="89", ";Not A Brand";v="99"', 'sec-ch-ua-mobile': '?0', 'upgrade-insecure-requests': '1', 'user-agent': 'Mozilla/5.0 (Windows NT 10.0; Win64; x64) AppleWebKit/537.36 (KHTML, like Gecko) Chrome/89.0.4389.128 Safari/537.36', accept: 'text/html,application/xhtml+xml,application/xml;q=0.9,image/avif,image/webp,image/apng,*/*;q=0.8,application/signed-exchange;v=b3;q=0.9', 'sec-fetch-site': 'none', 'sec-fetch-mode': 'navigate', 'sec-fetch-user': '?1', 'sec-fetch-dest': 'document', 'accept-encoding': 'gzip, deflate, br', 'accept-language': 'en-US,en;q=0.9,sh;q=0.8,sr;q=0.7,bs;q=0.6' }, rawHeaders: [ 'Host', 'localhost:3000', 'Connection', 'keep-alive', 'Cache-Control', 'max-age=0', 'sec-ch-ua', '"Google Chrome";v="89", "Chromium";v="89", ";Not A Brand";v="99"', 'sec-ch-ua-mobile', '?0', 'Upgrade-Insecure-Requests', '1', 'User-Agent', 'Mozilla/5.0 (Windows NT 10.0; Win64; x64) AppleWebKit/537.36 (KHTML, like Gecko) Chrome/89.0.4389.128 Safari/537.36', 'Accept', 'text/html,application/xhtml+xml,application/xml;q=0.9,image/avif,image/webp,image/apng,*/*;q=0.8,application/signed-exchange;v=b3;q=0.9', 'Sec-Fetch-Site', 'none', 'Sec-Fetch-Mode', 'navigate', 'Sec-Fetch-User', '?1', 'Sec-Fetch-Dest', 'document', 'Accept-Encoding', 'gzip, deflate, br', 'Accept-Language', 'en-US,en;q=0.9,sh;q=0.8,sr;q=0.7,bs;q=0.6' ], trailers: {}, rawTrailers: [], aborted: false, upgrade: false, url: '/', method: 'GET', statusCode: null, statusMessage: null, client: <ref *1> Socket { connecting: false, _hadError: false, _parent: null, _host: null, _readableState: ReadableState { objectMode: false, highWaterMark: 16384, buffer: BufferList { head: null, tail: null, length: 0 }, length: 0, pipes: [], flowing: true, ended: false, endEmitted: false, reading: true, sync: false, needReadable: true, emittedReadable: false, readableListening: false, resumeScheduled: false, errorEmitted: false, emitClose: false, autoDestroy: false, destroyed: false, errored: null, closed: false, closeEmitted: false, defaultEncoding: 'utf8', awaitDrainWriters: null, multiAwaitDrain: false, readingMore: false, decoder: null, encoding: null, [Symbol(kPaused)]: false }, _events: [Object: null prototype] { end: [Array], timeout: [Function: socketOnTimeout], data: [Function: bound socketOnData], error: [Function: socketOnError], close: [Array], drain: [Function: bound socketOnDrain], resume: [Function: onSocketResume], pause: [Function: onSocketPause] }, _eventsCount: 8, _maxListeners: undefined, _writableState: WritableState { objectMode: false, highWaterMark: 16384, finalCalled: false, needDrain: false, ending: false, ended: false, finished: false, destroyed: false, decodeStrings: false, defaultEncoding: 'utf8', length: 0, writing: false, corked: 0, sync: true, bufferProcessing: false, onwrite: [Function: bound onwrite], writecb: null, writelen: 0, afterWriteTickInfo: null, buffered: [], bufferedIndex: 0, allBuffers: true, allNoop: true, pendingcb: 0, prefinished: false, errorEmitted: false, emitClose: false, autoDestroy: false, errored: null, closed: false, closeEmitted: false }, allowHalfOpen: true, _sockname: null, _pendingData: null, _pendingEncoding: '', server: Server { maxHeaderSize: undefined, insecureHTTPParser: undefined, _events: [Object: null prototype], _eventsCount: 2, _maxListeners: undefined, _connections: 2, _handle: [TCP], _usingWorkers: false, _workers: [], _unref: false, allowHalfOpen: true, pauseOnConnect: false, httpAllowHalfOpen: false, timeout: 0, keepAliveTimeout: 5000, maxHeadersCount: null, headersTimeout: 60000, requestTimeout: 0, _connectionKey: '6::::3000', [Symbol(IncomingMessage)]: [Function: IncomingMessage], [Symbol(ServerResponse)]: [Function: ServerResponse], [Symbol(kCapture)]: false, [Symbol(async_id_symbol)]: 2 }, _server: Server { maxHeaderSize: undefined, insecureHTTPParser: undefined, _events: [Object: null prototype], _eventsCount: 2, _maxListeners: undefined, _connections: 2, _handle: [TCP], _usingWorkers: false, _workers: [], _unref: false, allowHalfOpen: true, pauseOnConnect: false, httpAllowHalfOpen: false, timeout: 0, keepAliveTimeout: 5000, maxHeadersCount: null, headersTimeout: 60000, requestTimeout: 0, _connectionKey: '6::::3000', [Symbol(IncomingMessage)]: [Function: IncomingMessage], [Symbol(ServerResponse)]: [Function: ServerResponse], [Symbol(kCapture)]: false, [Symbol(async_id_symbol)]: 2 }, parser: HTTPParser { '0': [Function: bound setRequestTimeout], '1': [Function: parserOnHeaders], '2': [Function: parserOnHeadersComplete], '3': [Function: parserOnBody], '4': [Function: parserOnMessageComplete], '5': [Function: bound onParserExecute], '6': [Function: bound onParserTimeout], _headers: [], _url: '', socket: [Circular *1], incoming: [Circular *2], outgoing: null, maxHeaderPairs: 2000, _consumed: true, onIncoming: [Function: bound parserOnIncoming], [Symbol(resource_symbol)]: [HTTPServerAsyncResource] }, on: [Function: socketListenerWrap], addListener: [Function: socketListenerWrap], prependListener: [Function: socketListenerWrap], _paused: false, _httpMessage: ServerResponse { _events: [Object: null prototype], _eventsCount: 1, _maxListeners: undefined, outputData: [], outputSize: 0, writable: true, destroyed: false, _last: false, chunkedEncoding: false, shouldKeepAlive: true, _defaultKeepAlive: true, useChunkedEncodingByDefault: true, sendDate: true, _removedConnection: false, _removedContLen: false, _removedTE: false, _contentLength: null, _hasBody: true, _trailer: '', finished: false, _headerSent: false, socket: [Circular *1], _header: null, _keepAliveTimeout: 5000, _onPendingData: [Function: bound updateOutgoingData], _sent100: false, _expect_continue: false, [Symbol(kCapture)]: false, [Symbol(kNeedDrain)]: false, [Symbol(corked)]: 0, [Symbol(kOutHeaders)]: null }, [Symbol(async_id_symbol)]: 4, [Symbol(kHandle)]: TCP { reading: true, onconnection: null, _consumed: true, [Symbol(owner_symbol)]: [Circular *1] }, [Symbol(kSetNoDelay)]: false, [Symbol(lastWriteQueueSize)]: 0, [Symbol(timeout)]: null, [Symbol(kBuffer)]: null, [Symbol(kBufferCb)]: null, [Symbol(kBufferGen)]: null, [Symbol(kCapture)]: false, [Symbol(kBytesRead)]: 0, [Symbol(kBytesWritten)]: 0, [Symbol(RequestTimeout)]: undefined }, _consuming: false, _dumped: false, [Symbol(kCapture)]: false, [Symbol(RequestTimeout)]: undefined } |
Destructing request object:
|
1 2 3 4 5 6 7 8 9 10 11 12 13 14 15 16 17 18 19 |
const http = require('http'); const server = http.createServer((request, response) => { const { method, url, headers } = request; const responseBody = { headers, method, url, body: ["item1", "item2", "item3"] } if (request.method === "GET" && request.url === "/neki_slug") { response.statusCode = 200 response.setHeader("Content-Type", "application/json") response.write(JSON.stringify(responseBody)) response.end() } } ) server.listen(3000); |
Example response header:
|
1 2 3 4 5 6 7 8 9 10 11 12 13 14 15 16 17 |
200 OK Access-Control-Allow-Origin: * Connection: Keep-Alive Content-Encoding: gzip Content-Type: text/html; charset=utf-8 Date: Mon, 18 Jul 2016 16:06:00 GMT Etag: "c561c68d0ba92bbeb8b0f612a9199f722e3a621a" Keep-Alive: timeout=5, max=997 Last-Modified: Mon, 18 Jul 2016 02:36:04 GMT Server: Apache Set-Cookie: mykey=myvalue; expires=Mon, 17-Jul-2017 16:06:00 GMT; Max-Age=31449600; Path=/; secure Transfer-Encoding: chunked Vary: Cookie, Accept-Encoding X-Backend-Server: developer2.webapp.scl3.mozilla.com X-Cache-Info: not cacheable; meta data too large X-kuma-revision: 1085259 x-frame-options: DENY |
Example of buffer concat
|
1 2 3 4 5 6 7 8 9 10 11 12 13 14 15 16 17 18 19 20 21 22 23 24 25 26 27 28 29 30 31 32 33 34 35 36 37 38 39 40 41 42 43 44 |
const http = require('http'); http.createServer((request, response) => { const { headers, method, url } = request; if (method === "GET") { response.setHeader("Content-Type", "text/html") response.statusCode = 200 response.end(`<!doctype html> <html> <body> <form action="/" method="post" _lpchecked="1"> <p>Enter name:</p> <input type="text" name="fname"><br> <p>Enter age:</p> <input type="number" name="age"><br> <p>Choose a photo:</p> <input type="file" name="photo"><br><br> <button>Save</button> </form> </body> </html>`) } if (request.method === 'POST') { let body = []; request.on('error', (err) => { console.error(err); }).on('data', (chunk) => { body.push(chunk); }).on('end', () => { //The concat() method joins all buffer objects in an array into one buffer object. body = Buffer.concat(body).toString(); response.on('error', (err) => { console.error(err); }); response.statusCode = 200; response.setHeader('Content-Type', 'application/json'); const responseBody = { headers, method, url, body }; // Note: the 2 lines below could be replaced with this next one: response.end(JSON.stringify(responseBody)) response.write(JSON.stringify(responseBody)); response.end(); }); } }).listen(3000); |
Example
|
1 2 3 4 5 6 7 8 9 10 11 12 13 14 15 16 17 18 19 20 21 22 23 24 25 26 27 28 29 30 31 32 33 34 35 36 37 38 39 40 41 42 43 44 45 |
// Initial Request Url = http://localhost:3000" const http = require('http'); const { parse } = require('querystring'); const server = http.createServer((request, response) => { const { method, url } = request if (method === "GET" && url==="/") { response.setHeader("Content-Type", "text/html") response.statusCode = 200 return response.end(`<!doctype html> <html> <body> <form action="/message" method="post" _lpchecked="1"> <p>Unesi ime:</p> <input type="text" name="fname"><br> <p>Enter age:</p> <input type="number" name="age"><br> <p>Izaberi fotografiju:</p> <input type="file" name="photo"><br><br> <button>Save</button> </form> </body> </html> `) } if (method === 'POST' && url==="/message") { const FORM_URLENCODED = 'application/x-www-form-urlencoded'; if(request.headers['content-type'] === FORM_URLENCODED) { response.statusCode = 200; response.setHeader('Content-Type', 'application/json'); let body = ''; request.on('data', chunk => { body += chunk.toString(); }); request.on('end', () => { console.log( parse(body) ); return response.end('We have downloaded your submitted information'); }); } } } ) server.listen(3000); |