


Introduction
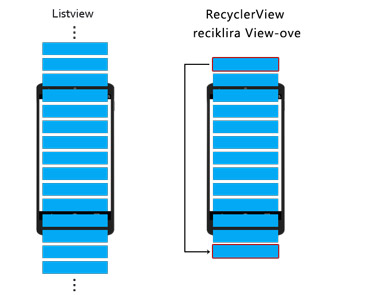
The adapter is a bridge between the data source (Array object, List object…) and the user interface. The role of the adapter object (implements the Adapter interface) is to read data from various data sources, and based on them fills View objects with members of a ViewGroup.
So far we have used ListView, but the recommendation is to use RecyclerView instead of listView, especially whenever you have data collections whose elements change during application execution in response to user activity or network events. RecyclerView is the successor of ListView and GridView, and is intended to efficiently render adapter-based views.
RecyclerView has its own adapter “RecyclerView.adapter” which implements the ViewHolder pattern, integrates “convertView” and has built-in methods that replace everything we did with “CustomArrayAdapter” and improves the efficiency of the display when scrolling the list.
RecyclerView.Adapter creation procedure
a) List data
In this example, one member of the list accepts more data, therefore it is necessary to create a class that will be a “model” for creating objects that store the data of one member of an AdapterView:
|
1 2 3 4 5 6 7 8 9 10 11 12 13 14 15 |
public class ExampleItem { private int mImageResource; private String mText1; private String mText2; public ExampleItem(int imageResource, String text1, String text2) { mImageResource = imageResource; mText1 = text1; mText2 = text2; } // geteri public int getImageResource() {return mImageResource;} public String getText1() {return mText1;} public String getText2() {return mText2;} } |
We have defined that through the constructor data is inserted for each member of the list, and therefore we can generate an initial list of data within the Activity (Fragment):
|
1 2 3 4 5 6 7 8 9 10 |
@Override protected void onCreate(Bundle savedInstanceState) { super.onCreate(savedInstanceState); setContentView(R.layout.activity_main); ArrayList<ExampleItem> exampleList = new ArrayList<>(); exampleList.add(new ExampleItem(R.drawable.nasmejan, "Pera", "Pancevo")); exampleList.add(new ExampleItem(R.drawable.ravnodusan, "Mika", "Belgrade")); exampleList.add(new ExampleItem(R.drawable.tuzan, "Steva", "Nis")); } |
b) Creating an AdapterView
It is necessary to define the place where the data list will be placed as part of the Activity (fragment) layout. This part is similar to a regular adapter, once it is created it uses a RecyclerView instead of a ListView.
|
1 2 3 4 5 6 7 8 9 10 11 12 13 14 15 16 |
<?xml version="1.0" encoding="utf-8"?> <android.support.constraint.ConstraintLayout xmlns:android="http://schemas.android.com/apk/res/android" xmlns:app="http://schemas.android.com/apk/res-auto" xmlns:tools="http://schemas.android.com/tools" android:layout_width="match_parent" android:layout_height="match_parent" tools:context=".MainActivity"> <android.support.v7.widget.RecyclerView android:id="@+id/recyclerView" android:layout_width="0dp" android:layout_height="0dp" android:scrollbars="vertical" app:layout_constraintEnd_toEndOf="parent" app:layout_constraintStart_toStartOf="parent"/> </android.support.constraint.ConstraintLayout> |
c) Creating a custom layout for one list element

Now it is necessary to create a custom layout, which will display multiple data unchanged for one element of the list. This part was not needed with the “regular” adapter, but now it is needed due to excess data, because we cannot use already predefined android layouts that accept only one data. In this example, we have three pieces of data for each row: an image and two texts.
NOTE:
Clicking on the row element of the RecyclerView does not produce the expected “ripple” effect. In order to activate such an effect, it is necessary to add an attribute to the root View of the row layout: android:background=”?android:attr/selectableItemBackground”
See the full sample code here.
d) Creating a Custom Adapter class
To create a customAdapter class, it is necessary that our class extends the RecyclerView.Adapter class. In order to define what type the data in the adapter is, we first need to create an internal static ViewHolder class inside the adapter that extends the RecyclerView.ViewHolder class. When we created a static ViewHolder, we need to define its own constructor method inside it.
|
1 2 3 4 5 |
public static class ExampleViewHolder extends RecyclerView.ViewHolder { public ExampleViewHolder(@NonNull View itemView) { super(itemView); } } |
Now we can insert the name of our ViewHolder andthus we define which type the adapter accepts.
|
1 |
public class ExampleAdapter extends RecyclerView.Adapter <ExampleAdapter.ExampleViewHolder> |
Only after this we can implement all the methods required by the RecyclerView.Adapter class, and define a constructor that accepts an ArrayList of data as a parameter. After all, the class should look like this:
|
1 2 3 4 5 6 7 8 9 10 11 12 13 14 15 16 17 18 19 20 21 22 23 24 25 |
public class ExampleAdapter extends RecyclerView.Adapter <ExampleAdapter.ExampleViewHolder>{ ArrayList<ExampleItem> mExampleList; public ExampleAdapter(ArrayList<ExampleItem> exampleList) { mExampleList = exampleList; } public static class ExampleViewHolder extends RecyclerView.ViewHolder { public ExampleViewHolder(@NonNull View itemView) { super(itemView); } } @NonNull @Override public ExampleViewHolder onCreateViewHolder(@NonNull ViewGroup viewGroup, int i) { return null; } @Override public void onBindViewHolder(@NonNull ExampleViewHolder exampleViewHolder, int i) { } @Override public int getItemCount() { return 0; } } |
Now that we have created the skeleton, we need to define the details.
Defining the ViewHolder class
First of all, we need to target all sub elements from the example_item.XML layout within the ViewHolder class:
|
1 2 3 4 5 6 7 8 9 10 11 12 |
public static class ExampleViewHolder extends RecyclerView.ViewHolder { public ImageView mImageView; public TextView mTextView1; public TextView mTextView2; // ViewHolder class constructor public ExampleViewHolder(@NonNull View itemView) { super(itemView); mImageView = itemView.findViewById(R.id.imageView); mTextView1 = itemView.findViewById(R.id.textView); mTextView2 = itemView.findViewById(R.id.textView2); } } |
Creating a ViewHolder instance
First, we need to parse the row layout into a View object, and this is done within the onCreateViewHolder() method, and then that object is passed as a parameter to the constructor of the new ViewHolder instance:
|
1 2 3 4 5 6 7 |
@NonNull @Override public ExampleViewHolder onCreateViewHolder(@NonNull ViewGroup viewGroup, int i) { View v = LayoutInflater.from(viewGroup.getContext()).inflate(R.layout.example_item, viewGroup, false); ExampleViewHolder evh = new ExampleViewHolder(v); return evh; } |
Inserting data into the list is done as part of the onBindViewHolder() method:
|
1 2 3 4 5 6 7 8 |
@Override public void onBindViewHolder(@NonNull ExampleViewHolder exampleViewHolder, int i) { ExampleItem currentItem = mExampleList.get(i); exampleViewHolder.mImageView.setImageResource(currentItem.getImageResource()); exampleViewHolder.mTextView1.setText(currentItem.getText1()); exampleViewHolder.mTextView2.setText(currentItem.getText2()); } |
Defining list size
The size of the list is defined in getItemCount()
|
1 2 3 4 |
@Override public int getItemCount() { return mExampleList.size(); } |
The entire Custom Adapter class now looks like this.
e) Inserting a RecyclerView into an Activity
The necessary things that define a RecyclerView are:
- View representing RecylerView
- RecyclerView.LayoutManager used to define the layout of elements within the RecyclerView (LinearLayoutManager, GridLayoutManager, StaggeredGridLayoutManager)
- Adapter used to populate the RecyclerView
NOTE:
RecyclerView is generally defined so that it does not depend on child elements, but mainly on the parent View in which it is placed, so its height and width generally do not change over time. But we have to emphasize this information so that Android would not check it every time when we insert a new or remove an existing element. For this reason, to improve the efficiency of the RecyclerView it is good to define our RecyclerView as having a fixed size with setHasFixedSize(true).
First of all, we need to define the fields that will later be available to other parts of the code:
|
1 2 3 |
private RecyclerView mRecyclerView; private RecyclerView.LayoutManager mLayoutManager; private ExampleAdapter mAdapter; |
In the onCreate() method we will set the created fields:
|
1 2 3 4 5 6 7 8 |
mRecyclerView = findViewById(R.id.recyclerView); mRecyclerView.setHasFixedSize(true); mLayoutManager = new LinearLayoutManager(this); mRecyclerView.setLayoutManager(mLayoutManager); mAdapter = new ExampleAdapter(exampleList); mRecyclerView.setAdapter(mAdapter); |
You can view the entire code contained in the Activity here.
NOTE
If we add or remove an element from the RecyclerView, after each addition it is necessary to notify the system that a change has occurred by calling the method notifyItemInserted(position):
|
1 |
mAdapter.notifyItemInserted(position); |
Also, after each removal of an existing element, the system should be notified that a change has occurred by calling the method notifyItemRemoved(position):
|
1 |
mAdapter.notifyItemRemoved(position); |
So the methods for inserting and removing elements would look like this:
|
1 2 3 4 5 6 7 8 9 |
public void insertItem(int position) { mExampleList.add(position, new ExampleItem(R.drawable.ic_android, "New Item At Position" + position, "This is Line 2")); mAdapter.notifyItemInserted(position); } public void removeItem(int position) { mExampleList.remove(position); mAdapter.notifyItemRemoved(position); } |
See all methods that can be used to notify the system about changes here.
f) Defining the click listener
-
- II way ViewHolder implements OnClickListener
Along with the standard ListView comes the onItemClick interface, however, it is not there with the RecyclerView, so we have to create our own interface and customClickListener (see how customListeners are created here).
Creating a new interface
First, we need to define a new interface and a callback method within our Custom Adapter:
|
1 2 3 |
public interface OnItemClickListener { void onItemClick(int position); } |
Setter method
And then we need to define the field and the setter method, by calling which in Activities we define the object that listens to the event:
|
1 2 3 4 5 |
private OnItemClickListener mListener; public void setOnItemClickListener(OnItemClickListener listener) { mListener = listener; } |
Triggering events
It is necessary to “trigger” the event by clicking on some element of the RecyclerView list that is defined in the ViewHolder class, and we will do this by calling the callback method of our interface:
|
1 |
listener.onItemClick(position); |
We will call this method when the “itemView” element is clicked (represented as a constructor method parameter). For this reason, the method call will be placed within the onClick() method:
|
1 2 3 4 5 6 7 8 9 10 11 |
itemView.setOnClickListener(new View.OnClickListener() { @Override public void onClick(View v) { if (listener != null) { int position = getAdapterPosition(); if (position != RecyclerView.NO_POSITION) { listener.onItemClick(position); } } } }); |
You must have noticed that android studio reports an error that it cannot find the listener variable since our class is static. To make this variable available, we’ll pass it as a parameter to the constructor function of the Custom ViewHolder class. Inserting a listener as a class parameter is the easiest to achieve if you mark the listener that is the problem in AndroidStudio and call the help menu with ALT + ENTER, where the option “Create parameter listener” is selected, after which Android Studio will do everything by itself.
So the whole ViewHolder class would now look like this
|
1 2 3 4 5 6 7 8 9 10 11 12 13 14 15 16 17 18 19 20 21 22 23 24 |
public static class ExampleViewHolder extends RecyclerView.ViewHolder { public ImageView mImageView; public TextView mTextView1; public TextView mTextView2; // ViewHolder class constructor public ExampleViewHolder(@NonNull View itemView, final OnItemClickListener listener) { super(itemView); mImageView = itemView.findViewById(R.id.imageView); mTextView1 = itemView.findViewById(R.id.textView); mTextView2 = itemView.findViewById(R.id.textView2); itemView.setOnClickListener(new View.OnClickListener() { @Override public void onClick(View v) { if (listener != null) { int position = getAdapterPosition(); if (position != RecyclerView.NO_POSITION) { listener.onItemClick(position); } } } }); } } |
NOTE:
Every time you click on an element of the list, we need to know which element was clicked, this is simply obtained using the method getAdapterPosition()
Defining the object that listens and the contents of the callback method
Within the Activity there is an object that implements the interface, which in our case is an instance of the “mAdapter” adapter itself. Then that object calls the setter method setOnItemClickListener() to define the object that listens to the event through the passed parameter. In our case it will be an anonymous object that implements the interface “on the fly”. We will define the action that should be performed after triggering the event by “overriding” its callback method onItemClick:
|
1 2 3 4 5 6 7 8 |
mAdapter.setOnItemClickListener(new ExampleAdapter.OnItemClickListener() { @Override public void onItemClick(int position) { // This is where the click action is defined ExampleItem item = mAdapter.mExampleList.get(position); Toast.makeText(MainActivity.this, "Kliknut element " + item.getText1(), Toast.LENGTH_SHORT).show(); } }); |
See the full code of Activity here.
This is the simpler way and everything is defined within the adapter class. First, our ViewHolder class needs to implement View.OnClickListener:
|
1 |
public static class ExampleViewHolder extends RecyclerView.ViewHolder implements View.OnClickListener |
And after that, AndroidStudio will report an error and require its callback method onClick() to be implemented as well. Within this method, the action that takes place when the event is triggered is defined, i.e. when a member of the list is clicked.
|
1 2 3 4 5 6 7 |
@Override public void onClick(View view) { // goes here reakcija na klik int position = getAdapterPosition(); ExampleItem item = mExampleList.get(position); Toast.makeText(view.getContext(), "Kliknut element je " + item.getText1(), Toast.LENGTH_SHORT).show(); } |
In order to define a listening object, we need to pass it as a parameter to the setOnClickListener() method in the ViewHolder constructor. In our case it’s the ViewHolder itself so we’ll pass “this”:
|
1 |
itemView.setOnClickListener(this); |
So the entire ViewHolder would look like this:
|
1 2 3 4 5 6 7 8 9 10 11 12 13 14 15 16 17 18 19 20 21 22 |
public class ExampleViewHolder extends RecyclerView.ViewHolder implements View.OnClickListener{ public ImageView mImageView; public TextView mTextView1; public TextView mTextView2; // ViewHolder class constructor public ExampleViewHolder(@NonNull View itemView) { super(itemView); mImageView = itemView.findViewById(R.id.imageView); mTextView1 = itemView.findViewById(R.id.textView); mTextView2 = itemView.findViewById(R.id.textView2); // We define a listener itemView.setOnClickListener(this); } @Override public void onClick(View view) { // goes here reakcija na klik int position = getAdapterPosition(); ExampleItem item = mExampleList.get(position); Toast.makeText(view.getContext(), "Kliknut element je " + item.getText1(), Toast.LENGTH_SHORT).show(); } } |
|
1 2 3 4 5 6 7 8 9 10 11 12 13 14 15 16 17 18 19 20 21 22 23 24 25 26 27 28 29 30 31 32 33 34 35 36 37 38 39 40 41 42 43 44 45 46 47 48 49 50 51 52 |
<?xml version="1.0" encoding="utf-8"?> <android.support.constraint.ConstraintLayout xmlns:android="http://schemas.android.com/apk/res/android" xmlns:app="http://schemas.android.com/apk/res-auto" xmlns:tools="http://schemas.android.com/tools" android:layout_width="match_parent" android:layout_height="wrap_content" android:background="?android:attr/selectableItemBackground"> <ImageView android:id="@+id/imageView" android:layout_width="60dp" android:layout_height="60dp" android:layout_marginStart="16dp" android:layout_marginTop="16dp" android:layout_marginBottom="16dp" app:layout_constraintBottom_toBottomOf="parent" app:layout_constraintStart_toStartOf="parent" app:layout_constraintTop_toTopOf="parent" app:srcCompat="@mipmap/ic_launcher" /> <TextView android:id="@+id/textView" android:layout_width="0dp" android:layout_height="wrap_content" android:layout_marginStart="8dp" android:layout_marginTop="16dp" android:layout_marginEnd="8dp" android:layout_toEndOf="@+id/imageView" android:text="Line 1" android:textColor="@android:color/black" android:textSize="20sp" android:textStyle="bold" app:layout_constraintEnd_toEndOf="parent" app:layout_constraintHorizontal_bias="0.0" app:layout_constraintStart_toEndOf="@+id/imageView" app:layout_constraintTop_toTopOf="parent" /> <TextView android:id="@+id/textView2" android:layout_width="0dp" android:layout_height="wrap_content" android:layout_marginStart="8dp" android:layout_marginTop="12dp" android:layout_marginEnd="8dp" android:layout_toEndOf="@+id/imageView" android:text="Line 2" android:textSize="15sp" app:layout_constraintEnd_toEndOf="parent" app:layout_constraintHorizontal_bias="0.003" app:layout_constraintStart_toEndOf="@+id/imageView" app:layout_constraintTop_toBottomOf="@+id/textView" /> </android.support.constraint.ConstraintLayout> |
|
1 2 3 4 5 6 7 8 9 10 11 12 13 14 15 16 17 18 19 20 21 22 23 24 25 26 27 28 29 30 31 32 33 34 35 36 37 38 39 40 |
public class ExampleAdapter extends RecyclerView.Adapter <ExampleAdapter.ExampleViewHolder>{ ArrayList<ExampleItem> mExampleList; public ExampleAdapter(ArrayList<ExampleItem> exampleList) { mExampleList = exampleList; } // ViewHolder public static class ExampleViewHolder extends RecyclerView.ViewHolder { public ImageView mImageView; public TextView mTextView1; public TextView mTextView2; // ViewHolder class constructor public ExampleViewHolder(@NonNull View itemView) { super(itemView); mImageView = itemView.findViewById(R.id.imageView); mTextView1 = itemView.findViewById(R.id.textView); mTextView2 = itemView.findViewById(R.id.textView2); } } @NonNull @Override public ExampleViewHolder onCreateViewHolder(@NonNull ViewGroup viewGroup, int i) { View v = LayoutInflater.from(viewGroup.getContext()).inflate(R.layout.example_item, viewGroup, false); ExampleViewHolder evh = new ExampleViewHolder(v); return evh; } @Override public void onBindViewHolder(@NonNull ExampleViewHolder exampleViewHolder, int i) { ExampleItem currentItem = mExampleList.get(i); exampleViewHolder.mImageView.setImageResource(currentItem.getImageResource()); exampleViewHolder.mTextView1.setText(currentItem.getText1()); exampleViewHolder.mTextView2.setText(currentItem.getText2()); } @Override public int getItemCount() { return mExampleList.size(); } } |
|
1 2 3 4 5 6 7 8 9 10 11 12 13 14 15 16 17 18 19 20 21 22 23 24 25 26 |
public class MainActivity extends AppCompatActivity { private RecyclerView mRecyclerView; private RecyclerView.LayoutManager mLayoutManager; private ExampleAdapter mAdapter; @Override protected void onCreate(Bundle savedInstanceState) { super.onCreate(savedInstanceState); setContentView(R.layout.activity_main); ArrayList<ExampleItem> exampleList = new ArrayList<>(); exampleList.add(new ExampleItem(R.drawable.nasmejan, "Pera", "Pancevo")); exampleList.add(new ExampleItem(R.drawable.ravnodusan, "Mika", "Belgrade")); exampleList.add(new ExampleItem(R.drawable.tuzan, "Steva", "Nis")); mRecyclerView = findViewById(R.id.recyclerView); mRecyclerView.setHasFixedSize(true); mLayoutManager = new LinearLayoutManager(this); mRecyclerView.setLayoutManager(mLayoutManager); mAdapter = new ExampleAdapter(exampleList); mRecyclerView.setAdapter(mAdapter); } } |
|
1 2 3 4 5 6 7 8 9 10 11 12 13 14 15 16 17 18 19 20 21 22 23 24 25 26 27 28 29 30 31 32 33 |
public class MainActivity extends AppCompatActivity { private RecyclerView mRecyclerView; private RecyclerView.LayoutManager mLayoutManager; private ExampleAdapter mAdapter; @Override protected void onCreate(Bundle savedInstanceState) { super.onCreate(savedInstanceState); setContentView(R.layout.activity_main); ArrayList<ExampleItem> exampleList = new ArrayList<>(); exampleList.add(new ExampleItem(R.drawable.nasmejan, "Pera", "Pancevo")); exampleList.add(new ExampleItem(R.drawable.ravnodusan, "Mika", "Belgrade")); exampleList.add(new ExampleItem(R.drawable.tuzan, "Steva", "Nis")); mRecyclerView = findViewById(R.id.recyclerView); mRecyclerView.setHasFixedSize(true); mLayoutManager = new LinearLayoutManager(this); mRecyclerView.setLayoutManager(mLayoutManager); mAdapter = new ExampleAdapter(exampleList); mRecyclerView.setAdapter(mAdapter); mAdapter.setOnItemClickListener(new ExampleAdapter.OnItemClickListener() { @Override public void onItemClick(int position) { ExampleItem item = mAdapter.mExampleList.get(position); Toast.makeText(MainActivity.this, "Kliknut element " + item.getText1(), Toast.LENGTH_SHORT).show(); } }); } } |