


Introduction

In the basic version of the adapter, only one String data is used, which is placed in one of the predefined android layouts with one TextView.
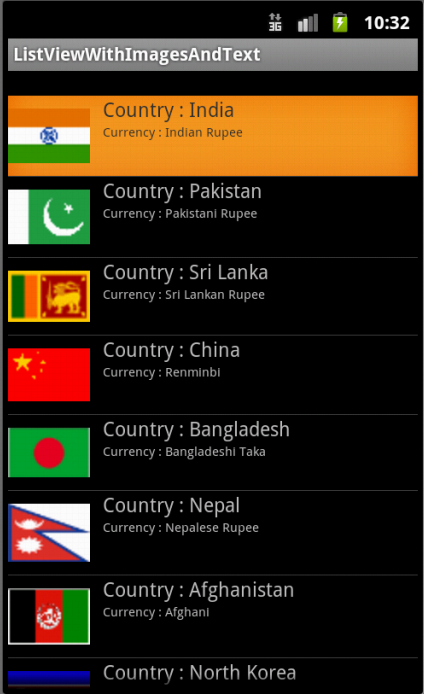
Custom adapter differs from “ordinary” in that one list element is presented with more data and it is necessary to define a “more complex layout” that would accept and display that data. Such a customLayout row list can contain multiple subViews and widgets: image, text data (arranged in their specific positions)…
Custom ArrayAdapter creation procedure
a) Custom model (accepts more data for one list member)
In this example, one member of the list contains two data, so it is necessary to create a class that will be a “model” for creating objects that store the data of one member of an AdapterView:
User.java
|
1 2 3 4 5 6 7 8 9 |
public class User { public String name; public String hometown; public User(String name, String hometown) { this.name = name; this.hometown = hometown; } } |
Now within the Activity (Fragment) we can define the initial array of data by creating new objects as follows:
Activity
|
1 2 3 4 5 6 7 8 9 10 11 |
User[] peopleList = new User[]{ new User("Pera", "Belgrade"), new User("Mika", "Pancevo"), new User("Zika", "Lozinica"), new User("Steva", "Smederevo"), new User("Rade", "Cacak"), new User("Jovan", "Beocin"), new User("Sima", "Barajevo"), new User("Dejan", "Prokuplje"), new User("Milan", "Niš") }; |
or to generate an ArrayList of User objects based on it:
|
1 2 3 4 |
final ArrayList listaLjudi = new ArrayList(); for (int i = 0; i < nizLjudi.length; ++i) { listaLjudi.add(nizLjudi[i]); } |
User.java
|
1 2 3 4 5 6 7 8 9 10 11 12 13 14 15 16 17 18 19 20 21 22 23 24 |
public class User { // Constructor that converts a JSON object into a Java class instance public User(JSONObject object){ try { this.name = object.getString("name"); this.hometown = object.getString("hometown"); } catch (JSONException e) { e.printStackTrace(); } } // A static factory method that converts an array of JSON objects into a list of objects, accessed with User.fromJson(jsonArray) public static ArrayList<User> fromJson(JSONArray jsonObjects) { ArrayList<User> users = new ArrayList<User>(); for (int i = 0; i < jsonObjects.length(); i++) { try { users.add(new User(jsonObjects.getJSONObject(i))); } catch (JSONException e) { e.printStackTrace(); } } return users; } } |
To generate data from JSON, we use the following code that converts JSON into an ArrayList of User objects:
Activity
|
1 2 3 |
JSONArray jsonArray = ...; ArrayList<User> newUsers = User.fromJson(jsonArray) adapter.addAll(newUsers); |
b) Creating an AdapterView
It is necessary to define the place where the data list will be placed as part of the Activity (fragment) layout. This part is the same as with a regular adapter, one ListView is created which will accept one custom row of each member.
activity_main.xml
|
1 2 3 4 5 6 7 8 9 10 11 12 13 14 15 |
<?xml version="1.0" encoding="utf-8"?> <android.support.constraint.ConstraintLayout xmlns:android="http://schemas.android.com/apk/res/android" android:layout_width="match_parent" android:layout_height="match_parent" android:background="@android:color/holo_orange_dark"> <LinearLayout android:layout_width="match_parent" android:layout_height="match_parent" android:orientation="vertical"> <ListView android:id="@+id/mojaLista" android:layout_width="match_parent" android:layout_height="match_parent" /> </LinearLayout> </android.support.constraint.ConstraintLayout> |
c) Creating a custom layout for one list element
Now it is necessary to create a custom layout, which will be used to display more data of one list element. This part was not needed with the “regular” adapter, but now it is needed due to excess data, because we cannot use already predefined android layouts that accept only one data.
item_user.xml
|
1 2 3 4 5 6 7 8 9 10 11 12 13 14 15 16 |
<?xml version="1.0" encoding="utf-8"?> <LinearLayout xmlns:android="http://schemas.android.com/apk/res/android" android:layout_width="match_parent" android:layout_height="match_parent" android:orientation="vertical"> <TextView android:id="@+id/tvName" android:layout_width="wrap_content" android:layout_height="wrap_content" android:text="Name" /> <TextView android:id="@+id/tvHome" android:layout_width="wrap_content" android:layout_height="wrap_content" android:text="HomeTown" /> </LinearLayout> |
d) Creating a Custom Adapter class
In the continuation of the application, we need to define the Adapter class on the basis of which a new adapter instance will be created as part of the Activity (Fragment). The entire process of converting a Java object into a View filled with data should be placed in this class.
We make custom adapter by creating a new class that extends the ArrayAdapter class. By extending the class, we get the getView() method, which we can “override” so that for each element of the list it takes data from the model and fills with it the previously defined Custom layout of the element.
Non-economical ArrayAdapter
This is an example of an ArrayAdapter that consumes a lot of resources when scrolling the screen, which is especially noticeable with large lists of data.
|
1 2 3 4 5 6 7 8 9 10 11 12 13 14 15 16 17 18 |
public class UsersAdapter extends ArrayAdapter<User> { public UsersAdapter(Context context, ArrayList<User> users) { super(context, 0, users); } @Override public View getView(int position, View convertView, ViewGroup parent) { View rowView = LayoutInflater.from(getContext()).inflate(R.layout.item_user, parent, false); // Popunjavanje custom layout-a sa podacima: TextView tvName = (TextView) rowView.findViewById(R.id.tvName); TextView tvHome = (TextView) rowView.findViewById(R.id.tvHome); tvName.setText(user.name); tvHome.setText(user.hometown); return rowView; } } |
All the shortcomings of this procedure, as well as the improved procedure itself, which solves those shortcomings, are shown in the following example.
Improved ArrayAdapter (with ViewHolder pattern applied)
The first thing we need to pay attention to is that in the NON-economical example, a new “rowView” is created every time the getView() method is called.
|
1 |
View rowView = LayoutInflater.from(getContext()).inflate(R.layout.item_user, parent, false); |
If our list has a large number of elements that cannot fit on one screen, with each new scrolling, new Views are generated (each View is 1-2kB), which constantly increases the memory load.
convertView
It is precisely because of this problem that Android passes the “convertView” parameter to the getVIew() method. This parameter is used to “store” a View in it (eg our single rowView), which we will use again and again later. To prevent “inflating always the same XML” (which is an expensive operation) for each new element of the list, we will save the once created View within the convertView variable.
|
1 2 3 |
if (convertView == null) { convertView = LayoutInflater.from(getContext()).inflate(R.layout.item_user, parent, false); } |
In the previous code, we check if there is already a saved View in the variable, and if there is none, we will create it (only the first time) as our rowView, because the convertView defined in this way will always be available to us as a parameter of the getView() method.
|
1 2 3 4 5 6 7 8 9 10 11 12 13 14 15 |
@Override public View getView(int position, View convertView, ViewGroup parent) { // Taking advantage of what android gives us with convertView: if (convertView == null) { convertView = LayoutInflater.from(getContext()).inflate(R.layout.user_item_row, parent, false); } TextView tvName = (TextView) convertView.findViewById(R.id.tvName); TextView tvHome = (TextView) convertView.findViewById(R.id.tvHome); // Popunjavanje custom layout-a sa podacima: tvName.setText(user.name); tvHome.setText(user.hometown); return convertView; } |
ViewHolder pattern
The next problem that occurs is the frequent calling of the findViewById() method for each subView of convertView. Frequent calls of the findViewById() method burden the system and reduce the performance of the application (especially if there is a lot of data).
To solve this problem, the so-called The “ViewHolder pattern” which relies on us already using convertView, and that we can simply target all of its subViews (just once) and thus avoid calling the findViewById() method all the time. Therefore, we create an inner static class which is often called ViewHolder.
|
1 2 3 4 |
private static class ViewHolder { TextView tvName; TextView tvHome; } |
We can associate the class members with the corresponding View by calling findViewById(), but note that we will do this only once and that is when we first define convertView:
|
1 2 3 4 5 6 7 8 9 10 11 12 13 |
ViewHolder rowViewHolder; if (convertView == null) { convertView = LayoutInflater.from(getContext()).inflate(R.layout.user_item_row, parent, false); rowViewHolder = new ViewHolder(); rowViewHolder.tvName = convertView.findViewById(R.id.tvName); rowViewHolder.tvHome = convertView.findViewById(R.id.tvHome); rowViewHolder.ivSlika = convertView.findViewById(R.id.ivSlika); convertView.setTag(rowViewHolder); } else { rowViewHolder = (ViewHolder) convertView.getTag(); } |
In the previous example, we also used the setTag() method to save the ViewHolder object if we had already created it once, and then we later called the getTag() method and thus got the saved object back.
Using the ViewHolder pattern accelerates the population of the ListView, and with it we get smooth and fast loading of items. Its implementation allows to avoid using the “expensive” method findViewById() within the adapter. Full custom adapter example:
|
1 2 3 4 5 6 7 8 9 10 11 12 13 14 15 16 17 18 19 20 21 22 23 24 25 26 27 28 29 30 31 32 33 34 35 |
public class UsersAdapter extends ArrayAdapter<User> { Context mContext; public UsersAdapter(Context context, ArrayList<User> users) { super(context, 0, users); } @Override public View getView(int position, View convertView, ViewGroup parent) { ViewHolder rowViewHolder; if (convertView == null) { convertView = LayoutInflater.from(getContext()).inflate(R.layout.user_item_row, parent, false); rowViewHolder = new ViewHolder(); rowViewHolder.tvName = convertView.findViewById(R.id.tvName); rowViewHolder.tvHome = convertView.findViewById(R.id.tvHome); convertView.setTag(rowViewHolder); } else { rowViewHolder = (ViewHolder) convertView.getTag(); } // Popunjavanje custom layout-a sa podacima: User user = getItem(position); rowViewHolder.tvName.setText(user.name); rowViewHolder.tvHome.setText(user.hometown); return convertView; } private static class ViewHolder { TextView tvName; TextView tvHome; } } |
|
1 2 3 4 5 6 7 8 9 10 11 12 13 14 15 16 17 18 19 20 21 22 23 24 25 26 27 28 29 30 31 32 33 34 35 36 37 38 39 40 41 42 43 44 45 46 47 48 49 50 51 52 |
<?xml version="1.0" encoding="utf-8"?> <android.support.constraint.ConstraintLayout xmlns:android="http://schemas.android.com/apk/res/android" xmlns:app="http://schemas.android.com/apk/res-auto" xmlns:tools="http://schemas.android.com/tools" android:layout_width="match_parent" android:layout_height="wrap_content" android:background="?android:attr/selectableItemBackground"> <ImageView android:id="@+id/imageView" android:layout_width="60dp" android:layout_height="60dp" android:layout_marginStart="16dp" android:layout_marginTop="16dp" android:layout_marginBottom="16dp" app:layout_constraintBottom_toBottomOf="parent" app:layout_constraintStart_toStartOf="parent" app:layout_constraintTop_toTopOf="parent" app:srcCompat="@mipmap/ic_launcher" /> <TextView android:id="@+id/textView" android:layout_width="0dp" android:layout_height="wrap_content" android:layout_marginStart="8dp" android:layout_marginTop="16dp" android:layout_marginEnd="8dp" android:layout_toEndOf="@+id/imageView" android:text="Line 1" android:textColor="@android:color/black" android:textSize="20sp" android:textStyle="bold" app:layout_constraintEnd_toEndOf="parent" app:layout_constraintHorizontal_bias="0.0" app:layout_constraintStart_toEndOf="@+id/imageView" app:layout_constraintTop_toTopOf="parent" /> <TextView android:id="@+id/textView2" android:layout_width="0dp" android:layout_height="wrap_content" android:layout_marginStart="8dp" android:layout_marginTop="12dp" android:layout_marginEnd="8dp" android:layout_toEndOf="@+id/imageView" android:text="Line 2" android:textSize="15sp" app:layout_constraintEnd_toEndOf="parent" app:layout_constraintHorizontal_bias="0.003" app:layout_constraintStart_toEndOf="@+id/imageView" app:layout_constraintTop_toBottomOf="@+id/textView" /> </android.support.constraint.ConstraintLayout> |
|
1 2 3 4 5 6 7 8 9 10 11 12 13 14 15 16 17 18 19 20 21 22 23 24 25 26 27 28 29 30 31 32 33 34 35 36 37 38 39 40 |
public class ExampleAdapter extends RecyclerView.Adapter <ExampleAdapter.ExampleViewHolder>{ ArrayList<ExampleItem> mExampleList; public ExampleAdapter(ArrayList<ExampleItem> exampleList) { mExampleList = exampleList; } // ViewHolder public static class ExampleViewHolder extends RecyclerView.ViewHolder { public ImageView mImageView; public TextView mTextView1; public TextView mTextView2; // ViewHolder class constructor public ExampleViewHolder(@NonNull View itemView) { super(itemView); mImageView = itemView.findViewById(R.id.imageView); mTextView1 = itemView.findViewById(R.id.textView); mTextView2 = itemView.findViewById(R.id.textView2); } } @NonNull @Override public ExampleViewHolder onCreateViewHolder(@NonNull ViewGroup viewGroup, int i) { View v = LayoutInflater.from(viewGroup.getContext()).inflate(R.layout.example_item, viewGroup, false); ExampleViewHolder evh = new ExampleViewHolder(v); return evh; } @Override public void onBindViewHolder(@NonNull ExampleViewHolder exampleViewHolder, int i) { ExampleItem currentItem = mExampleList.get(i); exampleViewHolder.mImageView.setImageResource(currentItem.getImageResource()); exampleViewHolder.mTextView1.setText(currentItem.getText1()); exampleViewHolder.mTextView2.setText(currentItem.getText2()); } @Override public int getItemCount() { return mExampleList.size(); } } |
|
1 2 3 4 5 6 7 8 9 10 11 12 13 14 15 16 17 18 19 20 21 22 23 24 25 26 |
public class MainActivity extends AppCompatActivity { private RecyclerView mRecyclerView; private RecyclerView.LayoutManager mLayoutManager; private ExampleAdapter mAdapter; @Override protected void onCreate(Bundle savedInstanceState) { super.onCreate(savedInstanceState); setContentView(R.layout.activity_main); ArrayList<ExampleItem> exampleList = new ArrayList<>(); exampleList.add(new ExampleItem(R.drawable.nasmejan, "Pera", "Pancevo")); exampleList.add(new ExampleItem(R.drawable.ravnodusan, "Mika", "Belgrade")); exampleList.add(new ExampleItem(R.drawable.tuzan, "Steva", "Nis")); mRecyclerView = findViewById(R.id.recyclerView); mRecyclerView.setHasFixedSize(true); mLayoutManager = new LinearLayoutManager(this); mRecyclerView.setLayoutManager(mLayoutManager); mAdapter = new ExampleAdapter(exampleList); mRecyclerView.setAdapter(mAdapter); } } |
|
1 2 3 4 5 6 7 8 9 10 11 12 13 14 15 16 17 18 19 20 21 22 23 24 25 26 27 28 29 30 31 32 |
public class MainActivity extends AppCompatActivity { private RecyclerView mRecyclerView; private RecyclerView.LayoutManager mLayoutManager; private ExampleAdapter mAdapter; @Override protected void onCreate(Bundle savedInstanceState) { super.onCreate(savedInstanceState); setContentView(R.layout.activity_main); ArrayList<ExampleItem> exampleList = new ArrayList<>(); exampleList.add(new ExampleItem(R.drawable.nasmejan, "Pera", "Pancevo")); exampleList.add(new ExampleItem(R.drawable.ravnodusan, "Mika", "Belgrade")); exampleList.add(new ExampleItem(R.drawable.tuzan, "Steva", "Nis")); mRecyclerView = findViewById(R.id.recyclerView); mRecyclerView.setHasFixedSize(true); mLayoutManager = new LinearLayoutManager(this); mRecyclerView.setLayoutManager(mLayoutManager); mAdapter = new ExampleAdapter(exampleList); mRecyclerView.setAdapter(mAdapter); mAdapter.setOnItemClickListener(new ExampleAdapter.OnItemClickListener() { @Override public void onItemClick(int position) { Toast.makeText(MainActivity.this, "Kliknut element sa pozicijom " + position, Toast.LENGTH_SHORT).show(); } }); } } |