


Introduction
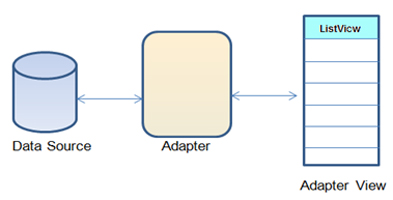
Adapter is a bridge between the data source (Array object, List object…) and the user interface. The role of the adapter object (implements the Adapter interface) is to read data from different data sources, and based on them fill View objects members of a ViewGroup.
ViewGroup: ListView, RecyclerView, GridView, Spinner, Gallery whose contents are populated using adapters are collectively called “AdapterView”.
Using the adapter as a mediator between the “model” (data) and the View is a variation of the MVC pattern called MVA (ModelViewAdapter). This means that the Model and the View never communicate with each other, but through the Adapter (which is really just an “event-driven Controller”). The advantage of this pattern is that the View does not have to know anything about the model, and in this way a better separation of responsibilities is achieved.

There are several different adapters, and their choice depends on the AdapterView it is used for. The simplest adapter is “ArrayAdapter”, which takes data in the form of “ArrayList” and fills with it the content of View elements that are part of the container (“ListView”, GridView, Spinner). The “RecyclerView” uses its specialized “RecyclerView.adapter”, while the “ViewPager” uses the “PagerAdapter”.
ArrayAdapter creation procedure
The basic default Android Adapter is an “ArrayAdapter” that uses some of the default layouts built into Android.
a) Defining the data to be displayed
First we need data to be stored in a View, ArrayAdapter has different constructors, and therefore can receive different types of data:
|
1 |
String[] nizPodataka = new String[] { "Pera", "Mika", "Zika", "Rada", "Deka", "Marko", "Darko", "Sima", "Mirko"}; |
|
1 2 3 4 5 6 7 8 9 10 |
listaPodataka = new ArrayList<String>(); listaPodataka.add("Pera"); listaPodataka.add("Mika"); listaPodataka.add("Zika"); listaPodataka.add("Rada"); listaPodataka.add("Deka"); listaPodataka.add("Marko"); listaPodataka.add("Darko"); listaPodataka.add("Sima"); listaPodataka.add("Mirko"); |
or
|
1 2 3 4 5 |
String[] nizPodataka = new String[] { "Pera", "Mika", "Zika", "Rada", "Deka", "Marko", "Darko", "Sima", "Mirko"}; final ArrayList<String> listaPodataka = new ArrayList<String>(); for (int i = 0; i < nizPodataka.length; ++i) { listaPodataka.add(nizPodataka[i]); } |
Right-click on res > values then select New > Values resource file and then select the name of the file, e.g. “people_names_array”
|
1 2 3 4 5 6 7 8 9 10 11 12 13 14 |
<?xml version="1.0" encoding="utf-8"?> <resources> <string-array name="imena_ljudi"> <item>Pera</item> <item>Mika</item> <item>Zika</item> <item>Rada</item> <item>Deka</item> <item>Marko</item> <item>Darko</item> <item>Sima</item> <item>Mirko</item> </string-array> </resources> |
This can be accessed later:
|
1 |
getResources().getStringArray(R.array.imena_ljudi); |
NOTE:
When the data is a static list then it is not necessary to use adapters, we can connect data (resource string-array) and View more simply and without using adapters just by using the View XML attribute: android:entries.
|
1 2 3 4 5 |
<ListView android:id="@+id/mojListView" android:layout_width="match_parent" android:layout_height="match_parent" android:entries="@array/imena_ljudi" /> |
b) Creating an AdapterView that should accept data
It has already been mentioned that AdapterView is actually a ViewGroup (ListView, RecyclerView…) whose content is filled with data with the help of an adapter, and it is necessary to define an AdapterView within XML.
Example
|
1 2 3 4 5 6 7 8 9 10 11 12 13 14 15 |
<?xml version="1.0" encoding="utf-8"?> <android.support.constraint.ConstraintLayout xmlns:android="http://schemas.android.com/apk/res/android" android:layout_width="match_parent" android:layout_height="match_parent" android:background="@android:color/holo_orange_dark"> <LinearLayout android:layout_width="match_parent" android:layout_height="match_parent" android:orientation="vertical"> <ListView android:id="@+id/mojaLista" android:layout_width="match_parent" android:layout_height="match_parent" /> </LinearLayout> </android.support.constraint.ConstraintLayout> |
NOTE:
If we extend the activity with ListActivity (or for fragments with ListFragment), then we don’t have to define any layout, because in that case the activity (fragment) already contains by default a ListView that can receive data as a root view. In addition, ListActivity and ListFragment also allow us to “override” (override) the onListItemClick() method and thus define the action that will be performed by clicking on one of the list members. See the unified code from the example here.
c) Creating an adapter instance
There are multiple “ArrayAdapter” constructors that can accept different data types, although a generalized constructor might look like this:
|
1 |
ArrayAdapter(Context context, int resource, nekaVrstaPodataka) |
Legend:
- Context
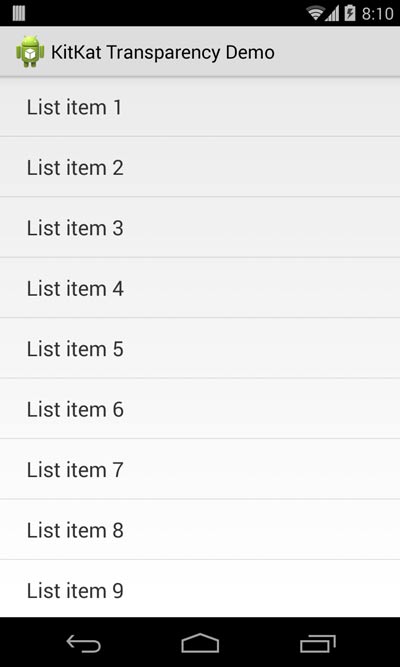
- Some predefined layout that comes with android (eg “R.layout.simple_list_item_1” see picture) or some custom layout. You can view the list of predefined layouts here.
- Data to be inserted yes (list, array…)
Example
ArrayAdapter requires that the array element type be declared as View (in this example as String).
|
1 |
ArrayAdapter<String> mojAdapter = new ArrayAdapter<String>(this,android.R.layout.simple_list_item_1, myStringArray); |
NOTE:
ArrayAdapter by default in the background for each array item calls the “toString()” method and thus generates a TextView into which it puts the content of the array member. If we want a more complicated layout that has more elements (eg ImageView), then we need to create a custom ArrayAdapter which will be explained in another article.
In addition to this way of creating adapters where the method constructor is used, we can also use its method to create adapters
method createFromResource(). See all ArrayAdapter and RecyclerView.adapter methods here.
d) Connecting adapter instance to AdapterView
Connecting the adapter towith the corresponding View, it is done with the method setAdapter() (setListAdapter() in “ListActivity”).
|
1 2 |
ListView nekiListView = (ListView) findViewById(R.id.nekiListview); nekiListView.setAdapter(mojAdapter); |
With this, we have enabled the adapter to pick up data from a resource and insert it as a String into each AdapterView element that is styled with the selected predefined android layout (in the example: “android.R.layout.simple_list_item_1”)
f) Defining the click listener
In order to activate the action after clicking on one of the list elements, it is necessary to implement the AdapterView.OnItemClickListener interface and override the onItemClick() callback method. The method accepts four parameters, the first of which represents the parent view (in this example ListView).
|
1 2 3 4 5 6 7 |
mojListView.setOnItemClickListener(new AdapterView.OnItemClickListener() { @Override public void onItemClick(AdapterView<?> parent, View view, int position, long id) { String poruka = "Kliknut je redni broj #" + i + " sa imenom " + parent.getItemAtPosition(position).toString(); Toast.makeText(MainActivity.this, poruka, Toast.LENGTH_SHORT).show(); } }); |
See the unified code from the example here.
List of predefined layouts within android.
- activity_list_item
- browser_link_context_header
- expandable_list_content
- list_content
- preference_category
- select_dialog_item
- select_dialog_multichoice
- select_dialog_singlechoice
- simple_dropdown_item_1line
- simple_expandable_list_item_1
- simple_expandable_list_item_2
- simple_gallery_item
- simple_list_item_1
- simple_list_item_2
- simple_list_item_activated_1
- simple_list_item_activated_2
- simple_list_item_checked
- simple_list_item_multiple_choice
- simple_list_item_single_choice
- simple_selectable_list_item
- simple_spinner_dropdown_item
- simple_spinner_item
- test_list_item
- two_line_list_item
These layouts are accessed with R.layout.nazivLayouta and their XML can be viewed here.
ArrayAdapter methods
Methods of RecyclerView.Adapter
- bindViewHolder
- createViewHolder
- getItemCount
- getItemId
- getItemViewType
- hasObservers
- hasStableIds
- notifyDataSetChanged
- notifyItemChanged
- notifyItemChanged
- notifyItemInserted
- notifyItemMoved
- notifyItemRangeChanged
- notifyItemRangeChanged
- notifyItemRangeInserted
- notifyItemRangeRemoved
- notifyItemRemoved
- onAttachedToRecyclerView
- onBindViewHolder
- onBindViewHolder
- onCreateViewHolder
- onDetachedFromRecyclerView
- onFailedToRecycleView
- onViewAttachedToWindow
- onViewDetachedFromWindow
- onViewRecycled
- registerAdapterDataObserver
- setHasStableIds
- unregisterAdapterDataObserver
|
1 2 3 4 5 6 7 8 9 10 11 12 13 14 15 16 17 18 19 20 21 22 |
public class MainActivity extends AppCompatActivity { ListView mojListView; @Override protected void onCreate(Bundle savedInstanceState) { super.onCreate(savedInstanceState); setContentView(R.layout.activity_main); mojListView = findViewById(R.id.mojListView); ArrayAdapter mojAdapter = new ArrayAdapter<>(this, android.R.layout.simple_list_item_1, getResources().getStringArray(R.array.imena_ljudi)); mojListView.setAdapter(mojAdapter); mojListView.setOnItemClickListener(new AdapterView.OnItemClickListener() { @Override public void onItemClick(AdapterView<?> adapterView, View view, int i, long l) { String poruka = "Kliknut je redni broj #" + i + " sa imenom " + adapterView.getItemAtPosition(i).toString(); Toast.makeText(MainActivity.this, poruka, Toast.LENGTH_SHORT).show(); } }); } } |
|
1 2 3 4 5 6 7 8 9 10 11 12 13 14 15 16 |
public class MyListFragment extends ListFragment { @Override public void onActivityCreated(Bundle savedInstanceState) { super.onActivityCreated(savedInstanceState); // There is NO part of this // setContentView(R.layout.activity_main); // mojListView = findViewById(R.id.mojListView); ArrayAdapter mojAdapter = new ArrayAdapter<>(getActivity(), android.R.layout.simple_list_item_1, getResources().getStringArray(R.array.imena_ljudi)); mojListView.setAdapter(mojAdapter); } @Override public void onListItemClick(ListView l, View v, int position, long id) { // Action on click } } |