



Introduction
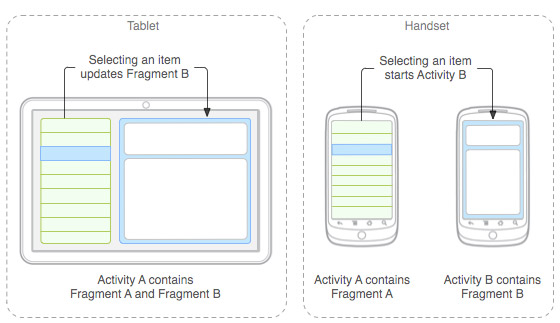
A fragment is a modular part of an activity, which has its own life cycle, receives its own input events, you can add or remove it while the activity is running. A fragment unifies the View and logic so that it can be easily reused within one or more different activities. There can be more than one fragment in activities so that each fragment can represent a View within one activity.
The advantage of an architecture that uses fragments is that fragments allow us to reuse code, with a simple process of creating different views for tablets (landscape) and mobile devices.
Communication between two fragments is quite complicated and can be done in two ways:
- Via shared activity using the listener pattern (explained in the article: “Creating custom listeners in Android”)
- Using a shared ViewModel (explained in the article “Communication between fragments using ViewModel”)
In order to be able to use the method within the fragment
Fragment vs. Activity
In applications that use fragments, a part of activity responsibilities is delegated to fragments, so according to this division, the responsibilities that remain in the activity would be as follows:
- To contain navigation to other activities via an intent or navigation component (“NavigationDrawer”,“ViewPager”…)
- To hide and show fragments (using fragment manager)
- To receive data from other activities (intent)
- To communicate with fragments and mediate communication between them
While fragments undertake to:
- Show appropriate content
- Event handling
- Starting a network request
- Retrieving and storing data
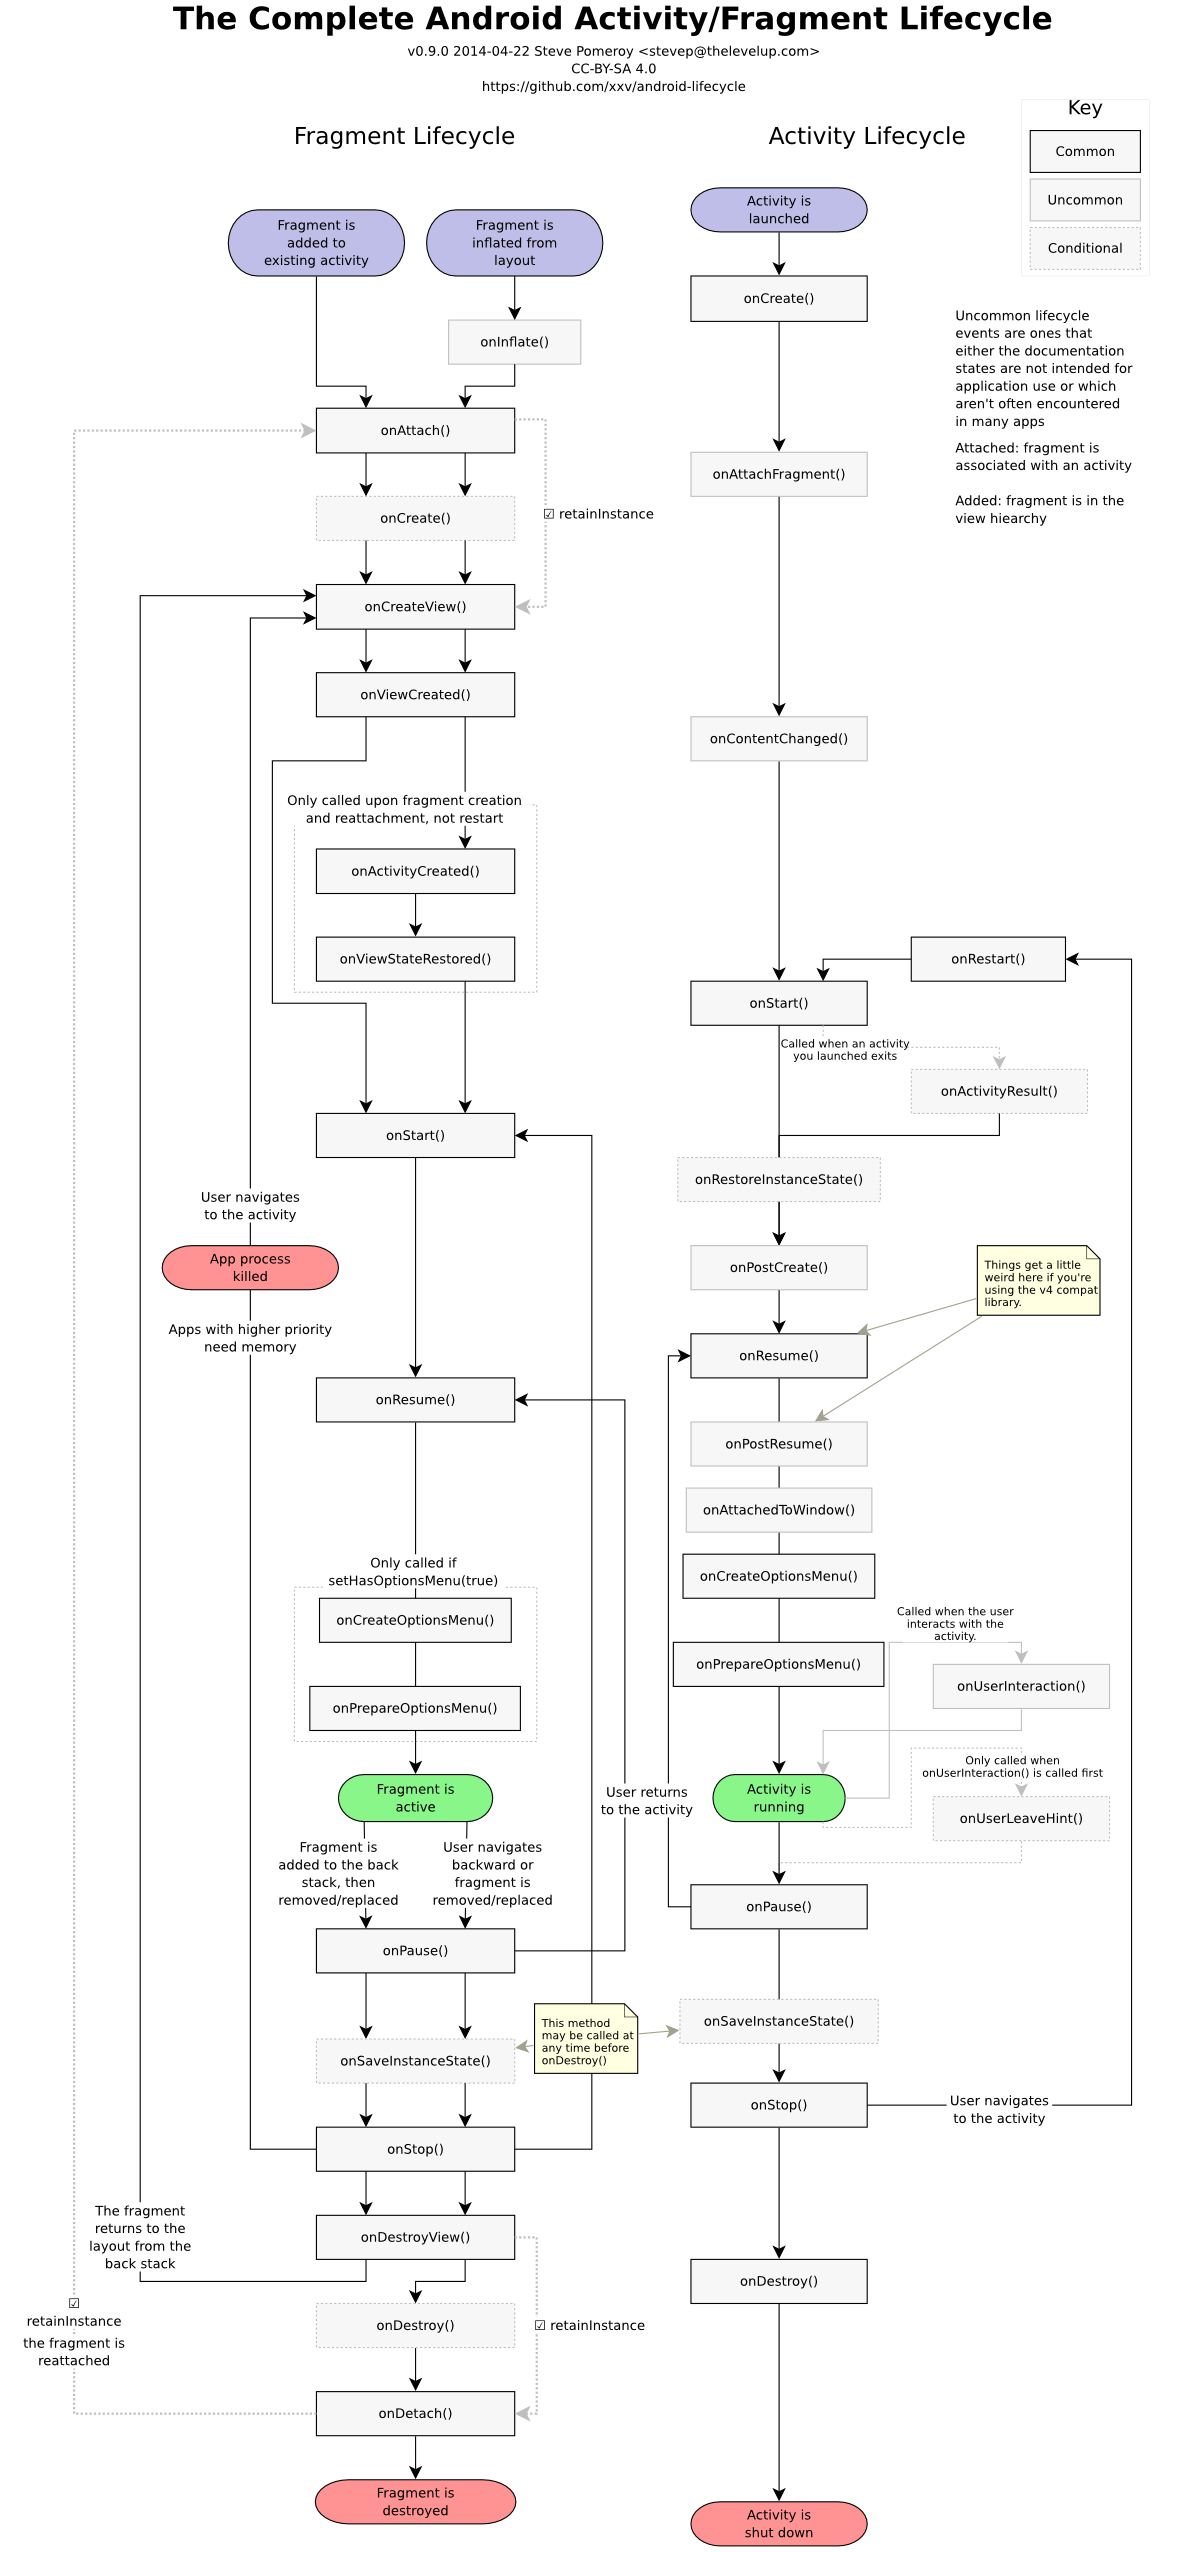
The life cycle of a fragment is directly influenced by the life cycle of an activity. When an activity is paused, then all fragments in it are also paused, and when an activity is destroyed, then all its fragments are also destroyed. However, while the activity is “live”, we can manipulate each fragment independently. You can view a detailed overview of lifecycle fragments and activities here.
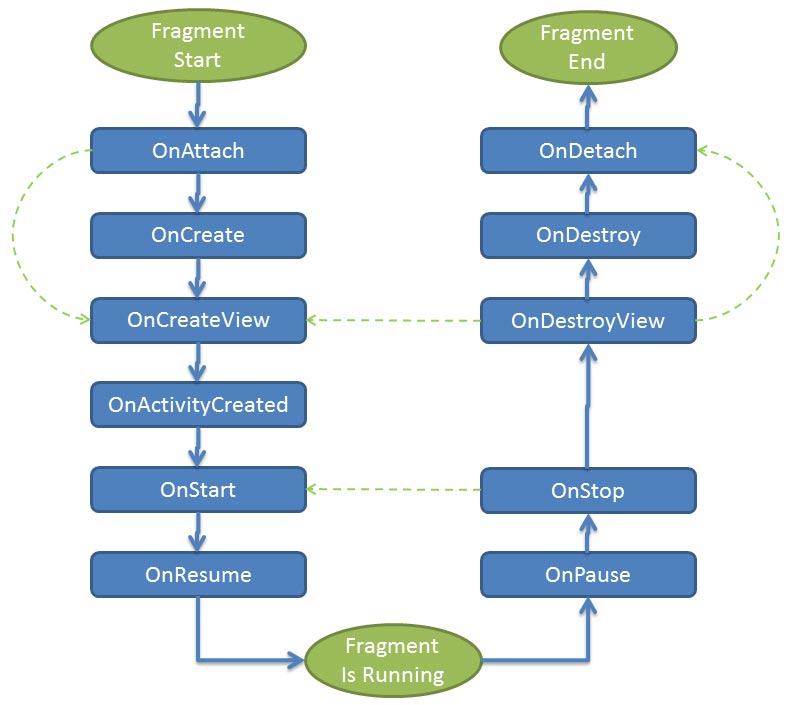
NOTE:
When implementing a fragment lifecycle method you should always call the superclass (eg super.onStart();):
Example
|
1 2 3 4 5 |
@Override public void onStart() { super.onStart(); // our code } |
Creating fragments
Extending fragment class
Creating a fragment consists of creating the appropriate class responsible for the logic and adding the appropriate layout to it. The class responsible for the logic mustextends one of the following classes:
- Fragment is the main class while the rest are its subclasses (see what the boilerplate code generated by android studio looks like).
- DialogFragment – A fragment that displays a dialog window, floating on top of its activity window. This is typically used to display a warning dialog, a confirmation dialog, or to request information from the user in a frame without having to switch to another activity, allowing the user to return to the previous fragment.
- PreferenceFragmentCompat is used to create a settings list for our application from where users have the ability to change the functionality and behavior of the application. (read more in the documentation).
- ListFragment is used to display a list of some data and has an already implemented event listener on the click of a member from the list, so we only need to define the onListItemClick() method (primer).
Linking a fragment to its layout
To provide a layout for a fragment, you need to implement the “onCreateView()” method, which Android calls when it’s time for the fragment to draw its layout. The implementation of this method must return a view that is the root layout of your fragment. Connecting the fragment class and its view is done using the inflate() method as part of the onCreateView‘s lifecycle method:
|
1 2 3 4 5 6 7 |
public static class NekiFragment extends Fragment { @Override public View onCreateView(LayoutInflater inflater, ViewGroup container,Bundle savedInstanceState) { // Inflate the layout for this fragment return inflater.inflate(R.layout.example_fragment, container, false); } } |
See more about the process of inserting a view from xml into the “Layout inflation” class in the article “Converting XML resources to a View object”.
In addition to this method, we can create a fragment based on the Android template called Fragment(Blank), which includes a lot of prepared boilerplate code. See more about this here.
Targeting elements within the layout
In order to be able to use the findViewById() method within the fragment, we need to target its layout first. We can do it in two ways, depending on where we need it in the code:
-
Within the onCreate() and onCreateView() methods, we first need to inflate the layout, after which we can use the findViewById() method:
12345678910@Overridepublic View onCreateView(LayoutInflater inflater, ViewGroup container, Bundle savedInstanceState) {rootView =inflater.inflate(R.layout.fragment_fragment_d, container, false);TextView text1 = rootView.findViewById(R.id.tvParametar1);TextView text2 = rootView.findViewById(R.id.tvParametar2);return rootView;}A fragment, unlike an activity, is not a subclass of the Context class, which means it doesn’t have access to global information about the application environment. This means that the fragment cannot use this to get the context. For this reason, as part of the onCreateView() method, the LayoutInflater object that has access to the context is passed as a parameter, so if we need a context, we can use it inflater.getContext().
-
Within the onViewCreated() method, we target the fragment’s layout with the getView() method. This method is available when we extend our class with the Fragment class and can be called only afterview creation, and therefore we cannot use it inside the onCreate() or onCreateView() method.
1234@Overridepublic void onViewCreated(View view, @Nullable Bundle savedInstanceState) {TextView title = (TextVIew) getView().findViewById(R.id.nekiId);}
Fragment embedding in activities
An activity containing a fragment must extend either FragmentActivity or its subclass AppCompatActivity. We can add fragments to the activity in two ways:
- a) Static insertion of fragments directly into the layout activity
- b) Programmed fragment insertion in an existing ViewGroup
a) Static insertion of a fragment directly into the layout activity
Static insertion of a fragment into an activity implies that the fragment is inserted into the layout of the activity as a view.
|
1 2 3 4 5 6 7 8 9 10 11 12 13 14 15 16 |
<?xml version="1.0" encoding="utf-8"?> <LinearLayout xmlns:android="http://schemas.android.com/apk/res/android" android:orientation="horizontal" android:layout_width="match_parent" android:layout_height="match_parent"> <fragment android:name="com.example.FragmentA" android:id="@+id/list" android:layout_weight="1" android:layout_width="0dp" android:layout_height="match_parent" /> <fragment android:name="com.example.FragmentB" android:id="@+id/viewer" android:layout_weight="2" android:layout_width="0dp" android:layout_height="match_parent" /> </LinearLayout> |
The fragment inserted in this way must have a defined id in the XML, because it is targeted in the activity using the method findFragmentById():
|
1 2 3 4 5 6 7 |
@Override public void onCreate(Bundle savedInstanceState) { super.onCreate(savedInstanceState); if (savedInstanceState == null) { NekiFragment nekiFragment = (NekiFragment)getSupportFragmentManager().findFragmentById(R.id.nekiFragment); } } |
When we have a reference to a fragment, we can call its public methods or properties.
b) Programmed insertion of fragments into the activity
The procedure for programmatically inserting a fragment into an activity is as follows:
1.) Creating fragment containers in XML
If your activity allows fragments to be removed and replaced, you should add the initial fragment (called fragmentContainer) to “onCreate()”. That container is used so that we can insert another fragment into it later.
|
1 2 3 4 |
<FrameLayout xmlns:android="http://schemas.android.com/apk/res/android" android:id="@+id/fragment_container" android:layout_width="match_parent" android:layout_height="match_parent" /> |
2.) Creation of fragmentManager
Fragment manager is instantiated by calling method getSupportFragmentManager()
|
1 |
FragmentManager fragmentManager = getSupportFragmentManager(); |
Fragment manager
Fragment manager is an object responsible for working with fragments for navigation between them as well as referencing fragments within the activity:
3.) Creating a fragment instance
Creating a fragment instance is by default using the new operator:
|
1 |
NekiFragment nekiFragment = new NekiFragment(); |
If we want to pass some data during instantiation, then they must be defined within the constructor method:
|
1 2 3 4 5 |
public NekiFragment(int nekiBroj) { Bundle args = new Bundle(); args.putInt("nameIntArgument", nekiBroj); setArguments(args); } |
Then we pass them as a parameter:
|
1 |
NekiFragment nekiFragment = new NekiFragment(nekiBroj); |
It is recommended to use the so-called newInstance approach, when a factory method is defined within the fragment, which is used to instantiate the fragment:
|
1 2 3 4 5 6 7 8 9 10 |
public static NekiFragment newInstance(int nekiBroj, string nekiTekst) { NekiFragment myFragment = new NekiFragment(); Bundle args = new Bundle(); args.putInt("nameIntArgument", nekiBroj); args.putString("nameStringArgument", nekiTekst); myFragment.setArguments(args); return myFragment; } |
Later in the fragment within the onCreate() method, we can request the data generated when the fragment is instantiated via the argument name:
|
1 2 |
getArguments().getInt("nameIntArgument", 0); getArguments().getString("nameStringArgument", ""); |
The second argument in the getter is the default value in case it doesn’t find an argument.
4.) Performing some of the transactions with fragments (add, remove, replace)
There is an API for working with fragments in an activity (add, remove, or replace a fragment) and it is called FragmentTransaction. We get the FragmentTransaction instance using fragmentManager.
|
1 |
FragmentTransaction fragmentTransaction = fragmentManager.beginTransaction(); |
One of the methods that FragmentTransaction can perform is add(). This method serves to insert our fragment into a ViewGroup (container). That ViewGroup is defined through the first parameter, while the fragment we add is defined through the second parameter, and through the third parameter we define the TAG that will mark the added fragment (based on the tag, we can later target it with fragmentManager.findFragmentByTag(“TAGFRAGMENTA”);).
|
1 |
fragmentTransaction.add(R.id.fragment_container, nekiFragment, "TAGFRAGMENTA"); |
In order to return to the previous state by clicking the “back” button (that is, not to close the activity, which is the default), we need to add our fragment to the stack, the so-called “backStack” with the method addToBackStack().
|
1 |
transaction.addToBackStack("TAGFRAGMENTA"); |
After defining all the commands (there can be more than one), it is necessary to confirm the action (commit), after which they will actually be executed:
|
1 |
fragmentTransaction.commit(); |
Actions that we have committed are not executed immediately, but are put on hold for execution on the main thread. Actions will be performed only when the thread is ready. See examples of transactions here.
Targeting fragment from activity
To target the fragment in the activity frame that was inserted in this way, the findFragmentByTag() method is used, which is passed the TAG parameter (defined through the third parameter of the replace() method).
|
1 2 3 4 5 6 7 8 9 10 11 12 13 14 |
@Override public void onCreate(Bundle savedInstanceState) { super.onCreate(savedInstanceState); if (savedInstanceState == null) { // Dynamically adding fragments to the frame container getSupportFragmentManager().beginTransaction(). replace(R.id.flContainer, new NekiFragment(), "SOME MARKED A FRAGMENT"). commit(); // Now we can search for the fragment via that TAG NekiFragment nekiFragment = (NekiFragment) getSupportFragmentManager().findFragmentByTag("SOME MARKED A FRAGMENT"); } } |
Navigation between fragments can be defined within the activity using only FragmentManager, however nothing prevents us from using one of the following approaches:
Creating from the preparatory boilerplate “Fragment(Blank)”
Factory static method newInstance() is used when instantiating a fragment within an activity and allows easy passing of parameters when instantiating a fragment:
|
1 2 3 4 5 6 7 8 9 10 11 12 13 14 15 16 17 18 19 20 21 22 23 24 25 26 |
// TODO: Rename parameter arguments, choose names that match private static final String ARG_PARAM1 = "param1"; private static final String ARG_PARAM2 = "param2"; // TODO: Rename and change types of parameters private String mParam1; private int mParam2; // TODO: Rename and change types and number of parameters public static FragmentD newInstance(String param1, int param2) { FragmentD fragment = new FragmentD(); Bundle args = new Bundle(); args.putString(ARG_PARAM1, param1); args.putInt(ARG_PARAM2, param2); fragment.setArguments(args); return fragment; } @Override public void onCreate(Bundle savedInstanceState) { super.onCreate(savedInstanceState); if (getArguments() != null) { mParam1 = getArguments().getString(ARG_PARAM1); mParam2 = getArguments().getInt(ARG_PARAM2); } } |
Now within the fragment we can use the passed parameters using the variables mParam1 and mParam2 and the Fragment instantiation in the activity is done with the following code:
|
1 |
Fragment fragment = NekiFragment.newInstance("Dragoljub", 45); |
NOTE:
If a fragment is a subclass of ListFragment, it returns a ListView in the onCreateView() method by default, so there is no need to implement the part related to connecting the logic to the layout unless we use a custom layout.
As part of the boilerplate code comes a part related to CustomListener which are used to pass data from the fragment to the activity (another fragment).
|
1 2 3 4 5 6 7 8 9 10 11 12 13 14 15 16 17 18 19 20 21 22 23 24 25 26 27 28 29 30 31 |
// Interfejs public interface OnFragmentInteractionListener { // TODO: Update argument type and name void onFragmentInteraction(Uri uri); } private OnFragmentInteractionListener mListener; // Examples of event triggers (can be deleted and adapted to your task // TODO: Rename method, update argument and hook method into UI event public void onButtonPressed(Uri uri) { if (mListener != null) { mListener.onFragmentInteraction(uri); } } //Setovanje listenera u okviru aktivnosti i obezbedjivanje da aktivnost mora da implementira interfejs @Override public void onAttach(Context context) { super.onAttach(context); if (context instanceof OnFragmentInteractionListener) { mListener = (OnFragmentInteractionListener) context; } else { throw new RuntimeException(context.toString() + " must implement OnFragmentInteractionListener"); } } @Override public void onDetach() { super.onDetach(); mListener = null; } |
See more about custom listeners in the article “Creating custom listeners”.
Example – ListFragment
|
1 2 3 4 5 6 7 8 9 10 11 12 13 14 15 16 17 18 19 20 |
public class MyListFragment extends ListFragment implements OnItemClickListener { @Override public View onCreateView(LayoutInflater inflater,ViewGroup container, Bundle savedInstanceState) { View view = inflater.inflate(R.layout.list_fragment, container, false); return view; } @Override public void onActivityCreated(Bundle savedInstanceState) { super.onActivityCreated(savedInstanceState); ArrayAdapter adapter = ArrayAdapter.createFromResource(getActivity(), R.array.Planets, android.R.layout.simple_list_item_1); setListAdapter(adapter); getListView().setOnItemClickListener(this); } @Override public void onItemClick(AdapterView<?> parent, View view, int position,long id) { Toast.makeText(getActivity(), "Item: " + position, Toast.LENGTH_SHORT).show(); } } |
Example
This example shows the definition of the initial fragment in the activity. In the empty container tag, we add a new view, our fragment.
|
1 2 3 4 5 6 7 8 9 10 11 |
@Override protected void onCreate(Bundle savedInstanceState) { super.onCreate(savedInstanceState); setContentView(R.layout.activity_main); FragmentManager manager = getSupportFragmentManager(); FragmentTransaction transaction = manager.beginTransaction(); Fragment fragmentC = new FragmentC(); transaction.add(R.id.kontejner, fragmentC, "C"); transaction.commit(); } |
Example
In this example, calling the showFragmentA method replaces the fragment
|
1 2 3 4 5 6 7 |
public void showFragmentA (View view){ Fragment fragmentA = new FragmentA(); transaction = manager.beginTransaction(); transaction.replace(R.id.kontejner, fragmentA, "A"); transaction.addToBackStack("A"); transaction.commit(); } |
|
1 2 3 4 5 6 7 8 9 10 11 12 13 14 15 16 17 18 19 20 21 22 23 24 25 26 27 28 29 30 31 32 33 34 35 36 37 38 39 40 41 42 43 44 45 46 47 48 49 50 51 52 53 54 55 56 57 58 59 60 61 62 63 64 65 66 67 68 69 70 71 72 73 74 75 76 77 78 79 80 81 82 83 84 85 86 87 88 89 90 91 92 93 94 95 96 97 98 99 100 101 102 |
import android.content.Context; import android.net.Uri; import android.os.Bundle; import android.support.v4.app.Fragment; import android.view.LayoutInflater; import android.view.View; import android.view.ViewGroup; /** * A simple {@link Fragment} subclass. * Activities that contain this fragment must implement the * {@link BlankFragmentA.OnFragmentInteractionListener} interface * to handle interaction events. * Use the {@link BlankFragmentA#newInstance} factory method to * create an instance of this fragment. */ public class BlankFragmentA extends Fragment { // TODO: Rename parameter arguments, choose names that match // the fragment initialization parameters, e.g. ARG_ITEM_NUMBER private static final String ARG_PARAM1 = "param1"; private static final String ARG_PARAM2 = "param2"; // TODO: Rename and change types of parameters private String mParam1; private String mParam2; private OnFragmentInteractionListener mListener; public BlankFragmentA() { // Required empty public constructor } /** * Use this factory method to create a new instance of * this fragment using the provided parameters. * * @param param1 Parameter 1. * @param param2 Parameter 2. * @return A new instance of fragment BlankFragmentA. */ // TODO: Rename and change types and number of parameters public static BlankFragmentA newInstance(String param1, String param2) { BlankFragmentA fragment = new BlankFragmentA(); Bundle args = new Bundle(); args.putString(ARG_PARAM1, param1); args.putString(ARG_PARAM2, param2); fragment.setArguments(args); return fragment; } @Override public void onCreate(Bundle savedInstanceState) { super.onCreate(savedInstanceState); if (getArguments() != null) { mParam1 = getArguments().getString(ARG_PARAM1); mParam2 = getArguments().getString(ARG_PARAM2); } } @Override public View onCreateView(LayoutInflater inflater, ViewGroup container, Bundle savedInstanceState) { // Inflate the layout for this fragment return inflater.inflate(R.layout.fragment_blank, container, false); } // TODO: Rename method, update argument and hook method into UI event public void onButtonPressed(Uri uri) { if (mListener != null) { mListener.onFragmentInteraction(uri); } } @Override public void onAttach(Context context) { super.onAttach(context); if (context instanceof OnFragmentInteractionListener) { mListener = (OnFragmentInteractionListener) context; } else { throw new RuntimeException(context.toString() + " must implement OnFragmentInteractionListener"); } } @Override public void onDetach() { super.onDetach(); mListener = null; } /** * This interface must be implemented by activities that contain this * fragment to allow an interaction in this fragment to be communicated * to the activity and potentially other fragments contained in that * activity. */ public interface OnFragmentInteractionListener { // TODO: Update argument type and name void onFragmentInteraction(Uri uri); } } |
Back Stack
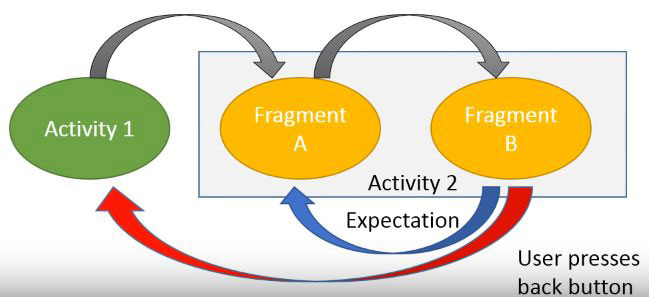
A stack is a type of memory in which elements are placed on top of each other, so that the last element added is on top (analogy to a heapplate). Elements are removed from the stack in reverse order, with the last element added being removed first. Within Android, there is a stack in which all activities are placed according to the order in which they are called. Pressing the “back” button deletes the last activity from the stack. However, in the case of using a fragment, this is not the default behavior, so when the user presses back from the stack, the last added fragment is not removed, but the entire activity. This is not the expected behavior and it is necessary for the developer to add this functionality “manually”.
addToBackStack
In order to insert the fragments on the backStack, they need to be added using the addToBackStack() method. This method needs to be added before every commit. The text that is passed is optional and is used if we later want to recognize that transaction, however it is perfectly fine to pass null as a parameter.
|
1 2 3 4 |
FragmentTransaction fts = getSupportFragmentManager().beginTransaction(); fts.replace(R.id.flContainer, new FirstFragment()); fts.addToBackStack("optional tag"); fts.commit(); |
FragmentManager.OnBackStackChangedListener
If the application with the change of fragments needs to update other elements of the user interface (eg actionBar) it means that it should react after the change of backStack. In that case, it is necessary to use the interface addOnBackStackChangedListener and to define the callback method onBackStackChanged() which should perform an action after triggering the event
Example when an activity implements an interface
|
1 2 3 4 |
@override public void onBackStackChanged() { // Code goes here za update UI-a } |
Example when the callback method onBackStackChanged() is defined “on the fly”:
|
1 2 3 4 5 6 |
getSupportFragmentManager().addOnBackStackChangedListener( new FragmentManager.OnBackStackChangedListener() { public void onBackStackChanged() { // Code goes here za update UI-a } }); |