



What is Thread and multithreading?
Thread is a series of instructions within a program that can be executed independently of other code. If the computer has multiple processors and an operating system that supports the so-called multithreading, it allows programmers to design programs whose threads can be executed simultaneously.
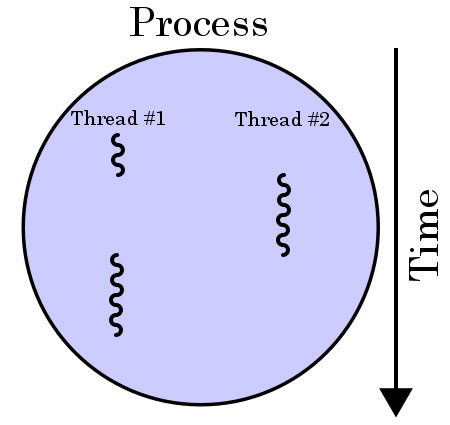
Thread mechanisms
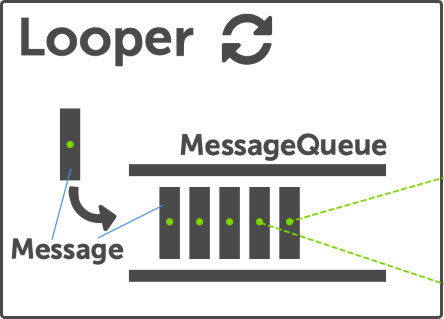
“Looper” and “MessageQueue” are mechanisms used by Thred to execute tasks. “Message” is a task (Runnable object) to be executed on Thread. On the one hand, the MessageQueue is filled with tasks that need to be performed (messages), while on the other hand, the “looper” takes one task at a time until it empties the MessageQueue.
In Android, the MainThread (the main thread) is busy doing things like drawing the user interface (UI), responding to user interactions, and generally, by default, executing (most) of the code we write. Therefore, since Android supports multithreading, it is wise to use this possibility and when programming actions that can temporarily block the operation of the UI, move them to another Thread. When we move demanding slow-running operations from the main thread, we need to bring that data back to it because only the main thread can update the UI.
Example of bad UI blocking code
By clicking on the button, the image from the network starts to be downloaded (the action may take some time), the interface is frozen all the time during the download and until the image is displayed in its ImageView:
|
1 2 3 4 5 6 7 |
((Button)findViewById(R.id.Button1)).setOnClickListener( new OnClickListener() { @Override public void onClick(View v) { final Bitmap b = loadImageFromNetwork(); mImageView.setImageBitmap(b); } }); |
EXPLANATION:
“Caller Thread”: is a thread that calls “worker Thread” to perform some task. Often the “Caller Thread” is actually the thread that draws the UI so called. “Main Thread”, so then “Worker Thread” is also called “background Thread”.
Creating a new Thread
Creating a new Thread can be done in two ways.
a) By extending the Thread class
The first way is for our class to extend the Thread class and thus inherit all the methods of this class. The method that is essential for executing tasks on a Thread is run().
|
1 2 3 4 5 6 |
class ThreadKlasa extends Thread{ public void run(){ System.out.println("thread is running..."); // some code to be executed on a secondary thread } } |
After creating the class, it is sufficient to create its instance within the activity and run the start() method:
|
1 2 |
ThreadKlasa noviThread = new ThreadKlasa() noviThread.start() |
b) By implementing the Runnable interface
For this approach, it is necessary to create a class that implements the Runnale interface. The Runnable interface contains only one run() method. The code to be executed is inserted into this method. The object created by instantiating this class is used as a parameter when creating a Thread. One object can be used for multiple Threads.
|
1 2 3 4 5 6 |
class RunnableKlasa implements Runnable { public void run(){ System.out.println("thread is running..."); // some code to be executed on a secondary thread } } |
In order to create a Thread in this way, it is necessary within the activity to create an instance of the Thread class that accepts a Runnable object as a parameter and then run the start() method:
|
1 2 |
Thread noviThread = new Thread(new RunnableKlasa()) noviThread.start() |
NOTE:
In practice, the instanceclasses that implement the “Runnable” interface are most often created “on the fly” without defining the class:
|
1 2 3 4 5 |
new Thread(new Runnable() { public void run() { // some code } }).start(); |
What is the difference between these two approaches?
If we extend a class with Thread, our class can no longer extend another class because Java does not support multiple inheritance. But if we implement the Runnable interface, our class can still be extended with other classes. However, it should be emphasized that by extending the class with the Runnable interface, we still do not get all the methods that are obtained by extending the class with Thread (eg yield(), interrupt()…). Therefore, if you need those methods, the interface is not an option, but if the run() method is sufficient for you, the Runnable interface is the recommended way, leaving you with the option to extend your class with another class.
UI update from side Thread
On Android, actions that take place on another thread (background thread) cannot update the UI, because the UI can only update the Main Thread. Therefore, it is necessary for the secondary thread to somehow communicate with the main thread and send it tasks in the MessageQueue, after which the main thread would update the UI.
a) View.post() / View.postDelayed()
This approach uses the post() method and thus ensures that the Runnable is added to the message queue where it waits for its turn to be run on the main thread.
Example
|
1 2 3 4 5 6 7 8 9 10 11 12 13 14 |
public void onClick(View v) { Thread noviThread = new Thread(new Runnable() { public void run() { final Bitmap b = loadImageFromNetwork(); mImageView.post(new Runnable() { public void run() { mImageView.setImageBitmap(b); } }); } }) noviThread.start(); } |
This is the easiest way, but it is not suitable for more complex cases, because it is difficult to maintain and debug the code. So it is recommended to use either AsyncTask and Handler for more complex interactions.
b) Handler
Handler is used to facilitate communication between “caller Thread” and “worker Thread”. This approach is great precisely when complexity increases as or when we perform multiple repetitive tasks (eg downloading multiple images to be displayed in ImageView…).
Example
In this example, a long action
final Bitmap b = loadImageFromNetwork();
is executed in the new worker Thread within the run() method, and then after completion the Handler method post() which updates the UI:
|
1 2 3 4 5 6 7 8 9 10 11 12 13 14 15 |
final Handler myHandler = new Handler(); Thread noviThread = new Thread(new Runnable() { @Override public void run() { final Bitmap b = loadImageFromNetwork(); myHandler.post(new Runnable() { @Override public void run() { mImageView.setImageBitmap(b); } }); } } noviThread.start(); |
Activity.runOnUiThread()
This is actually an upgraded version of Handler. The method runOnUiThread() checks whether the current Thread is actually a UiThread, if so it immediately executes the specified code on the UI Thread. Only if the current Thread is not a Ui Thread, then it acts as a Handler that forwards the task to the MessageQueue. For ease of understanding, the content of this method is shown in the following section:
|
1 2 3 4 5 6 7 8 9 10 11 |
final Handler mHandler = new Handler(); private Thread mUiThread; // ... public final void runOnUiThread(Runnable action) { if (Thread.currentThread() != mUiThread) { mHandler.post(action); } else { action.run(); } // ... } |
A is used by passing it a Runnable object with a task to execute.
Example
|
1 2 3 4 5 6 7 8 9 10 11 12 13 14 |
Thread noviThread = new Thread(new Runnable() { @Override public void run() { final Bitmap b = loadImageFromNetwork(); runOnUiThread(new Runnable() { @Override public void run() { mTextView.setText(result); } }); } }); noviThread.start(); |
b) AsyncTask
The
AsyncTask class also allows tasks to be executed on a secondary Thread and their results published on the main Thread. To execute asynchronous tasks, it is enough to extend our class with the AsyncTask class and apply its methods:
- onPreExecute()
- doInBackground()
- onProgressUpdate()
- onProgressUpdate()
- onPostExecute()
This is ita simple way that does not require knowledge of the Thread model, because the class encapsulates the creation of Threads and the use of Handlers. The problem with AsyncTask is that the class is not “aware” of the life cycle (lifecycle) of the activity or fragment, so it is up to the developer to decide what to do with the tasks defined through AsyncTasks when the activity is destroyed. Therefore, this is not the best option for long operations, because if the application is destroyed by Android to free up memory, it will also destroy our background process.
AsyncTasks is ideal when the CallerThread is actually a UI Thread, and actions don’t take long, such as:
- Collection of data from web services and their display
- Query to the database (database query)
- Read and write hard disk I/O
Example
|
1 2 3 4 5 6 7 8 9 10 11 12 |
private class DownloadImageTask extends AsyncTask { protected Bitmap doInBackground(String... urls) { return loadImageFromNetwork(urls[0]); } protected void onPostExecute(Bitmap result) { mImageView.setImageBitmap(result); } } public void onClick(View v) { new DownloadImageTask().execute("http://example.com/image.png"); } |
An anonymous class is a class that does not have a name, so if we wanted to instantiate an object from this class it would look like this:
|
1 |
new { } |
We need a specific anonymous class, one that implements a specific interface, so although we don’t need to define a class name, we do need to define which interface to implement. If the interface is defined in its own file, this is achieved by inserting the name of the interface before the brackets:
|
1 |
new NazivInterfejsa () { }; |
In addition to this, we need to implement all the abstract methods of this interface:
|
1 2 3 4 5 6 |
new NazivInterfejsa () { @Override public void interfejsMetoda() { // some code in the callback method } }; |