


Introduction to application routing

In web application development, routing is all about user interface separation. Splitting the application into several different pages is necessary for easier viewing of a complex application. In the roughest terms, routing is the definition of rules with the help of which appropriate content is associated with a request submitted by a specific URL address. Routing is often divided into two main sections:
- a) Routing on the server (eng. server-side routing) implies that the client submits a request to the server defined with a URL address and the server performs routing (connects the request with the appropriate content) and returns the requested content.
- b) Client-side routing (eng. client-side routing) implies that the client submits a request to the server only when the page is initially loaded, while all subsequent changes to the URL address are accepted by javascript.
Traditional “Single Page Application” (SPA) are web applications that are loaded only once and then dynamically updated after user interaction (without subsequent requests to the server). With them, you get empty HTML and JavaScript at the beginning, which after that dynamically generates everything, including the pages.
After loading the first page (usually index.html), Vue.js simulates a page change, because it changes the url addresses in the browser window, while it actually simultaneously only re-renders the home page (index.html). In this way, it gives the user the effect of visiting different pages, but in reality, it is always the same page with different content. For this reason, Vue.js is said to perform “client-side routing”.
This describes the so-called ClientSide Rendering (CSR) of traditional SPA applications, but you should know that there is also the possibility of ServerSide Rendering (SSR), when the server renders each page “on the fly” and returns a static HTML page, after which Vue.js takes control of the page and breathes life into it. The appearance of a “full” HTML page is the biggest advantage of server rendering, because search engines (google, bing…) can easily view the content, which is not the case with rendering on the client, where empty HTML arrives and only later JavaScript renders the DOM. For this reason, better SEO is obtained with SSR. In the Vue.js world, a framework called NUXT.js is used for simple server side rendering.
Router plugin installation
Vue 3 note (2026): Current official API is Vue Router 4 with Vue 3: createRouter + createWebHistory / createWebHashHistory, then app.use(router). Vue.use(VueRouter) and new VueRouter() are Vue Router 3 / Vue 2.
The official router does not come with the basic installation of Vue.js, but must be installed afterwards.
- It can be inserted as a script distributed via a CDN network, so it is enough to insert a script with always the latest router release at the bottom of the body section after the script for Vue.js itself:
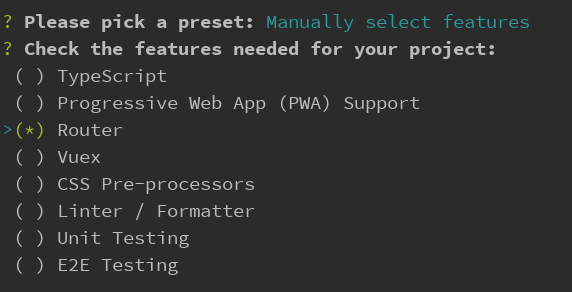
<script src="<br /> https://unpkg.com/vue-router@4"></script> - When using “vue-cli” to quickly create a starter project, then the router plugin can be installed together with the Vue.js installation, if the option to include the router is selected (see image).
- For an already existing Vue.js project, we can subsequently install it independently using one of the package managers:
1npm install --save vue-router1yarn add vue-router
Creating a router instance and injecting it into the application
a) Notifying the application that there is a router plugin
The first thing we have to do is import the router plugin into the main javascript file where we have the main vue instaca, and then tell the application that it should use it ( Vue.use(VueRouter);).
main.js
|
1 2 3 |
import VueRouter from 'vue-router'; Vue.use(VueRouter); |
Vue Router 4 (Vue 3) — recommended
|
1 2 3 4 5 6 7 8 9 10 11 12 13 14 15 16 17 |
import { createApp } from "vue"; import { createRouter, createWebHistory } from "vue-router"; import App from "./App.vue"; import Home from "./Home.vue"; import About from "./About.vue"; const routes = [ { path: "/", component: Home }, { path: "/about", component: About }, ]; const router = createRouter({ history: createWebHistory(), routes, }); createApp(App).use(router).mount("#app"); |
b) Creating a router instance
When creating a router instance, the constructor function is passed the so-called options object that contains data about routes (to which url address which component is bound).
|
1 |
new VueRouter(optionObjekat); |
a) Defining routes (for options object)
The main property of this “options object” is “routes”. The “routes” property is an array containing data about routes, and is represented as an array of objects, where each object defines a single route. A route is defined by two basic properties: “path” and “component”. In the path property, the url address is defined, and in the component property, the name of the component that stores the content for that route
optionObject
|
1 2 3 4 5 6 |
{ routes : [ {path: '/page-one', component: PageOne}, {path: '/page-two', component: PageTwo} ] } |
The property “routes” represents all routes and for better organization it is recommended to separate it to one location (eg file routes.js.). And in order for the routes to be available in the entire application, it is necessary to export one variable from that file that will represent all our routes.
routes.js
|
1 2 3 4 5 6 7 |
import PageOne from './components/PageOne'; import PageTwo from './components/PageTwo'; export const routes = [ {path: '/page-one', component: PageOne}, {path: '/page-two', component: PageTwo} ]; |
NOTE:
You can view the list of all route properties in the documentation in the section “route-object-properties”
b) Creating an instance
To create an instance, you need to pass an object that has the “routes” property defined to the constructor function. The “routes” property (so-called ““array of all routes”) is usually created in a separate file, so we must first import it into the file where we create the instance (usually main.js).
main.js
|
1 2 3 4 5 |
// Importing an array of routes to pass to the new router instance import {routes} from './routes'; // Creating a new router instance that is passed the option string const router = new VueRouter({routes}); |
c) Injecting the router into the application
By passing the router instance as a property to the main Vue instance we have performed router injection. Injecting a router means that the properties of the router object are from that moment available in every component with this.$router, and the current route with this.$route.
main.js
|
1 2 3 4 5 6 |
new Vue({ el: '#app', // Injecting routers router, render: h => h(App) }); |
With injecting the router, we have definitely finished connecting the router and the application, so the final main.js could look like this:
main.js
|
1 2 3 4 5 6 7 8 9 10 11 12 13 |
import Vue from 'vue' import VueRouter from 'vue-router'; import App from './App.vue' import {routes} from './routes'; Vue.use(VueRouter); const router = new VueRouter({routes}); new Vue({ el: '#app', router, render: h => h(App) }); |
NOTE:
You can view the list of all Router instance methods in the documentation in the section “router-instance-methods”
Defining where content is displayed
Vue.js is known to simulate page changes, so that when the url address changes, it only re-renders the home page (index.html) but with new content. Therefore, a place must be defined where the content that depends on the url address will be displayed, and this is achieved with
<router-view></router-view>
App.vue
|
1 2 3 4 5 |
<template> <div class="container"> <router-view></router-view> </div> </template> |
Adding links
I way: declarative injection of links with <router-link>
For declarative linking of routes, we use the intended component <router-link>. This component renders as <a> element in the browser.
|
1 2 |
<router-link>Click for Page 1</router-link> <router-link>Click for Page 2</router-link> |
NOTE:
Component <router-link> no koa link typicallythe cursor property is set on the hover element
cursor: pointer;, and it needs to be defined in CSS.
attribute “to”
Since this component is rendered as a link ie. <a> element, it is necessary to assign an address to it, in the case of the <router-link> component, do not use the well-known href attribute, but a new specialized one under the intuitive name “to”:
|
1 2 3 4 5 6 7 8 9 10 11 12 13 14 15 16 17 18 19 |
<!-- literal string --> <router-link to="home">Home</router-link> <!-- renders to --> <a href="home">Home</a> <!-- javascript expression using `v-bind` --> <router-link v-bind:to="'home'">Home</router-link> <!-- Omitting `v-bind` is fine, just as binding any other prop --> <router-link :to="'home'">Home</router-link> <!-- same as above --> <router-link :to="{ path: 'home' }">Home</router-link> <!-- named route --> <router-link :to="{ name: 'user', params: { userId: 123 }}">User</router-link> <!-- with query, resulting in `/register?plan=private` --> <router-link :to="{ path: 'register', query: { plan: 'private' }}">Register</router-link> |
Styling the active link
Styling the active <router-link> taga is very simple and is a big advantage over the usual <a></a> tag. All that is required is to apply the “active-class” attribute to each <router-link> tag, after which Vue.js takes care of when the link is active. If the link is active, Vue.js will add the appropriate CSS class to the link, and all we have to do is insert the code into that class and style the active link.
Two classes can be added to an element:
- “router-link-active” – This class is always present, even when its sublinks are active. This means that the “user” link (/user) will be active even if its subpage (/user/234) is also active.
- “router-link-exact-active” – This class is only present if that exact link is active.
The “exact” attribute
The exact attribute is used to make sure that the active class only applies to the home page ie. only when the home page is active. Otherwise, the homepage link will be active even when you click on another page.
NOTE:
List of all <router-link> attributes can be viewed in the documentation in the section “router-link-props”
Usually all links to pages are grouped in one place on the page, so it is convenient to also group the code related to navigation into one file/component (eg Navigation.vue).
Navigation.vue
|
1 2 3 4 5 6 7 8 9 10 11 12 13 14 15 16 |
<template> <div> <ul class="nav"> <li class="nav-item"> <router-link to="/" class="nav-link" active-class="active" exact>Home</router-link> </li> <li class="nav-item"> <router-link to="/page-one" class="nav-link" active-class="active">Page One</router-link> </li> <li class="nav-item"> <router-link to="/page-two" class="nav-link" active-class="active">Page Two</router-link> </li> </ul> <hr> </div> </template> |
II method: programmed insertion of links with router.push()
The programmatic way involves using the router object method called push ().
Syntax
|
1 |
router.push(location, onComplete?, onAbort?) |
The main parameter which is required indicates the path where the link should take, while the optional callback functions (onComplete() or onAbort()) will be called when the navigation is successfully completed or aborted.
|
1 2 3 4 5 6 7 8 9 10 11 |
// literal string path router.push('home') // object router.push({ path: 'home' }) // named route router.push({ name: 'user', params: { userId: 123 }}) // with query, resulting in /register?plan=private router.push({ path: 'register', query: { plan: 'private' }}) |
This method inserts a new item into the history so that when the user clicks the back button, they are taken to the previous URL.
Example – PageTwo.js
|
1 2 3 4 5 6 7 8 9 10 11 12 13 |
<template> <button @click="pushHome" class="btn">Go Home</button> </template> <script> export default { methods: { pushHome() { this.$router.push('/'); } } } </script> |
This method allows us to push a route onto the stack of existing routes. This ensures that the browser’s back and forward buttons continue to work fine. Also, notice that we simply went through the route representation we want to take. You can also pass the object as {path: ‘/’} if you want.
Example of explained procedure