


Introduction

Vue.js has mechanisms for easily integrating CSS animations over an HTML element. Vue.js enables CSS animation by automatically adding specific classes to the HTML element at a certain moment of animation, after which we can use them to define CSS properties for animation.
In addition, Vue.js enables animation with JavaScript because with “transition hooks” (“custom events” that are “triggered” by Vue.js according to the determined timing of the animation) it enables the use of JavaScript for direct manipulation of the DOM.
Also with Vue.js there is a possibility to easily integrate 3rd-party CSS animation libraries (eg Animate.css) or 3rd-party JavaScript animation libraries (eg Velocity.js or GreenSock).
Vue.js & CSS animation
In order to control the animation with Vue.js (either with CSS or JavaScript), we need to “wrap” the HTML element with a <transition> element to which we define the name attribute in order to target the element itself.
|
1 2 3 |
<transition name="ime-elementa-tranzicije"> // HTML element being animated </transition> |
NOTE:
There can be ONLY ONE HTML element within the transition wrapper tag, in fact there can be several elements, but only one can be displayed at a time (when using v-if or v-show).
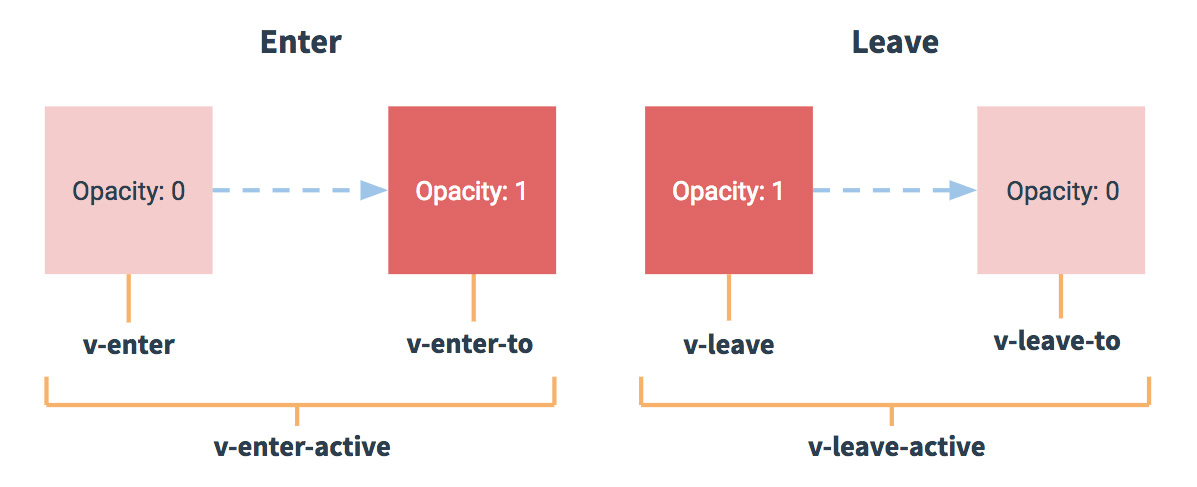
After implementing a “transition” element as a wrapper, Vue.js will automatically check whether the CSS properties “transition” or “animation”, and if it finds them then Vue.js adds and then removes its specific CSS classes at the appropriate timing. The animation is divided into two parts: “enter” and “leave”. The “enter” part happens when the component is displayed, while the “leave” part represents the animation when the element is removed. Each part has three classes so Vue.js adds/removes the next 6 classes during each CSS animation. Each of the classes receives a prefix according to the name of the transition (name=”name of the Transition Element”):
-
imeElementaTranzicije-enter
This is the initial state for input CSS classes are added before the element is inserted. This class disappears after the first frame of the animation. -
imeElementaTranzicije-enter-active
This class applies throughout the entry phase (the class is added before the element is inserted, and removed when the transition / animation is finished). This class is used to define the duration, animation function and animation delay. -
imeElementaTranzicije-enter-to
This class is added one frame after the element is inserted (right after the “TransitionElementName-enter” class is removed), and is removed after the animation is finished. -
imeElementaTranzicije-leave
This class is added when the animation is activated, and removed after the first frame. -
imeElementaTranzicije-leave-active
This class is applied throughout the “leave” phase. It is added immediately after the animation is activated, and removed after it endsanimations. In this class, the time duration, animation function and animation delay are defined. -
imeElementaTranzicije-leave-to
This class is added one frame after the element is inserted (immediately after the class “ElementnameTransition-leave” is removed), and is removed when the animation ends.
Conclusion:
…-enter should contain the start styling of the element that starts to appear
…-leave should contain the start styling of the element that starts to disappear
…-enter-active & …-leave-active is used to define animation properties (transition/animation)
…-enter-to should contain the final styling of the appeared
element
…-leave-to should contain the final styling of the disappeared
element
Example
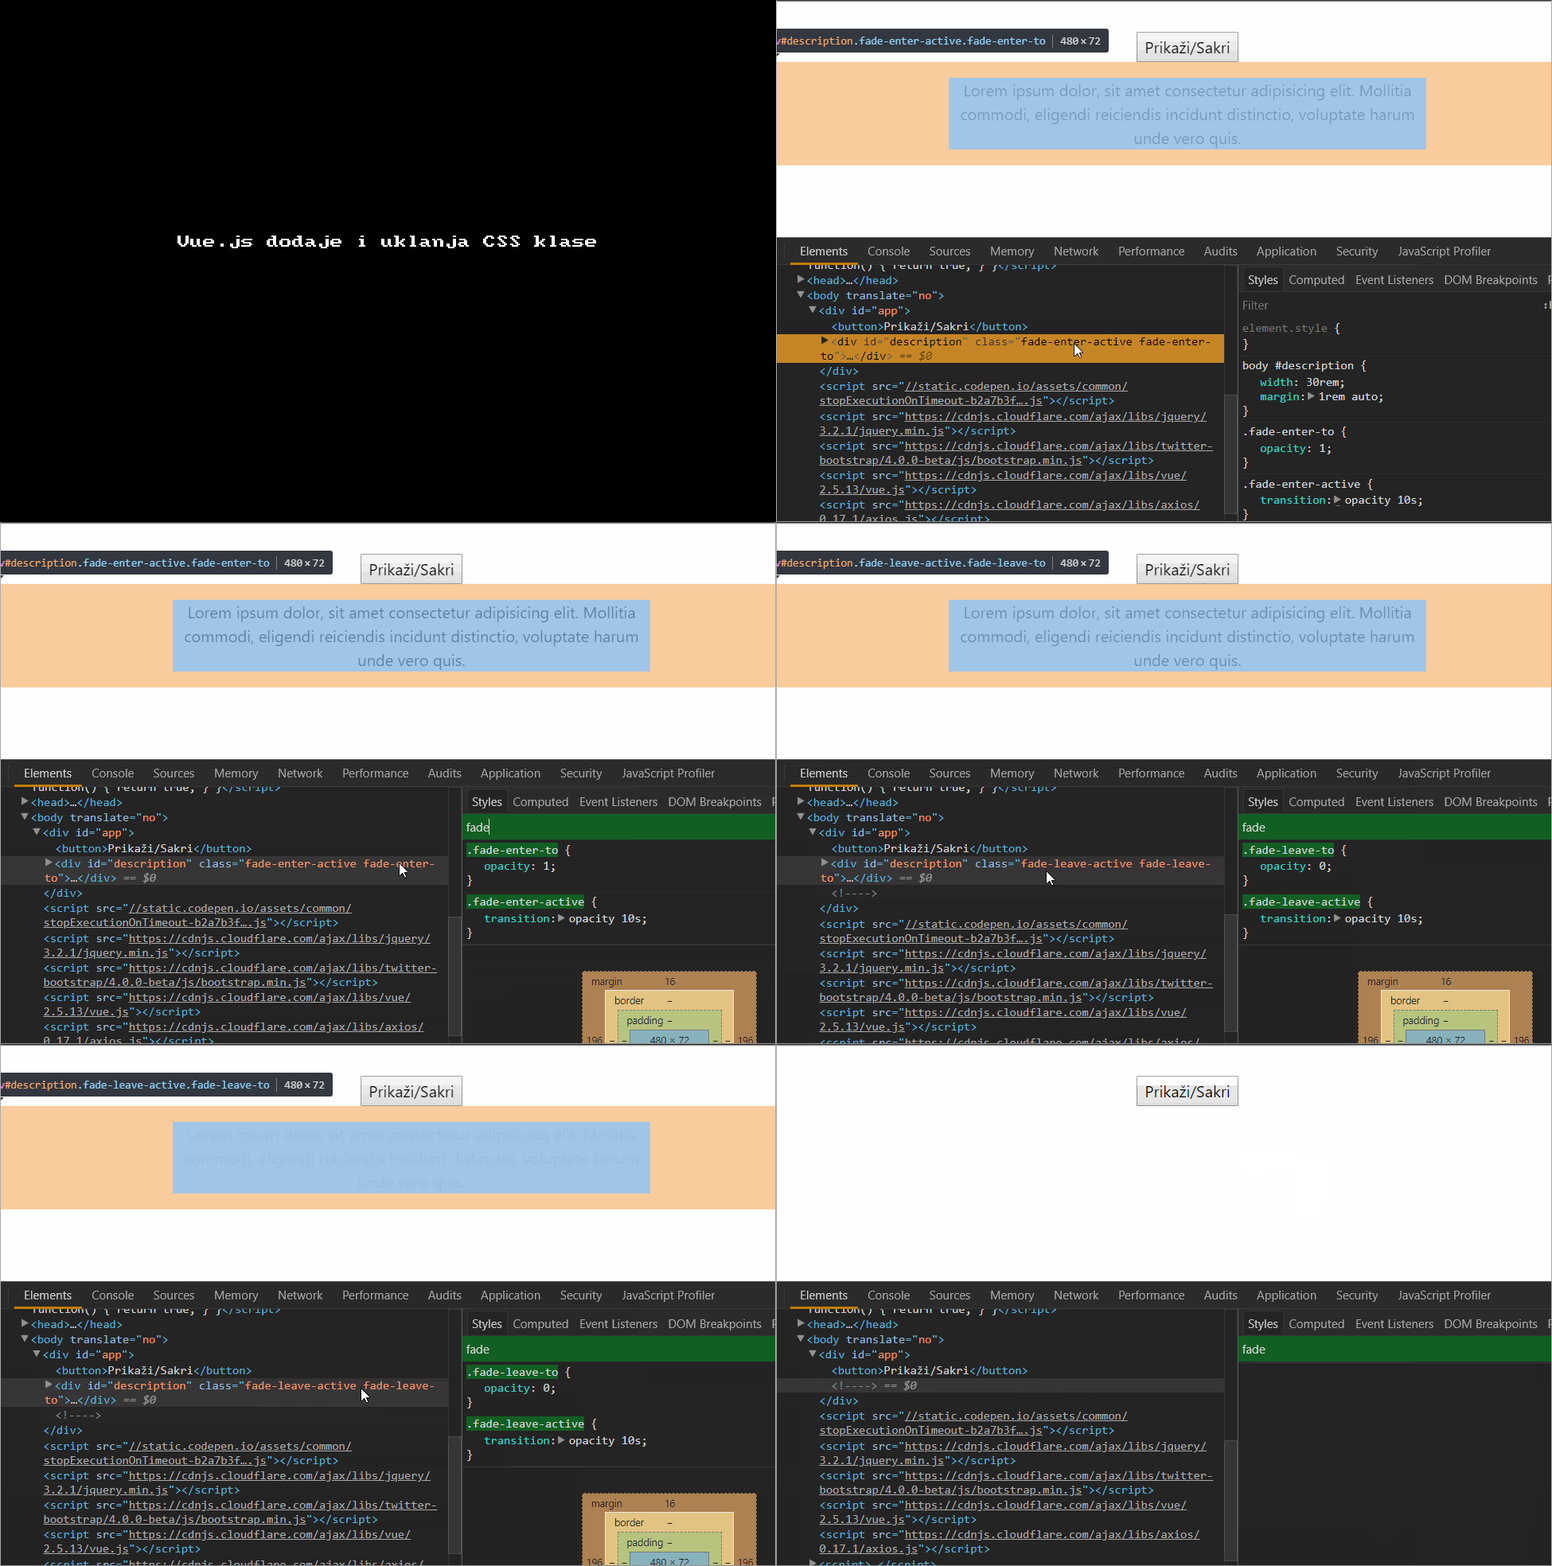
In this example, after a click, the text gradually fades in/out using the transition transition: opacity 5s;
See the Pen Vue basic animation by Web programming (@chos) on CodePen.
What is essential to understanding animation with Vue.js is to insert and then eject specific classes according to the appropriate timing.
CSS properties “transition” and “animation” on the same element
If for some reason the properties “transition” and “animation” are applied together on one element (eg CSS animation is driven by Vue.js, and the hover effect by a 3rd party library), and those properties have different durations, it is necessary to define a main property (whose duration is applied). This is achieved by adding the “type” attribute. The value of the “type” attribute defines which CSS property is the main one (type=”animation” or type=”transition”).
|
1 2 3 |
<transition name="ime-elementa-tranzicije" type="animation" > // HTML element being animated </transition> |
NOTE:
The only difference between the CSS properties “transition” and “animation” is that the “…-enter” class is not removed immediately after the elements are inserted, but after the animation is finished (when the “animationend”).
Initial loading animation
If we want the animation to be performed immediately when the page is loaded, it is necessary to add the attribute “appear” to the transition element:
|
1 2 3 |
<transition appear> <!-- ... --> </transition> |
Example
In this example, the animation is activated immediately after loading:
See the Pen
Vue.js & JavaScript animation
For animation with JavaScript, hooks are provided that we can hook onto:
- before-enter
- enter
- after-enter
- enter-cancelled
- before-leave
- leave
- after-leave
- leave-cancelled
These so-called hooks are actually “custom events” that are “triggered” by the Vue.js element <transition></transition> according to the established timing related to the animations. Prepared methods can be called upon “triggering” of appropriate events. These methods can be used independently or in conjunction with the transitions/animations CSS properties:
HTML
|
1 2 3 4 5 6 7 8 9 10 11 |
<transition v-on:before-enter="beforeEnter" v-on:enter="enter" v-on:after-enter="afterEnter" v-on:enter-cancelled="enterCancelled" v-on:before-leave="beforeLeave" v-on:leave="leave" v-on:after-leave="afterLeave" v-on:leave-cancelled="leaveCancelled"> </transition> |
JavaScript
|
1 2 3 4 5 6 7 8 9 10 11 12 13 14 15 16 17 18 19 20 21 22 23 24 25 26 27 28 |
methods: { beforeEnter: function (el) { // ... }, enter: function (el, done) { // ... done() // This callback function is only required if using javascript without CSS }, afterEnter: function (el) { // ... }, enterCancelled: function (el) { // ... }, beforeLeave: function (el) { // ... }, leave: function (el, done) { // ... done() // This callback function is only required if using javascript without CSS }, afterLeave: function (el) { // ... }, leaveCancelled: function (el) { // This method is only used with v-show // ... } } |
NOTE:
The callback function “done()” is mandatory in case we use only JavaScript without CSS (this is important because then Vue.js doesn’t know when the animation is done). It is also desirable to add v-bind:css=”false”, which tells Vue.js not to have CSS transitions and not to spend time and resources checking.
In case, in addition to animation with JavaScript, animation with CSS is also used, then the callback function “done()” is not needed, because then Vue.js knows when the animation is finished.
Example
In this example, the animation is processed only with JavaScript, without CSS (it should be noted that this is not really practical, because a combination of JavaScript and CSS animation is most often used).
See the Pen Animation with JavaScript only by Web programming (@chos) on CodePen.
Vue.jd & 3rd party animation libraries
Vue.js transition system offers many simple ways to animate entering and leaving elements, however Vue.js can animate numbers and anything that can be converted to numbers which requires the help of 3rd party libraries (e.g. GSAP, Velocity.js…) .
Thus, using GSAP’s “TweenLite” library, we can apply “easing” functions when changing the state of a variable, and Vue.js will enable us to be fast reactive and apply it to the DOM.
Example
In this example watcher allows us to, in cooperation with GSAP’s “TweenLite”, animate the changes of any state of a numeric variable.
Seethe Pen Number Animation with GSAP by Web Programming (@chos) on CodePen.
Example
In this example, I’m using a simple animation that involves translating the element along the “x” axis from a starting position 280px away from the predefined final position. The easy function uses a type called “bounce”.
See the Pen Animation with GSAP only by Web Programming (@chos) on CodePen.
NOTE:
The GSAP library allows us to call a callback function at the appropriate moment of the animation:
“onComplete”, “onUpdate”, “onStart” and “onRepeat”.
|
1 2 3 4 5 6 7 8 |
methods:{ enter(el, done){ TweenMax.to(el, 1, {x:280, ease: Bounce.easeOut, onComplete:this.nekaCallbackFunkcija}); }, nekaCallbackFunkcija: function(){ console.log("The callback function is called after the animation is finished"); } } |
Example
In this example, the GSAP method “staggerFrom” is used, which allows us to easily define the animation for several elements with the appropriate delay (eng. delay) of the animation for each element in the container individually.
See the Pen Vuejs and GSAP stagger by Web programming (@chos) on CodePen.