


Introduction
Communication between “neighboring” components can be achieved in several ways, and the choice of one of the offered mechanisms usually depends on the complexity of the application.
a) Communication via common parent ($emit -> $on & attribute -> props )
A feasible solution, but it is generally a bad idea, because it is difficult to monitor the flow of data and therefore difficult to debug.
b) Event bus ($emit & $on)
A fast and simple solution for applications with a simple architecture and fewer components.
c) Pinia / Vuex (centralized state)
For Vue 3 use Pinia (official store). Vuex remains relevant for older Vue 2 apps.
Communication through a common parent
Communication between two adjacent components can take place via a common parent component using the already explained communication principle “parent <---> child” in the article “Communication between components type parent <---> child”.
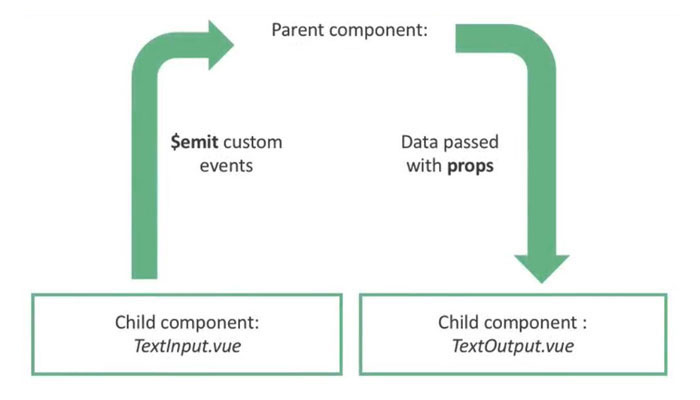
The procedure is based on the fact that the appropriate data is emitted from both components through custom events, while during this time the parent component should monitor changes. After each change, the parent should pass the changed data to the child component through the attribute. And the component should accept the passed data through the props property.
Event Bus
Vue 3 note (2026): Vue 3 removed instance event emitters ( $on / $off / $once). A plain new Vue() bus no longer works. Prefer props / emits via a parent, provide/inject, Pinia for shared state, or a tiny external emitter such as mitt. The Vue-instance examples below are Vue 2 legacy.
Event Bus (Vue 2) is a mechanism that instead of a common parent uses a central object, whose purpose is only to transmit messages between components. With Vue.js, that central object is actually a new Vue.js instance. The procedure is simple: one component emits a custom event and sends some data with it, while another component listens to that custom event and collects the data sent with it.
1) Creating EventBus
A new instance used as a bridge for passing data and can be defined in the same file as the main Vue instance:
main.js
|
1 2 3 4 5 6 7 8 9 10 11 12 |
import Vue from "vue"; import App from "./App"; /* Event Bus instance*/ export const eventBus = new Vue(); /* root instance*/ new Vue({ el: "#app", components: { App }, template: "<App/>" }); |
NOTE:
“Event Bus instance” must be defined before “root instance”
EventBus instance can also be extracted into a new JavaScript ES6 module:
eventBus.js
|
1 2 3 |
import Vue from 'vue'; export const EventBus = new Vue() |
2) Event broadcasting and data forwarding
In the desired component, we can broadcast an event and send any data along with it.
|
1 2 3 4 5 |
methods: { emitovanjeDogadjaja() { EventBus.$emit("nameCustomEvent", nekiPodatak); } } |
3) Listening to custom events
In the second component, from the moment the component is created, we start listening for the custom event, and when it happens, we use the data passed with the event.
|
1 2 3 4 5 |
created () { EventBus.$on("nameCustomEvent", function(prosledjeniPodatak) { console.log(prosledjeniPodatak); ); } |
NOTE:
Note that the “this” keyword in the callback function points to an EventBus instance. Therefore if in the callbackfunction, you want to target a component, use either the arrow function or the well-known mechanism “var that = this” (read more about this in the article “Meaning of the operator “this” in JavaScript”
Example
In this example, from the component “Child1” we emit the event “inputFromFirstComponent” and with it we forward the data entered through the input field. The “Child2” component listens for the “inputFromFirstComponent” event and uses the passed data this.input to assign it to the “print” data property.
Vuex
Vuex is a state management pattern + library for Vue.js. It serves as a centralized place to store values for all components in the application. Vuex has a set of rules that ensure that the state of a property can be changed in a predictable way. Vuex is a topic in itself and will be covered later in one of the following articles.