


.gitignore
Before activating Git, it is necessary to prevent the saving and tracking of changes of unnecessary files. Most often, these are files used by the editor or files created by compiling, etc. We define files or entire directories that we don’t want to track in .gitignore. The .gitignore file is placed within the project folder.
This file is filled with the appropriate commands with the help of which Git knows which files it should not follow. The principle of marking files and folders that we don’t want to track in .gitignore is as follows:
- Enter the file extensions with a space that we do not want to follow, such as
.swo .swp
- Enter the folders we don’t want to track:
folder_name
In case there is a file inside the folder that still needs to be tracked, write:
!someFile.txt
- Enter the folder and its subfolders that we do not want to track:
folder_name/subfolder_name
View branches
- Let’s enter the folder and all its subfolders that we don’t want to track:
folder_name/*
- Let’s write all objects and archives that we want to ignore:
*.[oa]
There are a large number of .gitignore examples on the Internet, depending on the project in question (WordPress, Android…), and you can find an excellent site for finding an adequate one at the following link: toptal/.gitignore.
Unfollow
It is very important to create a .gitignore file before initiating Git, because if Git has already started monitoring a certain file, it will not stop monitoring it even if we later insert that unwanted file into .gitignore. Below are described the necessary actions to stop uploading a file.
a) Termination of tracking without physical deletion
If some non-essential files for the project have been committed by mistake, the changes of which we do not want to save, but we also do not want to physically delete them from the working directory, we need to order git to stop tracking them (i.e. to remove them from the repository) with the command:
|
1 |
git rm --cached naziv_fajla.ekstenzija |
The command to stop tracking a directory is:
|
1 |
git rm -r --cached imeDirektorijuma |
where -r tells Git to stop tracking all subdirectories and files within it.
After the command to stop tracking, the file is in the preparation space (index). In order to prevent the files on the next commit from entering the repository again, it is necessary to insert those files into the .gitignore file before the commit-ovj.
NOTE:
Please note that if the file name contains a space between words, it is necessary to put it in quotation marks, as in the following example:
git rm "neki naziv fajla sa razmacima.ekstenzija"
b) Termination of monitoring with physicalby deleting
If there is a need to remove the file from the repository and delete it from the working directory, use the command:
|
1 |
git rm imeFajla |
If it is a directory, we use the command:
|
1 |
git rm -r imeDirektorijuma |
where -r tells Git to stop tracking all subdirectories and files within it. After the command to delete files, it is also necessary to commit (without first sending to the index).
See more about this command on the official page
Local repository
When we want to activate Git ie. to start tracking changes in the project, we need to initiate the creation of a “working git repository” within the project folder, which is done as follows:
|
1 2 |
cd projektni_folder git init |
This command creates a new folder .git (so-called “repository”) within our project and it will contain the entire database of our project. From that moment Git monitors the project and takes snapshots of the state when we commit. If we want Git to no longer monitor our project, it is enough to delete this folder.
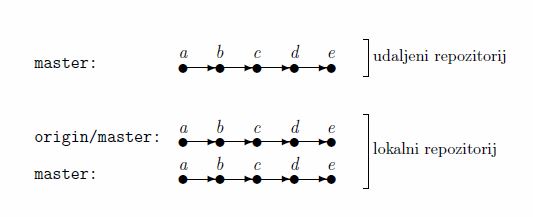
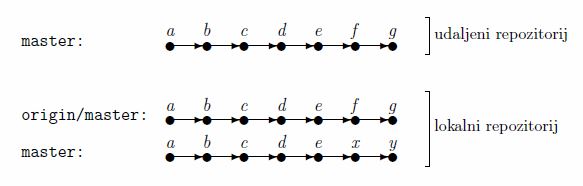
The local repository is in a specific relationship with the remote one because it is “aware” of the existence of the remote repository. Within the local repository there are always at least two branches (see picture):
- A branch named “origin/master” which is a local version (copy) of the remote repository. Our changes cannot be sent to this branch, but it serves to take changes (merges) from it, because it is practically an intermediary, i.e. an intermediate step for getting changes from a remote repository.
- The branch named “master” is our local branch directly linked for the project (where we make commits).
Remote repository
A remote repository, as its name suggests, is not directly related to the project we are working on, but is located somewhere else (most often on a server on the Internet, e.g. Github, Bitbucket…). This repository is not designed to send changes directly to it, but it is necessary to first save the changes locally, and only then to send them to the remote repository.
The remote repository can be “(“push”)” changes only by the authorized one, while non-privileged contributors have the option to send changes with a request to accept their changes (so-called “pull request”).
The most important reasons for the existence of a remote repository are: creating a backup copy and facilitating the collaboration of several participants on the same project.
NOTE:
“origin” is an alias for the full URL of the online repository (eg https://url_link_of_the_remote_repository). This abbreviated representation of the URL allows us to work with commands more simply because you avoid using a huge URL every time you need it in a command. Which exact link this alias represents can be checked with the command:
|
1 |
git remote -v |
When commands mention a branch on a remote repository (e.g. master), it is necessary to add a link to the remote repository in addition to the name of the branchrepository eg:
|
1 |
git push https://url_link_udaljenog_repozitorijuma master |
Knowing that “origin” is an alias for this link, now the “master” branch on the remote tail can be labeled more simply with “origin master” (the branch in the image named “master”). So the command from the previous example would look like this:
|
1 |
git push origin master |
More information about the remote repository can be obtained with the command:
|
1 |
git remote show origin |
What is “Bare Repo”? A
Bare repo is a special type of remote repository that only contains a .git directory. Such a repository does not have a working version of the project, ie. not linked to any local repository that has a working directory.
Linking local and remote repository
There are two cases here that differ depending on what stage the project is in when we connect the local and remote repository.
a) We have an existing local repo and we are creating a remote repository
Creating a new remote repository (which will become a bare repository) is done with the command:
|
1 |
git config --bool core.bare true |
NOTE:
This is not necessary if one of the online services like GitHub or BitBucket is used, because this is done by the service when creating an empty repository.
When we have a “bare repository” (local or on the cloud) we need to connect it to the local one, and we do that by letting the local repository know which is its remote repo with the following command:
|
1 |
git remote add origin link_do_udaljenog_repozitorijuma |
With the previous command, we only practically defined the url address represented by “origin”. We can control a job well done with the command:
|
1 |
git remote -v |
After which the message should appear :
|
1 2 |
origin https://url_link_udaljenog_repozitorijuma (fetch) origin https://url_link_udaljenog_repozitorijuma (push) |
Example:
Adding a repository from GitHub would look like this:
|
1 |
git remote add origin https://github.com/username_git_korisnika/naziv-udaljenog-repozitorijuma.git |
While connecting on BitBucket would look like this:
|
1 |
git remote add origin https://username@bitbucket.org/username/naziv-udaljenog-repozitorijuma.git |
Note: on BitBucket you get this command as soon as a new repo is created if the “I have an existing project” option is selected
This procedure is only used when we have a “bare repository” on the remote tail (an empty repo containing only the .git directory), while in other cases we use the approach explained in the next part “cloning a remote repository”.
b) Cloning a remote repository
This case assumes that we have an existing project with Git enabled, and we want to make a local copy. Cloning represents the copying of that remote repository, so there is a certain difference from simple copying itself, because in addition the new (local) repository becomes “aware” that it is a copy of some remote repository and it saves information about the repository from which it was created.
b.1) Cloning a repo with only one branch
This case is simpler and is solved in two steps. The first step is to go to the folder in the terminal where we keep all the projects(eg a folder named “projects”):
|
1 |
cd projekti |
Only when we are in the desired folder in the terminal can we execute the cloning command:
|
1 2 3 4 5 6 7 8 9 |
//ukoliko je u drugom folderu: git clone /path/to/repo // if it is not on the same system and we can access it via SSH: git clone username@remote_system_ip:/path/to/repo/on/remote //ukoliko je repo na internetu: git clone url_link_do_udaljenog_repozitorijuma |
With the previous command, a folder with the same name as the cloned project will be created in the directory. If I want that folder to be called differently, it is necessary to add a new folder name to the transitional command:
|
1 |
git clone url_link_do_udaljenog_repozitorijuma novi_naziv_foldera_projekta |
Example
|
1 |
C:folder_sa_git_projaktima> git clone https://github.com/username_git_korisnika/naziv-udaljenog-repozitorijuma.git |
b.2) Cloning a repo that has multiple branches
This case is more complicated because we have to do some things additionally. The beginning is the same, we start the cloning command:
|
1 |
git clone url_link_do_udaljenog_repozitorijuma |
However, when examining the state of the branches with the command:
|
1 2 |
cd klonirani_projekat git branch |
We get a notification that the cloned repository contains only the “master” branch which does not fork (see “master” at the bottom of the image).
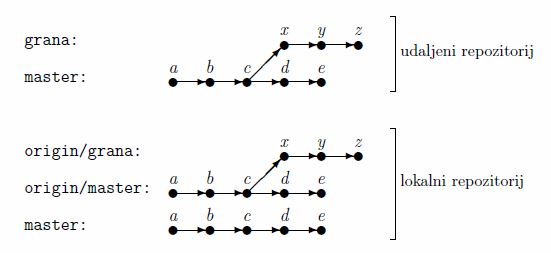
We will solve this problem thanks to the fact that our auxiliary branch “origin/master” still forks locally (see “origin/master” and “origin/branch” in the picture), and we can use that. We can check the status of this auxiliary local copy of the remote repository with the “branch” command with the “a” flag:
|
1 |
git branch -a |
As a result of the previous command, you can see a list of all origins/branches. In order to see other branches in our working directory as well, it is necessary (even though they are not visible) to switch to each of them with the command (note: without using the name origin/….):
|
1 |
git checkout naziv_grane |
After which git will send the following message:
|
1 2 |
Switched to a new branch 'branch_name' Branch 'branch_name' set up to track remote branch 'branch_name' from 'origin'. |
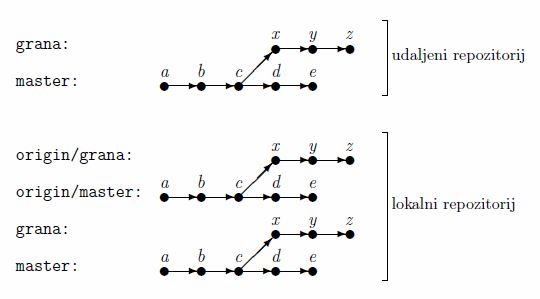
As you can see from the message itself, git automatically created a branch and moved us to it. We can check this with the command:
|
1 |
git branch |
After which other branches are visible (same as in the picture below).
Partial cloning of the repository
The Git repository contains the entire history of the project, and if the project runs for a long time it can be quite large. Therefore, if we want to download the project just to look at its code, and we are not interested in the whole history, it is possible to clone only the last few commits with the command:
|
1 |
git clone --depth 5 --no-hardlinks git://github.com/adresa_repozitorijuma.git |
Disconnecting from remote repo
If we want to break the connection of the local repository with a remote one (“origin”), we use the command:
|
1 |
git remote remove origin |
After this command the command git remote -v does not give any data.
Status and overview of changes
Git Status
Control whether we have changes on the files compared to the last commit is done with the command:
|
1 |
git status |
If the state of the working version of our project is exactly the same as the last version of the git repository, then git will inform us that we have nothing to commit. Otherwise, it will highlight which files have been modified.
Overview of code changes
diff
Printing all differencesbetween the current state of the project on the premises and the last version of the project recorded in the repository, is obtained with the command:
|
1 |
git diff |
Difference between commits on the same branch
In the following example, we get the difference between the previous commit and the commit three steps back.
|
1 |
git diff HEAD~3 HEAD~1 |
Difference between commits on two branches
When we want to print all the differences in the project between two specific snapshots of the state on different branches, we use the command with arguments branch names:
|
1 |
git diff master sekundarna_grana |
In the previous example, the command obtains the difference between the master branch and the secondary_branch. Note that order when writing branches matters. In case of an incorrect order, it would happen that some file that was added in the secondary branch would be displayed as if it had been deleted.
reflog
The following command is very important when working with change history, because it gives us information about actions performed with git. The command lists all git tracked changes across all branches:
|
1 |
git reflog |
or an even more detailed version of the listing with date and time:
|
1 |
git reflog --relative-date |
EXPLANATION:
This command allows us to see ALL changes, even those that are no longer visible due to rewriting history. With this command, we get a clearly described listing of all commits with the corresponding HEAD position number (“HEAD@{number}”), and even those that are no longer visible in the log.
In addition to this command, we can use:
|
1 |
git log --graph --decorate --oneline |
Viewing commits in the same branch (checkout)
With the command checkout we can switch (“teleport”) to another branch or to an older commit in the same branch. Such a state is called “detached HEAD” i.e. state when the HEAD pointer points to a commit that is not the last in the branch.
Example
If it is necessary to go back 10 commits (steps) back, use the command:
|
1 |
git checkout HEAD~10 |
After switching to another commit, we see files in the version for that commit in the working directory. If we make changes to those files, in order to save them, we need to create a new branch and commit the changes. After this, the HEAD pointer will point to the commit at the end of the new branch, so the repository will no longer be in a “detached HEAD” state.
Search
Comment search
If we search for comments when committing, we use:
|
1 |
git log --grep="the word being searched for" |
Word search within files
If we search for a word (string) within the files, we use the command:
|
1 |
git log -Luck_po_kojoj_se_oretrazuje |
If the sentence being searched has spaces, it must be put between quotation marks.
|
1 |
git log -S"the search phrase" |
Example
The following example searches for the text “strava program”:
|
1 |
git log -S"strava program" |
The search finds us a commit that contains the requested file in the form 76cf802d23834bc74473370ca81993c5b07c2e35. The name of the commit consists of the first five digits 76cf8. We can review the given commit with the command:
|
1 |
gitk 76cf8 |
Save changes
Sending changes to staging area
To send a snapshotchanged version of a file (e.g. proba.txt) to the repository, we must first send a snapshot to the preparation space (the so-called index). Only files located in this space can be committed, ie. send to the repository.
Sending a specific file
Sending only a specific file to the staging area with the command:
|
1 |
git add proba.txt |
Sending a specific directory
The following command sends the specified directory to the preparation space:
|
1 |
git add naziv_direktorijuma/* |
Sending a snapshot of all changed files of the specified extension from the root of the working folder
The following command will transfer to the staging directory all the files it finds in the main working directory with a .txt extension, but without the files from the subfolders.
|
1 |
git add *.txt |
Sending a snapshot of all changed files of a specified extension, including from subfolders
If all files with the same extension should be found, including files in subfolders, then the command with quotes is used:
|
1 |
git add '*.txt' |
Sending all files
The following command will take a snapshot of all changed files from the working directory to the staging directory.
|
1 |
git add . |
Pay attention to this command there is a space (space) between add and dot!
Committing
With committing we take a snapshot of the state changes of the files, which we previously selected and transferred to the preparation space.
|
1 |
git commit -m "obavezan komentar faze" |
Undo changes
Uncommitting Uncommitted Changes
a) Emptying “staging area” (index-a)
If we mistakenly sent the files to the “staging area” ie. “index”, removing all files from “staging area” is with the command:
|
1 |
git reset HEAD . |
b) Returning the state of the file from the last commit
If we have not yet committed the changes made in a certain file, and we want to return the version that was saved by the last commit, it is enough to switch to that file with the “checkout” command and the changes will be “forgotten” because we did not commit them.
If we changed a file by mistake but we haven’t committed it yet, we can restore the version of that file from the last commit with the command:
|
1 |
git checkout -- file.extenzija |
NOTE:
In case the file is inside a folder, we must set the path in the command line to point to that folder, otherwise git will not find the requested file.
Example
To restore the file proba.txt located in the folder “probni_folder”, we need to set the path to that folder:
|
1 2 |
cd probni_folder git checkout -- proba.txt |
c) Return the state of all files from the last commit
Returning the state of all files, which have not yet been committed, to the state recorded with the last commit, is returned with the command:
|
1 |
git checkout -- . |
This command undoes all uncommitted changes.
EXPLANATION:
The tag
-- means that everything after it is treated as filename (even if there is some command, it will not be executed but will be treated as filename).
Changeof the last commit (–amend)
Modification of last commit message only
If we want to partially change the message from the last commit, it is enough to use the command “commit” with “flag” --amend:
|
1 |
git commit --amend |
After this command, a text file is opened, on top of which there is a message from the last commit, to change the message it is enough to edit the message in that file and then save and close the file, after which the last commit with the same state snapshot but with a different message will be “overrun”.
If we want to change the entire message without editing the old message, it is enough to use the following combination of commands and flags:
|
1 |
git commit --amend -m "Totally new message" |
Modifying the contents of the last commit
If we have smaller changes that we would like to have been part of the previous commit, we need to add the desired additional names to the “stage” (index):
|
1 |
git add file-koji-je-naknadno-promenjen |
and then use “commit” command with flag: --amend:
|
1 |
git commit --amend |
After this command, a text file is also opened, on top of which there is a message from the last commit, to change the message it is enough to edit the message in that file and then save and close the file.
NOTE:
If we don’t want to change the message when changing the last commit, it’s enough to add the flag
--no-edit. If we use this flag, the file for editing the message will not be opened, but the changes will be saved immediately.
|
1 |
git commit --amend --no-edit |
Revert
The command “revert” is used to undo committed changes. This approach is safer than the approach where the reset command is used, because it does not delete the commit, but adds a new commit, ie. node where changes were made in one of the previous commits. With this command, we “revert to the state of some old commit” (while there is still a way to restore the changes we just overrode).
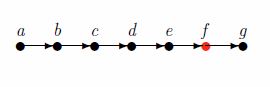
So if the last commit is in node “f” and we want to discard the changes made in it, we use the revert command, which will not delete it from the commit history, but will create a new commit in node “g” which will be the same as in node “e”.
|
1 |
git revert HEAD~0 |
or more simply:
|
1 |
git revert HEAD |
If we want to go back a couple of commits, we first need to use the reflog command to find the HEAD number of the commit we want to go back to:
|
1 2 |
git reflog git revert HEAD~3 |
EXPLANATION:
This command is safe because we can return to the original state by re-reverting.
Reset
And the command “reset” is used to undo committed changes, which has three possible subtypes:
a) Soft reset
|
1 |
git reset --soft HEAD~brojKomitaUnazad |
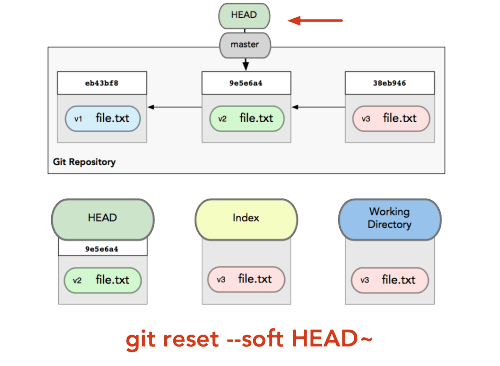
With the command “reset” and the flag --soft we delete the corresponding commit until the commit determined by the command HEAD~broj. At that moment, the files with all the changes are ready for the next commit (they are on “stage”). Practically, with the commit at that moment, we would return to the state “numberCommitBack+1”.
Example
With the command in this example, we delete the last commit and the HEAD remains ns the penultimate commit (HEAD~1), and the changes from the last commitare located on stage (they are also the same in the working directory)
|
1 |
git reset --soft HEAD~1 |
If we were to commit all the files on “stage” immediately, we would return to the beginning.
b) Mixed reset
With the command “reset” and the flag --mix we also delete the corresponding commit until the commit determined by the command HEAD~broj. Since at that moment the files with changes (for the next commit) are in the working directory.
Example
In this example, we delete the last commit (the head returns to the next commit, i.e. to the penultimate one), but all the changes are now in the working repository (still nothing is lost).
|
1 |
git reset --mixed HEAD~1 |
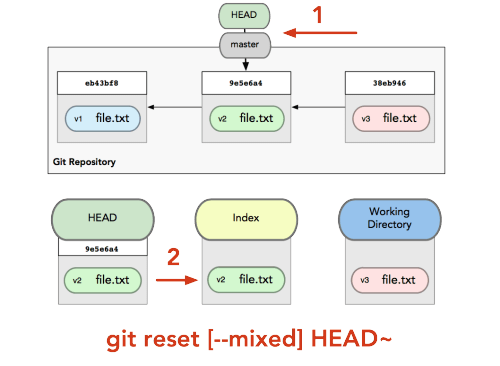
If we immediately sent the files to “stage” without any additional changes, and then did a commit, we would return to the beginning.
c) Hard reset
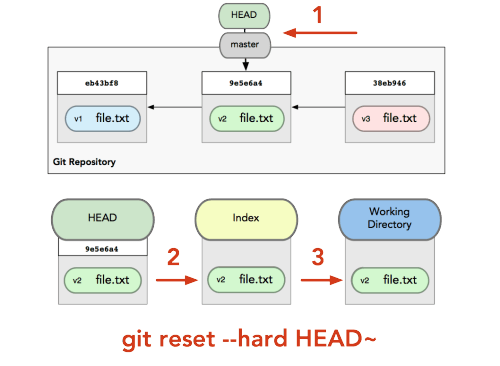
With the command “reset” and the flag --hard, we delete the corresponding commit until the commit specified by the command HEAD~broj, while the state of the files is the same as if we had just committed the commit.
Example
In this example, we delete the last commit (the head returns to the next commit, i.e. to the penultimate one), there are currently no changes to commit and all changes from the previous commit are gone.
|
1 |
git reset --hard HEAD~1 |
NOTE:
Instead of using
HEAD~1 we can always use the exact commit name we get with “reflog” like e.g.
git reset --hard f3cb6e2
Example
This example shows inappropriate actions if we accidentally sent changes to master when we should have sent them to a new branch:
|
1 2 3 4 5 6 7 8 |
# we create a new branch with the current state of master git branch nova_grana # Undoing that last bad commit on the master branch git reset HEAD~ --hard # Switching to a new branch that still contains the problematic commit git checkout nova_grana |
Example
This example shows the sequence of actions that are required in case we committed to the wrong branch:
|
1 2 3 4 5 6 7 8 9 10 11 |
# undo the last commit but leave the changes in the files git reset HEAD~ --soft git stash # prebacivanje na korektnu granu git checkout name-of-the-correct-branch git stash pop # Adding changes and committing them to the right branch git add . # or add individual files git commit -m "your message here"; |
Update local “origin/master” branch (fetch)
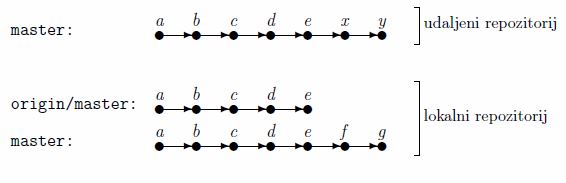
While we work locally, our colleagues work in parallel in their local repositories. If they push their changes to a remote repository, there will be a difference between the master branch on the remote repository (in the image “master”) and its local copy (in the image origin/master).
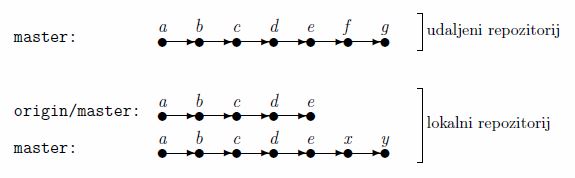
In the image above we can notice that our local copy of the remote branch “origin/master” has two commits less. When the situation on the project is similar to the situation in the previous image, updating the origin/master branch is done with the command:
|
1 |
git fetch |
After this command the new state of the local branch (“origin/master”) is updated, and the branch is now an identical copy of “master” from the remote repository:
Merge changes from “origin/master” to local “master” branch (merge)
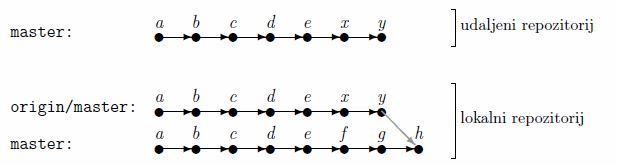
Now that we have an updated local version of the remote repository, we can download those changes to our working repository under the “master” branch (in the image below, the master branch). For this purpose, we use the command:
|
1 |
git merge origin/master |
Git will even manage if we don’t write what we want to merge:
|
1 |
git merge |
after which the graph looks like this:
Pull
Due to the frequent use of fetch and then merge commands, there was a need to reduce the code and include everything in just one command:
|
1 |
git pull |
What is the substitute for both:
|
1 2 |
git fetch git merge origin/master |
Sending changes to a remote repository
Usual commit does not send changes to a remote repository as in the case of a local repository, but a special command “push” is used for that. The practice is to make several commits locally, and only when we have completed a whole, we send the changes to the remote repository. There are two options for this action:
- push – when we have the authority
- pull request – when we do not have authorization
Push
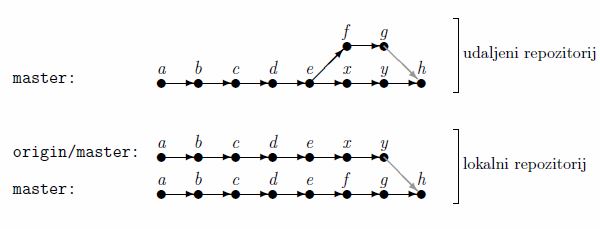
When several collaborators work on different problems on one project, the situation becomes more complicated over time. In case the repository owner is working on his repository and has committed his two commits x and y, while at the same time a collaborator is working locally on another problem and has committed e and f nodes, the branch diagram looks like this:
If we use the push command as in the previous example, git will not accept it, because we must first “fix” our local repository and update our local origin/master branch with the git pull command.
Only after “tidying up” the local repository and updating the local “master” branch can we send our commits to the remote repository and update the remote “master” branch with the command:
|
1 |
git push origin master |
After this we get a definitive graph as in the picture below:
Pull request
Pull request is nothing more than a short message to the owner of a remote repository that contains the address of our repository, a description of the changes we made and a suggestion that he download those changes to his repository.
In addition to emailing the repository owner with a message, we also use the following command:
|
1 |
git request-pull |
which prepares all the details of the changes you made to that message.
GitHub Pull request
If you use Github for your projects there is morefully automated ways to push changes from our repository on GitHub to the repository we “forked” from. The simplest way is directly via the New pull request button.
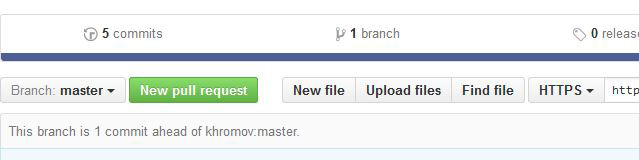
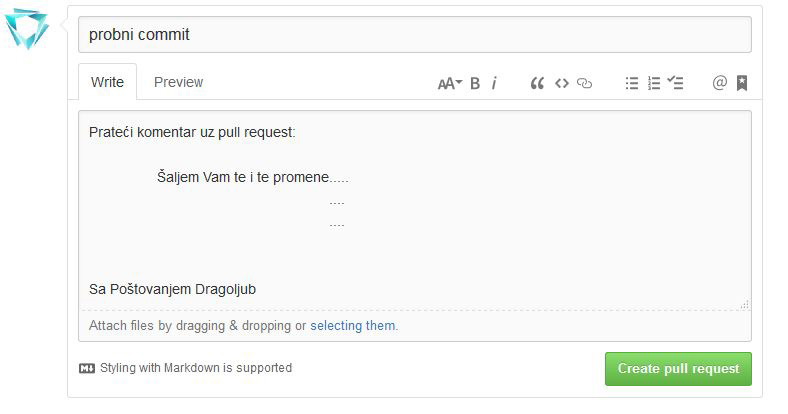
After selecting the branch from which we want to send changes and activating the button, a new Comparing changes page opens, where you can clearly see what the changes are and on which files. When you determine after the review that these are the changes you want to send, select the Create pull request button. A new page opens where we need to write a title and an optional accompanying comment, after which we definitely send our changes by activating the Create pull request button.
Git branching basics
Creating a new branch
Creating a branch is done with the command:
|
1 |
git branch naziv_nove_grane |
Branches overview
To make sure that we have created a new branch, we will check with the command “branch” which lists all the branches in the repository:
|
1 |
git branch |
When listing in the code with * (asterisk), the branch we are currently in is marked.
Announcing to the “world” that there is a new branch
A new branch has been created, but it is currently only available locally, in order to disclose the existence of the branch on the remote repository, we need to smoke the branch:
|
1 |
git push origin firstName-grane |
NOTE:
Although we have pushed all changes to the remote repository, colleagues cannot switch to this branch until they have pushed all changes to their local.
|
1 |
git fetch |
Switch to new branch
Even though the new branch is now made, we are currently still on the same branch we were on (usually master), so we need to switch to the new branch:
|
1 |
git checkout naziv_grane_na_koju_se_prebacujemo |
After creating the branch itself and then switching to it, our working directory will be a copy of the branch we were on when we created the new branch.
However, there is also a simpler way that includes the previous two commands:
|
1 2 |
git branch naziv_nove_grane git checkout naziv_nove_grane |
And that is:
|
1 |
git checkout -b naziv_nove_grane |
With this flag -b we created and switched to a new branch.
Rename branch
If there is a need to rename the branch in which we are, we can do it with the command:
|
1 |
git branch -m novi_naziv_grane |
Save changes to new branch
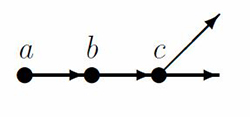
When a branch is created, there is not a single node in it, new nodes are created only when we make some changes and commit them, which we do in the standard way:
|
1 2 |
git add . git commit -m "komentar uz komit" |
Committing changes to a new branch
Changes on this branch are sent from the local repository to the remote repository in the same way as on the master branch, except that instead of the branch name we use the name of the secondary_branch:
|
1 |
git push origin naziv_grane |
Merge branches
After making changes in the minor branch, the procedure for sending those changes to the main branch consists of the following steps:
- a) updating a side branch with someone else’s changes on the side branch
- b) updating the minor branch with changes from the master branch
- c) Pushing merged side branch changes to remote repo
- d) Switch to the master branch
- e) Master branch update control
- f) Data download from secondary to master branch
- g) Conflict resolution when merging branches
- h) Sending merged changes from master to remote repo
a) updating a side branch with someone else’s changes on the side branch
First of all, it is necessary to check that someone has not leaked changes on the side branch in the meantime:
|
1 |
git pull origin sporedna_grana |
b) updating the minor branch with changes from the master branch
This part is important because there is a possibility that some changes have been made to the master branch in the meantime.
|
1 |
git merge master |
NOTE:
Please note that this is not the “origin master” (remote version of the master) but our local version of the master (without the origin part)!
Although “merge branch” translates as “merge branches” this is not the correct meaning of this command, because the standard meaning of the sentence “merge branch” would make only one branch, which is not the case here because the branches continue their lives separately. The only thing is that from that moment all new changes created in one branch are taken over to another branch.
c) Sending merged side branch changes to remote repo
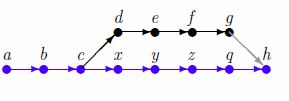
After merging without conflicts, it is not necessary to do commit because the command itself created a new node “h”, so it is enough to push those changes to the remote repository with the command:
|
1 |
git push origin sporedna_grana |
However, if there is a conflict, the problematic file will not be committed, but the user is left to edit the file himself and choose the version that suits him. After that, you first need to commit and only then push:
|
1 2 |
git commit -m "komentar komita" git push origin sporedna_grana |
d) Switch to the master branch
To download changes from another branch, you need to be in the branch to which you want to add changes from another branch. So we need to switch to the master branch:
|
1 |
git checkout master |
e) Master branch update control
As soon as we switched to the master branch, it is necessary to check again that someone has not made additional changes in the meantime:
|
1 |
git pull origin master |
f) Downloading data from the secondary branch to the master branch
And only now we can use the command that will transfer all changes from the minor branch to the master branch:
|
1 |
git merge naziv_grane_iz_koje_preuzimamo. |
After executedmerge does not need to be done commit because the command itself created a new node “h”. Unlike other nodes (comites), only this one has two “parents”, ie. two arrows lead to it.
With the following cases we will better understand how the command works:
g) Conflict resolution when merging branches
In the event of a conflict, the problematic file will not be committed, but the user is left to edit the file himself and choose the version that suits him. When a conflict occurs, if we execute the git status command, we will get a highlighted part of the problematic code as follows:
|
1 2 3 4 5 6 7 |
<<<<<<<< HEAD ... ... ======== ... ... >>>>>>>> new_branch |
The part of the code between <<<<<<<< HEAD and ======== contains the code that is present in the basic branch, i.e. branch to which we push changes, while the lines of code between ======== and >>>>>>>> new_branch are present in the branch from which changes are pushed “new_branch”. It is up to the developer to decide which part to keep and which to delete (or possibly make a combination of both).
There are several programs (so-called merge tools) that are used for visual display of conflicts and easier conflict resolution, read more about it in the article: “My favorite tools to resolve git merge conflicts”.
h) Sending merged changes from master to remote repo
And finally, the whole round ends by sending these merged changes on master to its repo. I emphasize that it is not necessary to do a commit because the node is automatically added, so it is enough just to play that automatically generated commit:
|
1 |
git push origin master |
Merging “Rebase” branches
The command is similar to the merge command, but it does not merge them into one new end node (like merge commit), but adds the entire history of all commits. It is easiest to understand through examples.
Example
The following image shows the state of the project, where in addition to the master branch there is also a secondary branch, and within it a couple of commit nodes. The task is to merge the data from the masterbranches (blue circles) in secondary.
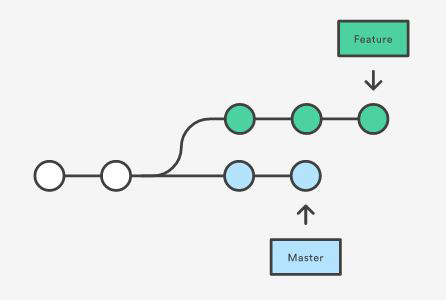
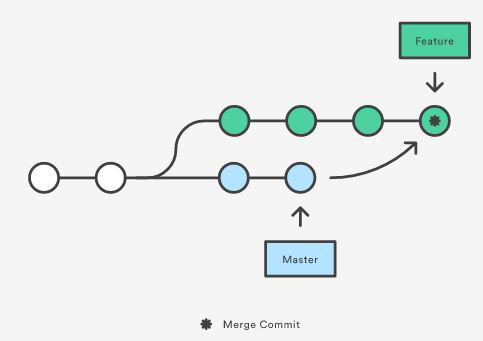
If we use the merge command, we would create a new commit (green with a star) which would add all the changes from the master branch, so the diagram would look like the following picture:
And if we do the same with the rebase command, the diagram would look like this:
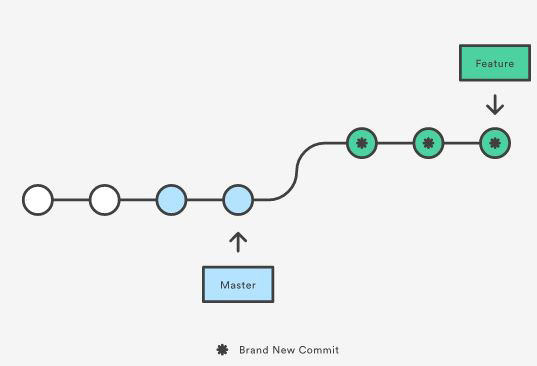
The biggest advantage is a clearer history of the project, whose diagram is linear, as well as the elimination of additional nodes that are created when using the merge command.
This command is most often used to update the origin/master branch which is a local copy of the master branch of a remote repository.
Cherry-pick branch merging
Cherry-pick is a special type of merging two branches, when we want to transfer only one commit from one branch to another. We don’t want to use merge because it would push all the changes we made to the entire branch.
Procedure
To transfer the last commit from the minor branch to the master branch, the procedure is as follows:
- git log secondary_branch – let’s study the history of the secondary branch
- choose a unique commit number
- git cherry-pick unique_commit_number – command that activates cherry-pick
In the event of a conflict, the procedure is the same as when a conflict occurs when using the marge command.
Delete branch
Deleting a local branch
Deleting a branch can cause unwanted consequences and loss of code, so it is necessary to check whether all the necessary steps have been done before deleting. Deleting a local branch (if it is already synchronized with its “origin”, ie a branch on a remote server) is not so “dangerous” because we can always “pull” it back from the server. In order to delete a branch, we must not be on it, and it is necessary to “checkout” to another branch (e.g. master):
|
1 |
git checkout master |
Only after that we can use the command:
|
1 |
git branch -d localBranchName |
Note:
The -d option will only delete a branch if it has already been pushed and merged with a remote branch. If you want to force delete a branch, even if it hasn’t been pushed or merged yet, use -D.
Delete remotely branch
The remote repository is usually called “origin”, so to delete a branch on the remote repository we use the following command:
|
1 |
git push origin --delete remoteBranchName |
Forking
The fork command does not exist within git, but is tied to the GitHub service. This command allows us to copy an existing project of another GitHub user to our Github account, making our copy “aware” of the existence of a parentrepository.
After forking the project to our gitHub account it is necessary to create a local version of the repository by cloning. This local repository is linked to both repositories on GitHub. In the command line, we set the path to our local repository, and the command by which we let the local repository know that there is an initial repository based on which the repository was forked to our giohub account is as follows:
|
1 |
git remote add upstream https://github.com/ime_korisnika/naziv_repozitorijuma.git |

After the command > git remote -v the connection of our local tail to the remote bare repositories would look like this:
|
1 2 3 4 |
ime_fork_roditelja https://github.com/ime_fork_roditelja/naziv_repa (fetch) ime_fork_roditelja https://github.com/ime_fork_roditelja/naziv_repa (push) origin https://github.com/ime_korisnika/naziv_repa (fetch) origin https://github.com/ime_korisnika/naziv_repa (push) |
From a local point of view, the parent repository in a standard clone is called “origin”, and the original GitHub repository that is forked is called “upstream”
The connection between the local repository and the upstream repository is important because through it we update the local branch upstream/master which is a copy of the upstream branch with the command:
|
1 |
git fetch upstream |
after which we merge the changes with the command:
|
1 |
git merge upstream/master |
or if upstream has a simple set of commits
|
1 |
git rebase upstream/master |
After finishing work on local files, we can send all changes to our remote origin repository with the push command, after which we can send upstream pull request in several ways.
After finishing work on the local files, we can send all changes to our remote origin repository with the push command, after which we can send a pull request to the upstream in several ways, but more about this in the GitHub Pull request section.
(BONUS) Creating a Git alias
When using git in the terminal, there is a need to shorten some frequently used commands, i.e. to create aliases. Alias creation is enabled as follows:
Example
|
1 |
git config --global alias.st status |
In the previous example we created a short form for the git command status and from now on we can use it with the same effect as:
|
1 |
git st |
If the command consists of several words, then on Windows it is necessary to put everything between double quotes ” “, while on Unix it is enough to use single quotes.
Example
|
1 |
git config --globa alias.rso "remote show origin" |
After which we can call the “remote show origin” command with the abbreviation:
|
1 |
git rso |